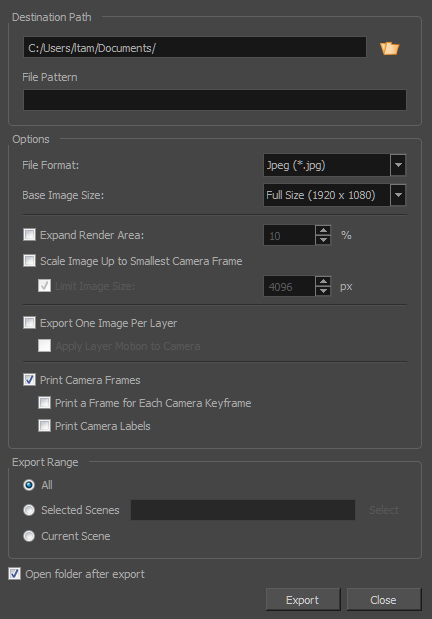
Export Layout Dialog Box
The Export Layout window lets you export some or all the scenes of your project into layout images, which can be used to properly position scene elements when working on different aspects of the scene throughout the production. For example, a layout can be be imported in Harmony to accelerate its set up and properly position the elements and camera keyframes of the scene. Also, a layout exported into .psd format can serve as the base to create the background art for the scene so that it’s properly adapted to the scene’s layout, action and camera movements.
Layout images can be rendered with all layers combined or with one image per layer, and can optionally include camera keyframes and movements. Layouts can be exported in .psd (with separate layers), .tga, .jpg or .png format.
- Select File > Export > Layout.
| Parameter | Description |
|
Destination Path |
|
|
Path |
Lets you specify the name and location of the XML/AAF file you are creating. |
|
File Pattern |
Allows you to enter the prefix or the pattern for the names of the exported files. You can leave this field blank to use the default file naming pattern, type in a file name to use it as a prefix, or type a full pattern using the following variables:
TIP: Numbers used in file naming patterns are automatically padded by zeros as needed. You can type a number between the % sign and the variable letter to determine the amount of characters you want the variable to use. For example, with the variable %4s, scene 1 would appear as scene 0001.
|
|
Options |
|
|
File Format |
Allows you to select an image format in which to save the layout images:
|
|
Transparent Background |
When exporting in Photoshop (*.psd) format, enable this option to render the layers on a transparent background instead of a solid white background. |
|
Base Image Size |
Allows you to select whether you export at the same size as your project's resolution, at half its dimensions or at a quarter of its dimensions. |
|
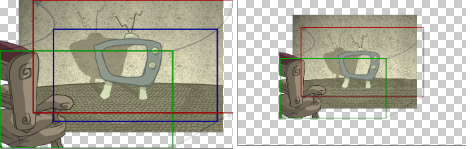
Expand Render Area |
Expands the area to render into the layouts. By default, only the area of the scene that is covered by the camera is rendered, and exported layout images are cropped at the edges of the camera frames. If enabled, this option adds space around the render area and captures extra details outside the camera frames. By default, the render area is expanded by 10%. You can use the input field to the right of the option to change this ratio.
|
|
Scale Image Up to Smallest Camera Frame |
Ensures that when a camera close-up is included in a scene, the exported image is larger so that the closest camera frame is at least the size of the chosen image size. This way, the layout does not appear pixelated when zooming in on the closest camera frame. If disabled, the size of the exported images will be based off the chosen Base Image Size and Expand Render Area options. |
|
Limit Image Size |
If the Scale Image Up to Smallest Camera Frame option is enabled, this ensures images do not get scaled up too much. If enabled, images will be limited to 4096 pixels in width and height by default. |
|
Export One Image Per Layer |
Exports each layer as a separate image file. If Print Camera Frames option is enabled, the camera frames and camera movements will be printed on each layer. |
|
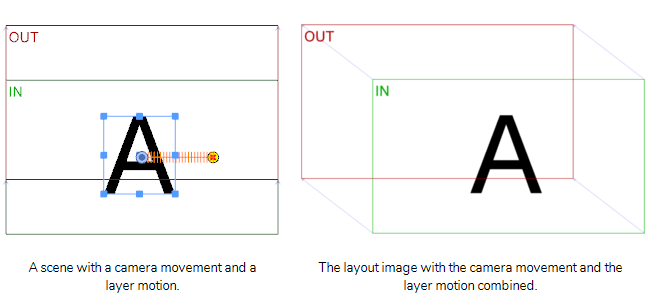
Apply Layer Motion to Camera |
For example, in a scene where a drawing layer moves towards the right, and the camera moves up, the camera movement that will be printed on the layer's layout image will be combined with that layer's animation, and the resulting camera movement will go up and towards the left, so that the layer itself appears to move towards the right.
|
|
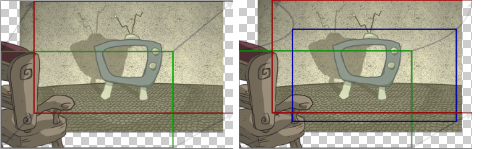
Print Camera Frames |
Prints the first and last camera frame of each scene into the exported layout images. If exporting in .psd format, the camera frames will be printed on a separate layer. |
|
Print a Frame for Each Camera Keyframe |
If a scene contains a camera movement with more than two keyframes, this prints each camera keyframe into the layout.
|
|
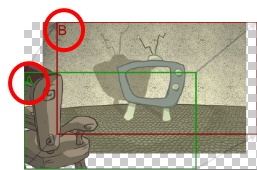
Print Camera Labels |
Adds the camera position label in the top-left corner of each camera frame. Camera frames are labeled with a letter of the alphabet indicating their respective order.
|
| Export Range | |
|
All |
Exports the entire storyboard. |
|
Selected Scenes |
Select this option to export a specific selection of scenes. Then, click on the Select button to open the Scenes Picker dialog box, in which you can:
|
|
Current Scene |
Exports only the currently selected scene. |
|
Open folder after export |
Opens the folder after export. |