Export to EDL/AAF/XML Dialog Box
The Export to EDL/AAF/XML window lets you export a storyboard project directly to Apple Final Cut Pro using the EDL or XML formats or to Adobe Premiere, Avid Xpress, or Sony Vegas using the AAF format.
The timing, motions, and sounds edited with Storyboard Pro are preserved.
- Select File > Export > EDL/AAF/XML.
The Export to EDL/AAF/XML window opens.
| Parameter | Description |
|
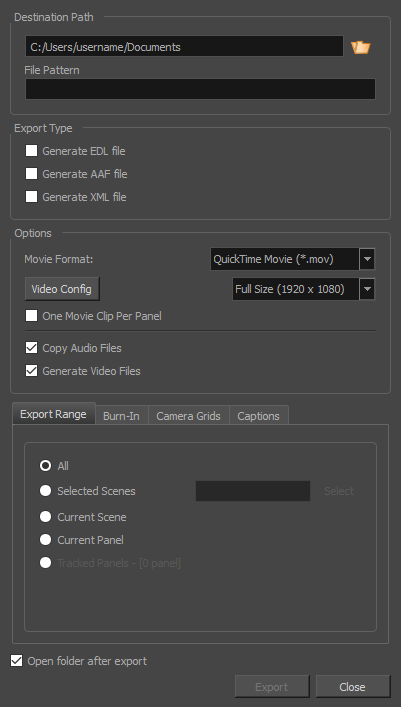
Destination Path |
|
|
Path |
Lets you specify the name and location of the XML/AAF file you are creating. |
|
File Pattern |
Allows you to enter the prefix or the pattern for the names of the exported files. You can leave this field blank to use the default file naming pattern, type in a file name to use it as a prefix, or type a full pattern using the following variables:
TIP: Numbers used in file naming patterns are automatically padded by zeros as needed. You can type a number between the % sign and the variable letter to determine the amount of characters you want the variable to use. For example, with the variable %4s, scene 1 would appear as scene 0001.
|
|
Export Type |
|
|
|
Lets you elect the format in which to store the timing information (timecode for panels and audio tracks). The format will be chosen depending on the destination application:
|
|
Generate EDL, AAF, XML File |
Generates an EDL, AAF, or XML file. |
|
Options |
|
|
Movie Format |
Movie clips can be exported in Windows Media Video (*.wmv) format on Windows and in QuickTime Movie (*.mov) format on either Windows or Mac OS if QuickTime Player is installed. This option can not be changed if only one movie format is available for export. NOTE: Not all editing systems support importing Windows Media Video files. Check with your software’s documentation to see which movie file types are supported.
|
|
Video Config |
Click this button to configure the video settings. When exporting in QuickTime, this allows to set the video codec, framerate and quality. When exporting in WindowsMedia Video allows to set the video bit rate and variable bit rate quality.The resolution drop-down right of the Video Config button can be used to define the output resolution, since you might not always need to export the storyboard at full resolution. You can select Full, Half or Quarter of a project’s resolution. |
|
One Movie Clip Per Panel |
Exports more than one QuickTime movie clip per scene (which might contain more than one panel) e.g. to obtain better granularity during editing since the storyboard will have smaller movie clips. |
|
Generate Video Files |
If you only need the EDL, AAF or XML files to be generated, deselect this option so no video files are rendered. |
|
Copy Audio Files |
By default, the project’s sound files are copied to the same directory as the EDL/XML/AAF files and the video files when exporting. Sound clips that are used several times in the project will only be copied once and linked to several times in the EDL/XML/AAF sequence. When this option is unchecked, the project’s sound tracks and their editing data will still be exported into the EDL/XML/AAF sequence. Only the actual sound files will be missing. |
|
Export Range Tab |
|
|
All |
Exports the entire storyboard. |
|
Selected Scenes |
Select this option to export a specific selection of scenes. Then, click on the Select button to open the Scenes Picker dialog box, in which you can:
|
|
Current Scene |
Exports only the currently selected scene. |
|
Current Panel |
Exports only the currently selected panel. |
|
Tracked Panels - [0 panel] |
Exports panels on which tracking changes is enabled |
|
Burn In Tab |
|
|
Print Time Code |
Prints the project timecode on the video as an overlay on your video. |
|
Print Scene Names and Panel Numbers |
Prints the scene names and panel numbers as an overlay on your video. |
|
Print Additional Duration |
Prints an additional duration on your video, defined by the Units and Repeat menu. |
|
Units |
Displays additional duration information using Time Code or Frames units. |
|
Repeat |
Displays additional duration information per panel, scene or sequence. |
|
Camera Grid Tab |
|
|
Project Safety |
Prints the safe area on your video |
|
4:3 Safety |
Prints the 4:3 safe area on each panel of your storyboard that has a camera movement. |
|
4:3 Reference |
Prints the 4:3 area on each panel of your storyboard that has a camera movement. |
|
Captions Tab |
|
|
Print Captions |
Choose whether to not print captions (None) or select one of your project’s captions to print into the exported movies. By default, a Storyboard Pro project has Action Notes, Dialog, Slugging and Notes captions, but you can also choose to print custom captions if your project has any. |
|
Font |
Select which font the captions will be printed in. By default, they will be printed in Arial. |
|
Height % |
Sets the size of caption lines relative to the height of the exported movies. For example, if exporting a movie at 1080p with 3% Height captions, each caption line will be 32 pixels in height. |
|
Position |
Prints the captions at either the Top Left, Top Centre, Top Right, Bottom Left, Bottom Centre or Bottom Right of the panels. By default, captions are printed to the Bottom Centre. |
|
Max Lines |
Sets the maximum amount of caption lines to print on each panel. If a caption being printed requires more than the maximum amount of lines, it will be cut off with an ellipsis (...) at the end. NOTE: Even if captions are printed at the bottom, they will be aligned to the top of the space reserved for them, which is calculated by the amount of Max Lines x the Height %. Therefore, if this setting is too high and captions are printed at the bottom, they may appear closer to the middle of the picture than to the bottom.
|
|
Text Colour |
Select the font colour in which to print the captions. |
|
Bg Colour |
Select the background colour on which to print the captions. If the checkbox is unchecked, the captions will be printed directly into the rendered picture. Otherwise, they will be printed in rectangular boxes of the chosen colour. |
|
Open folder after export |
Opens the folder after export. |