Conformation - Export Project / Selected Scenes / Tracked Scenes Dialog Box
The Export Project dialog box lets you export your storyboard to a third-party software using XML or AAF format. You can then edit your project, and import the changes back into Storyboard Pro
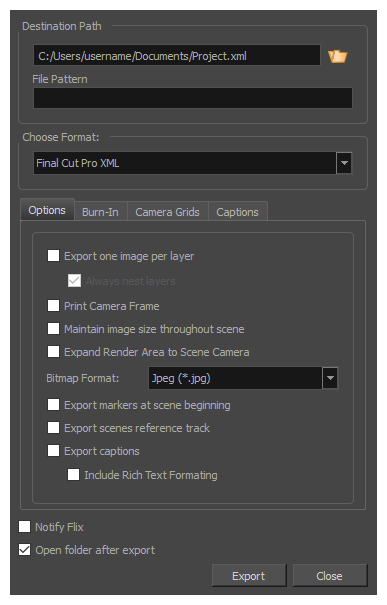
- Select File > Conformation > Export Project.
| Parameter | Description |
|
Destination Path |
|
|
Path |
Lets you specify the name and location of the XML/AAF file you are creating. |
|
File Pattern |
Allows you to enter the prefix or the pattern for the names of the exported files. You can leave this field blank to use the default file naming pattern, type in a file name to use it as a prefix, or type a full pattern using the following variables:
TIP: Numbers used in file naming patterns are automatically padded by zeros as needed. You can type a number between the % sign and the variable letter to determine the amount of characters you want the variable to use. For example, with the variable %4s, scene 1 would appear as scene 0001.
|
| Choose Format | |
|
Format |
Lets you select export format, Final Cut Pro XML or Media Composer AAF. |
|
Options |
|
|
Export One Image Per Layer |
Exports the drawing layers in your panels as separate video clips instead of flattening them together to make one clip per panel. This option is only available when exporting in Final Cut Pro XML format. |
|
Always Nest Layers |
When exporting one image per layer, this will store all the layers for a single panel into a nested clip. By default, different layers are spread on different video tracks, except when a panel contains both camera movements and layer animations. |
|
Print Camera Frame |
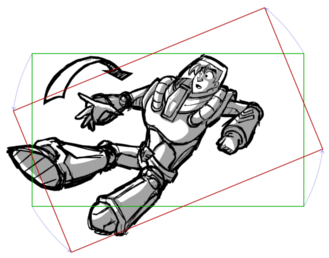
Prints the camera frames on the exported images. The first camera frame will be printed in green, and the last camera frame will be printed in red.
|
|
Maintain image size throughout scene |
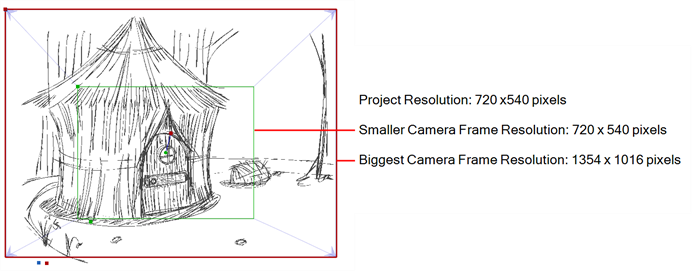
By default, the resolution of each image that is exported so that, at the end of a camera zoom-in, or at the beginning of a camera zoom-out, there is no pixelation. This means that the smallest camera frame in each panel must be at least the same resolution of the project. Hence, panels with small camera frames will have to be exported at a bigger resolution than other panels. For example, the following panel must be exported in a bigger resolution than the project's resolution, so that the smallest camera frame has the same resolution as the project:
This can also mean that, within a same scene, a panel that has a camera zoom-in or zoom-out will have to be exported in a bigger resolution than the other panels in the scene. With this option enabled, all the panels in any given scene are exported in the same resolution. NOTE: The panels will appear as expected in your video editing software regardless of whether or not this option is enabled.
|
|
Expand Render Area to Scene Camera |
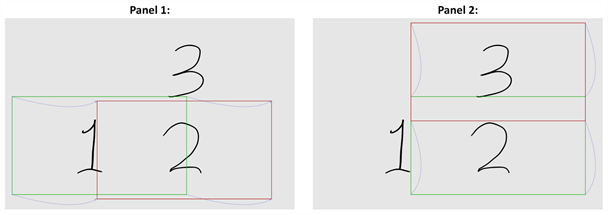
By default, exported panels only cover the area covered by the camera movements in the panel. With this option enabled, exported panels will cover the area covered by the camera movements in all the panels in their scene combined. That way, if all the exported panels in a scene are combined, the elements of the scene will all be in their proper position respective to each other. In the following example, the camera goes from 1 to 2 in the first panel, then from 2 to 3 in the second panel, but both panels are exported to cover the whole camera movement, from 1 to 2 to 3:
|
|
Bitmap Format |
Allows you to select the image format in which to save the exported panels:
NOTE: Since the images exported for conformation are generally not imported into the Storyboard Pro project when you re-import your sequence, the quality of exported images is not critical. Hence, the default image format for conformation is Jpeg (*.jpg). Although Jpeg images do not preserve picture quality, they are quicker to export and do not use a lot of disk space.
|
|
Export Markers at scene beginning |
Places a chapter marker at the beginning of each scene. These markers are used to find the in-point of each scene when conforming from Final Cut Pro to Storyboard Pro. The markers are named "Scene:" followed by the name of their respective scene, and they have a unique scene ID and chapter marker as their comment. |
|
Export scenes references track |
Adds an extra video track to the sequence in which images indicating the number of the current scene are displayed. |
|
Export captions |
Includes the captions of each panel as metadata in the exported sequence. The captions can be edited in the sequence, and importing modified captions will update the captions in the Storyboard Pro project. |
|
Include Rich Text Formatting |
If you're exporting the project's captions and your captions have special text formatting, this will export the captions in HTML instead of plain text, to preserve their formatting. If you export your captions in plain text, then re-import them, they will lose their formatting. However, plain text captions are easier to read and edit in third party software. |
|
Burn-In |
|
|
Print Scene Names and Panel Numbers |
Prints the scene names and panel numbers as an overlay on your video. |
|
Camera Grids |
|
|
Project Safety |
Prints the safe area on your video |
|
4:3 Safety |
Prints the 4:3 safe area on each panel of your storyboard that has a camera movement. |
|
4:3 Reference |
Prints the 4:3 area on each panel of your storyboard that has a camera movement. |
| Captions | |
|
Print Captions |
Choose not to print captions (None) or select one of your project’s captions to print into the exported bitmaps. By default, a Storyboard Pro project has Action Notes, Dialog, Slugging and Notes captions, but you can also choose to print custom captions if your project has any. |
|
Font |
Select which font the captions will be printed in. By default, they will be printed in Arial. |
|
Height % |
Sets the size of caption lines relative to the height of the exported bitmaps. For example, if exporting bitmaps at 1080p with 3% Height captions, each caption line will be 32 pixels in height. |
|
Position |
Prints the captions at either the Top Left, Top Centre, Top Right, Bottom Left, Bottom Centre or Bottom Right of the bitmap. By default, captions are printed to the Bottom Centre. |
|
Max Line |
Sets the maximum amount of caption lines to print on each panel. If a caption being printed requires more than the maximum amount of lines, it will be cut off with an ellipsis (...) at the end. NOTE:
Even if captions are printed at the bottom, they will be aligned to the top of the space reserved for them, which is calculated by the amount of Max Lines x the Height %. Therefore, if this setting is too high and captions are printed at the bottom, they may appear closer to the middle of the picture than to the bottom.
|
|
Text Colour |
Select the font colour in which to print the captions. |
|
Bg Colour |
Select the background colour on which to print the captions. If the checkbox is unchecked, the captions will be printed directly into the rendered picture. Otherwise, they will be printed in rectangular boxes of the chosen colour. |
|
Notify Flix |
When new XML data is exported, a message is sent to Flix so it will automatically update its asset database. Note that Flix must be installed on your computer. |
|
Open folder after export |
Opens the folder after export. |