
Project Management
To distribute work to different board artists, it is necessary to split up a large storyboard into different files. Once the work on all of the parts is completed, you must reassemble them into the same project to complete the storyboard.
This section includes the following topics:
| • | Splitting a Storyboard |
| • | Extracting a Storyboard |
| • | Merging Your Project Storyboard |
| • | Inserting Scenes |
| • | Merging and Replacing Scenes |
Splitting a Storyboard
Using the Split option, you can divide your storyboard into two parts. Each part can be saved as a different file. You can choose to save either the first half of the project, the last half of the project, or both. You can also choose to preserve the original project intact, or to remove the panels from the original project. The selected panel determines the point of division.
To split a storyboard project:
- In the Timeline, drag the red playhead to the panel where you want the split to take place.
- Select File > Project Management > Split.
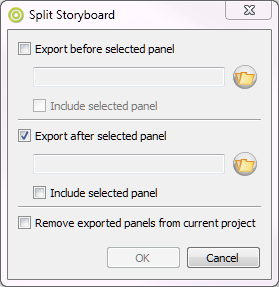
The Split Storyboard window opens.
- Select one or both options:
| ‣ | Export before selected panel: Exports all panels before the selected panel into a new file. |
| ‣ | Export after selected panel: Exports all panels after the selected panel into a new file. |
- For one or both options:
| ‣ | Use the browse button to choose a location and create a file name. |
| ‣ | Select the Include selected panel option to include the selected panel in the export. |
- Select the Remove exported panelsfrom current project option to remove the panels you have selected to export from the current project. If you do not check this option, you will be left with an intact copy of your storyboard, along with one or both divisions as a new project file(s).
Extracting a Storyboard
Use the Extract option to divide your storyboard into several parts. Each export will be saved as a different file. You can choose to save an intact copy of the entire storyboard or you can divide the project into separate files.
To extract different scenes from your storyboard:
- Select File > Project Management > Extract.
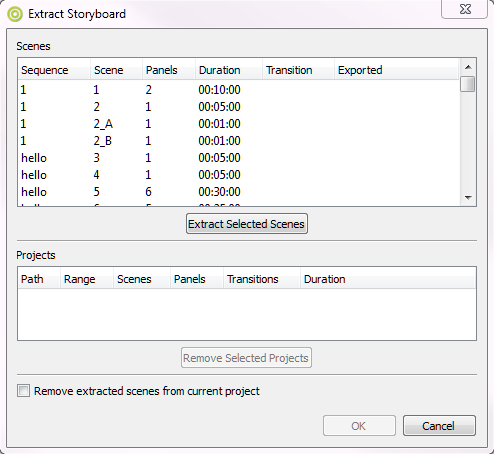
The Extract Storyboard window opens.
- From the Scenes section, select a scene or press [Shift]+click to include more than one scene.
- Click Extract Selected Shots.
A browser window opens.
- Choose a name and location for this new project file and click Save.
The project name and location appears under the Path heading in the Projects section.
- To delete an extracted project, select it from the Projects section, and click Remove Selected Projects.
- Select the Remove extracted scenes from current project option. This option determines if you will have an intact copy of the entire storyboard.
Merging Your Project Storyboard
After dividing your storyboard project by splitting or extracting it, you may need to reassemble all the files into a single project file. Using the Merge function, you can bring several projects into one final Storyboard Proproject.
To merge different storyboard files into a single project:
- Select File > Project Management > Merge.
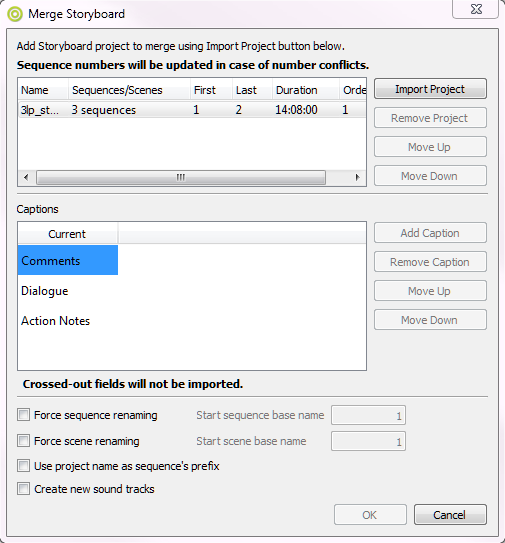
The Merge Storyboard window opens.
- Click Import Project.
- In the browser window that opens, search for a Storyboard Pro project file that you want to merge with your current file and click Open.
The file name appears in the top section of the Merge Storyboard window.
- Continue adding files in this way until you have all the files you need.
- Use the Move Up and Move Down buttons to reorganize the files into the order in which you want them to be imported in relation to your current file.
- Select any unwanted project file names and click Remove Project to delete them from the list.
- In the Captions section, select a caption from under one of the project name headings and click Remove Caption to keep them from being imported into the merged file.
Removal will be indicated by highlighting that caption in grey. If you change your mind about removing a caption, select that caption and click Add Caption to reinstate it.
- If you created new caption fields in your current project, the captions associated with certain panels in the project files that you intend to import and merge will not correspond. You may also have new dialogue or notes that you would like to insert into the proper fields, but would like to keep the old information just to be safe.
| ‣ | Use the Move Up and Move Down buttons to move the caption text around. If you move a caption from a certain project to a blank row, a new field will be created for this text in the project’s panel window. |
- By default, scene numbers will be updated to avoid number conflicts, however, you can force the scene‘s numbering by selecting the Force scenes numbering option. If you do this, you must enter a number in the Start scene number field. This number will be assigned to the first scene in import project list section above.
- Select the Use project name as scene‘s prefix option if you want the imported project’s name to remain on all its scenes in the new merged file. The scene‘s new name will be its number in the merged file, prefixed by the file it originated from.
- Select the Create new soundtracks option if you want to have the sound element from each imported project appear in a separate soundtrack (row) in the Timeline. Otherwise, all the sound elements will appear in the same soundtrack in the new merged project.
Inserting Scenes
After splitting your storyboard project, you may need to reintegrate the scenes from a separate project file. You can do this by using the Insert option.
To insert the scenes from a different project file into your current project:
- In your current project, in the Timeline view, move the red playhead to the point at which you want to insert the new scenes, or simply click a scene to select the insertion point.
- From the top menu, select File > Project Management > Insert.
The Open Storyboard Project window appears.
- Search for the *.sboard file you are looking for and click Open.
All scenes from the selected project file appear after the red playhead in the Timeline.
Merging and Replacing Scenes
Once the various parts of your project are complete and you are ready to bring it all back into your master project, you can easily merge and replace the changed scenes. In order to merge and replace scenes, you must keep a copy of your master project intact.
What is the difference between merging and merging/replacing? When merging a project, two projects are combined into one; each project appears sequentially in the Thumbnails and Timeline views. A merge and replace integrates scene changes back into the master project; any scenes that were changed are replaced with the new one. As an option, you can keep a copy of the original files for verification purposes.
To merge and replace scenes:
- Open your master project.
- From the top menu, select File > Project Management > Merge and Replace.
- In the Advanced Merge Storyboard dialog box that opens, click Import Project and locate the .
sboardfile you want to bring in.
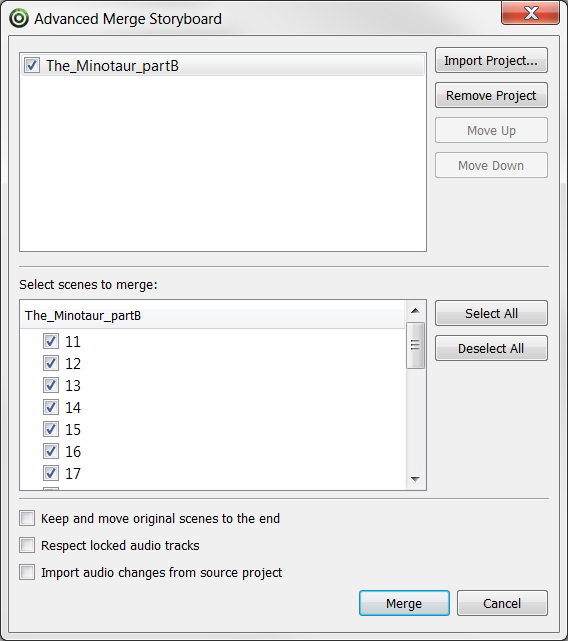
- In the top pane, select the project you want to merge/replace.
- Use the Move Up and Move Down buttons to organize the projects.
- In the Select Scenes to Merge section, select the individual scenes to merge/replace.
- Select the Keep and move original scenes to the end option to retain a copy of the original scenes, which are placed at the end of the master project. The name of the copy is prefixed sequentially by "1_orig" followed by the original scene name.
- Select the Respect locked audio tracks option to ensure that the locked audio tracks will not be synced during the merge and replace. When deselected, audio tracks will be synched regardless if they were locked or not.
- Select the Import audio changes from source project to allow the modifications done in the audio to be applied to the scenes that are replaced.