
Setting Up the Drawing Space
Before you start drawing and creating elements for a panel, you must set up your drawing space, so you can efficiently access the tools you use most often.
Displaying the Grid
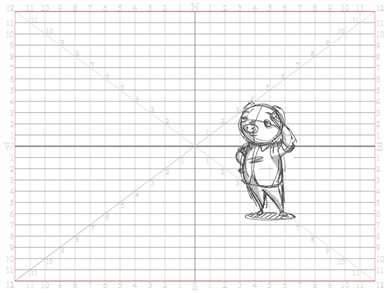
Using a grid is useful when positioning or drawing objects and characters in a scene. You can use the Show Grid option to display several different kinds of grids in the Stage or Camera views.
To display the grid, do one of the following:
| ‣ | Click the Grid |
| ‣ | Select View > Grid > Show Grid. |
| ‣ | Press [Ctrl]+[G] (Windows) or [⌘]+[G] (Mac OS X). |
From the top menu, select View > Grid and one of the following:
| ‣ | Grid Outline Only:Displays only the contour of the grid. |
| ‣ | Underlay: Displays the grid behind the drawing elements. |
| ‣ | Overlay: Displays the grid over the drawing elements. |
| ‣ | Square: Displays a standard square grid. |
| ‣ | 12 Field Grid: Displays a 12 field size grid. |
| ‣ | 16 Field Grid: Displays a 16 field size grid. |
| ‣ | World Grid: Displays a reference grid that remains the same size when you scale objects. This is useful when you want a reference point when creating elements in your drawings. |
Grouping and Ungrouping Objects
By grouping objects together, you can reposition, scale and apply other transformations to multiple objects of a drawing. You can also ungroup a group of objects to fine-tune individual objects.
To group or ungroup objects:
| ‣ | Select object(s) in the Stage view, then select Edit > Group Drawing Selection or Ungroup Drawings. |
 Panning the Drawing Space
Use the Hand tool to pan through the Stage view.
To pan the Stage view:
- In the Tools toolbar, click the Hand tool or hold down the [Spacebar].
- Click in the Stage view and move the mouse in the direction you want to pan the view.
- In the Tools toolbar, select the Hand tool, click in the Stage view and drag your cursor. You can also select the Hand tool from the top menu: Tools > Pan.
To reset pan:
| ‣ | From the top menu, select View > Reset Pan or press [Shift]+[N]. |
| ‣ | You can also hold down the [Spacebar], click in the Stage view and move your mouse in the direction you want to pan the view. |
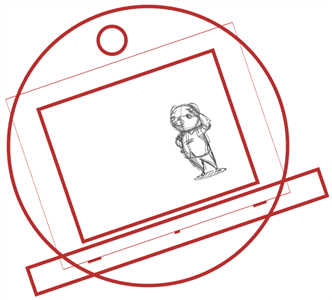
 Rotating the View
Use the Rotate View tool to rotate the Stage view in the same way as you would with a real animation disc.
You can also use the menu options to rotate the Stage view in 30 degree increments.
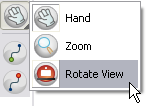
To rotate the Stage view:
- Do one of the following:
| ‣ | From the Tools toolbar, click and hold the Hand tool |
| ‣ | Hold down [Ctrl]+[Alt] (Windows) or [⌘]+[Alt] (Mac OS X). |
- Drag the cursor in the Stage view to rotate the view.
You can also use the menu options to rotate the Stage View in 30 degree increments.
To rotate the Stage view in 30 degree increments:
| ‣ | Select View > Rotate View CW (clockwise) or press [V]. |
| ‣ | Select View > Rotate View CCW (counterclockwise) or press [C]. |
To reset rotation:
| ‣ | Select View > Reset Rotation or press [Shift]+[X]. |
 Changing the Zoom Level
Zooming in and out of the Stage view lets you see elements close up and far away.
To zoom the Stage view:
| ‣ | From the Tools toolbar, click and hold the Hand tool |
| ‣ | Zoom In: Select View > Zoom In or press [2]. When the Zoom In mode is selected, hold [Alt] as you click to zoom out. |
| ‣ | Zoom Out: Select View > Zoom Out or press [1]. |
To reset zoom:
| ‣ | Select View > Reset Zoom or press [Shift]+[Z]. |
Zoom Tool Properties
When you select the Zoom tool from the Tools toolbar, its properties are displayed in the Tool Properties view.
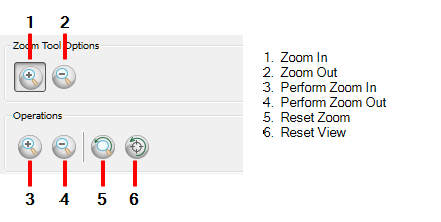
Zoom In/Zoom Out: Lets you zoom in or out.
Zoom In : Lets you zoom in the camera. The default keyboard shortcut is [2].
Zoom Out: Lets you zoom in the camera or Drawing view. The default keyboard shortcut is [1].
Reset Zoom: Restore the zoom level to 100%. The default keyboard shortcut [Shift]+[Z].
Reset View: Restore the original display by resetting any zooms, pans, or rotations.