User Interface
This section takes you through the most common elements of the user interface. Throughout this user guide, you will learn about each view and toolbar, and how to use them.
Views and Toolbars
Storyboard Pro has several views and toolbars. The top toolbars are available at the top of the interface and the different toolbars are in individual windows.
This is a complete list of the views and toolbars available in Storyboard Pro.
| Views |
Toolbar |
| 3D Nodes | Camera |
| Brush Presets | Edit |
| Camera view | File |
| Colour | Layer |
| Layers | Navigation |
| Library | Sounds |
| Message Log | Storyboard |
| Panel | Tools |
| Panel PDF Options | View |
| PDF Export | Workspace |
| Pitch Mode | Brush Preset |
| Side view | Keyframes and Control Points |
| Stage view | Onionskin |
| Storyboard | Playback |
| Thumbnails | |
| Timeline | |
| Tool Properties | |
| Top view |
Interface Highlights
It is important that you become familiar with the main elements of the user interface. This will help you to start using Storyboard Pro. You can learn more about the highlights described here, and how to use them in a production context, throughout this guide.
When you start Storyboard Pro for the first time, the default workspace is displayed. It contains all of the main elements.
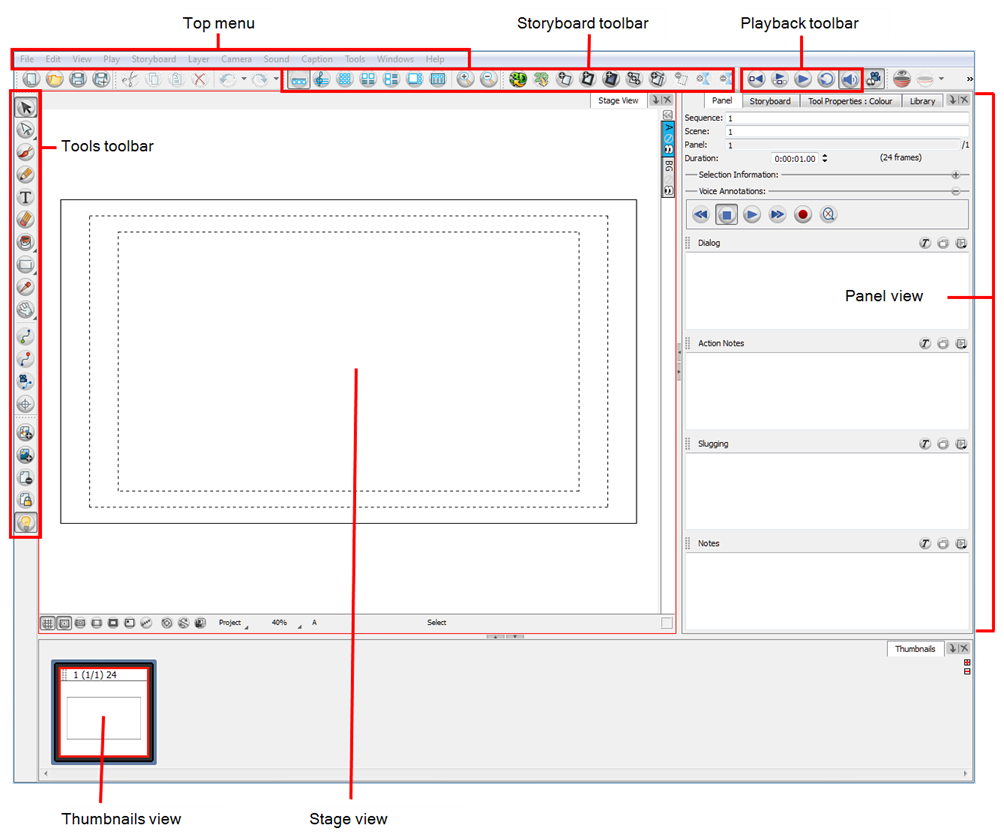
To learn how to modify the workspace and add more views and toolbars, refer to the following sections:
| • | Managing the Workspace |
| • | Managing the Views |
Stage View
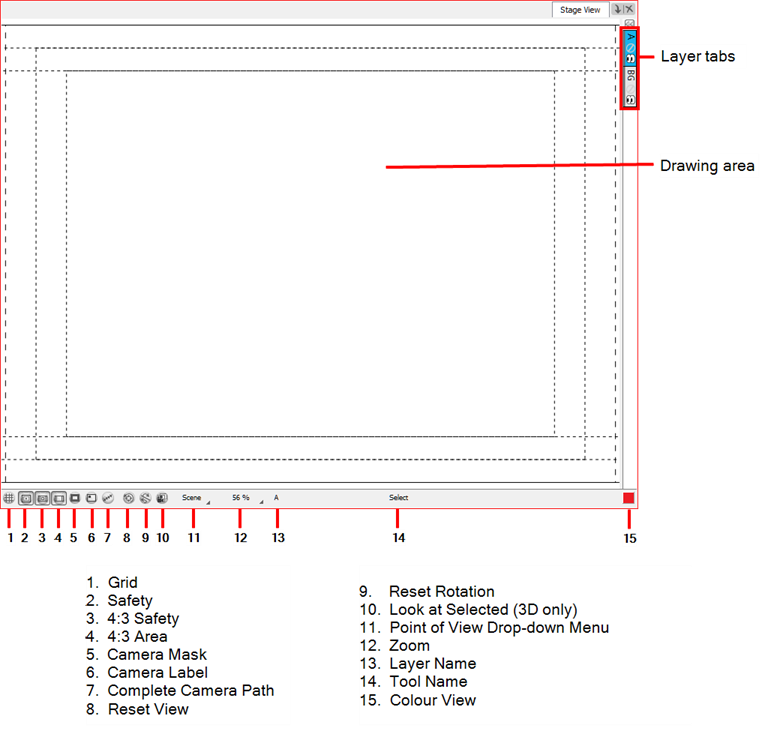
The Stage view is the centre of operations in Storyboard Pro. In this view, you can build, draw, paint, animate the camera, create layer paths, and see your results.
The Stage view has a status bar at the bottom that is displayed by default. You can hide the status bar through the Preferences panel.
To show/hide the status bar:
- Open the Preferences dialog box by doing one of the following:
| ‣ | Select Edit > Preferences (Windows) or Storyboard Pro > Preferences (Mac OS X). |
| ‣ | Press [Ctrl] + [U] (Windows) or [⌘] + [,] (Mac OS X). |
- In the Preferences dialog box, select the Camera tab.
- In the Options section, deselect the Show Status Bar option.

To zoom the Stage view:
| ‣ | In the status bar, click the Zoom menu and select a zoom level. |
| ‣ | Roll the scroll wheel of your mouse to zoom in and out of the Stage view. |
To reset the Stage view:
Select Edit > Reset Stage View To and one of the following:
| ‣ | Default Drawing Area to display the entire drawing area. |
| ‣ | Current Panel Overview to always reset the view to fit the camera, regardless of the point of view mode. |
| ‣ | Camera Overview to display the current panel from the camera`s point of view. |
| ‣ | Start Camera Frame to display the panel of the first frame in a panel. |
| ‣ | End Camera Frame to display the panel of the last frame in a panel. |
 Grid
Grid
You can choose to display a grid that appears in the Stage view. The default grid is a standard 12 field animation grid, but you can choose another.
You can also access the grid from the top menu by selecting View > Grid > Show Grid or press [Ctrl]+[G] (Windows) or [⌘]+[G] (Mac OS X)—see Drawing to learn more about the grid options.
 Safe Area
The Safe Area button shows or hides the TV safety zone and the centre of the camera frame. The Safe Area adapts to the scene resolution, as well as the safety zone and frame’s centre.
You can also access this feature from the top menu by selecting View > Extras > Show Safe Area.
You can define your own safety limits in the Preferences dialog box—see User Interface Preferences - Camera Tab.
 4:3 Safety
The 4:3 Safety button shows or hides the TV safety zone and the centre of the camera frame for a regular 4:3 resolution. If you are working on a widescreen project, for example, you can easily plan in advance the conversion of your project to a TV format. This way, you can create your project to fit both resolutions.
You can also access this feature from the top menu by selecting View > Extras > Show 4:3 Safe Area.
 4:3 Area
The 4:3 Area button shows or hides the 4:3 resolution zone without the centre of the camera frame and TV safety zone.
You can also access this feature from the top menu by selecting View > Extras > Show 4:3 Area.
 Camera Mask
The Camera Mask button shows or hides a black mask around the scene’s frame to avoid seeing anything outside the Camera frame. This is handy when you are setting up the scene as it allows you to see the scene’s composition better. You can also access this feature from the top menu by selecting View > Extras > Camera Mask.
 Camera Label
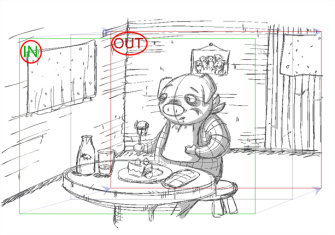
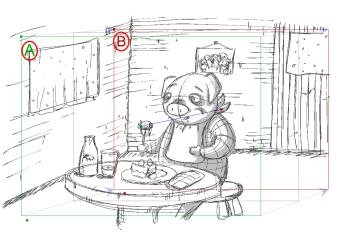
The Camera Label button shows or hides the IN and OUT indications in the top-left corner of the camera frames, on the start and end position of a camera move for the current panel. When the Camera tool is selected, the labels switch to alphabetical labels that clearly show the different camera keyframes—see Animatic.
 Complete Camera Path
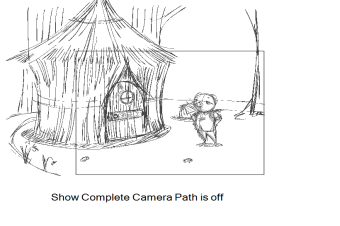
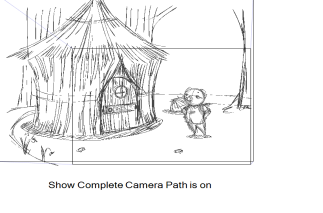
The Complete Camera Path button displays all the related camera keyframes and paths in a scene. When this button is deactivated, the Stage View only displays keyframes that are contained in a panel.
You can also access this feature from the top menu by selecting View > Show Complete Camera Path.
 Reset View
The Reset View button resets any panning, zooming or rotation done in the Stage View and returns the display to its initial settings. This option is also available from the top menu. Select View > Reset View or press [Shift]+[M].
 Reset Rotation
The Reset Rotation button resets any rotation done in the Stage View and returns the display to its initial rotation settings. This option is also available from the top menu. Select View > Reset Rotation or press [Shift]+[X].
 Look at Selected
When rotating 2D layers in 3D space, you can reach a situation where the Stage View is no longer perpendicular to a Drawing layer, making it impossible to draw on it. Use this option to make the Stage View perpendicular to a selected drawing layer, allowing you to draw on it.
Point of View Menu
The Point of View menu lets you determine the level at which the current position of the Stage View (zoom, pan and rotation) is remembered when you are flipping through the panels.

| • | Project: Keeps the zoom, pan and rotation values of the Stage view for the panels of the project. |
| • | Scene: Keeps the zoom, pan and rotation values of the Stage view for the panels that are part of the current scene. |
| • | Panel: Allows every panel of the project to have its own zoom, pan and rotation value. |
These options are also available from the top menu. Select View > Point of View Mode > Project Level, Scene Level or Panel Level.
Zoom Menu
The Zoom menu lets you enlarge or reduce the Stage view display. If you want the camera frame size to always match the size of your Stage View, select the Fit to View option. Click the corner of the button and select a zoom level.
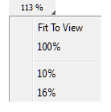
You can also use the default keyboard shortcuts [1] to zoom out and [2] to zoom in.
Layer Name
The Layer Name field displays the name of the selected layer of the current panel.
Tool Name


The Tool Name field displays the name of the selected tool. If you override a tool using an overriding keyboard shortcut, the tool’s name turns red—see Drawing.
Coordinates
The Coordinates field shows the coordinates of the cursor while in the Stage iew.
Colour Picker

The Colour Picker square at the bottom-right of the Stage View displays currently selected colour in the Colour View . You can click the colour pot to open the Colour View and select a new colour.
Camera Space
This is where you draw, animate layers, and create camera moves, as well as preview your storyboard. It is the main space of the default Drawing workspace.
Refer to the following chapters to learn more about the camera space:
| • | Drawing |
| • | Adding Colour |
| • | Animatic |
Thumbnails View

In the default workspace, the Thumbnails view is at the bottom of the interface. The Thumbnails View displays all the panels of your project in chronological order. You can use this view to navigate through your storyboard, rearrange panels and scenes, and select the panel of your choice to be displayed in the Stage view.
By default, it is not possible to draw in the Thumbnails view. However, you can change this behaviour in the Preferences dialog box.
| • | Expanding or Collapsing Scenes |
| • | Working in the Timeline with a Collapsed Scene |
To enable drawing in the Thumbnails view:
- Do one of the following:
| ‣ | Select Edit File > Preferences (Windows) or Storyboard Pro > Preferences (Mac OS X). |
| ‣ | Press [Ctrl] + [U] (Windows) or [⌘] + [,] (Mac OS X). |
- In the Preferences dialog box, select the General tab.
- In the General section, deselect the Forbid drawing on panel thumbnails option.

By default, the Thumbnails view does not have browsing buttons. But you can change this setting in the Preferences dialog box.
To display the next and previous thumbnails:
- In the Preferences dialog box, select the Global UI tab.
- In the Thumbnails View section, select the Display Next and Previous Buttons option.
Two buttons appear on the Thumbnails view to let you display the next and previous thumbnails.

To keep the current panel centred:
- In the Preferences dialog box, select the Global UI tab.
- In the Thumbnails View section, select the Keep Current Panel Centred option.

For more information about drawing your storyboard panels—see Drawing.
Expanding or Collapsing Scenes
As you work on a storyboard, you may accumulate a large number of scenes composed of a tremendous number of panels. You can collapse lengthy scenes into one panel to have more space in the Thumbnails view.

To expand or collapse a scene:
| ‣ | In the Thumbnails view, click the Expand/Collapse Scene button at the top-left of a scene composed of many panels. |
One of the following happens:
The scene collapses, leaving only the first panel visible. The Expand/Collapse icon changes to a plus (+) sign.
The scene expands to show all its panels. The Expand/Collapse icon change to a minus (-) sign.
To collapse or expand all scenes:
| ‣ | In the Thumbnails view, click the Expand/Collapse All Scenes button at the top-right. |
Working in the Timeline with a Collapsed Scene
When your scene is collapsed, you can still work in the Timeline. However when you select a panel, the entire scene is selected, not just one panel. This means that you cannot work only on a single panel in the Timeline; you must expand the collapsed scene first.
Tools Toolbar
The Tools toolbar contains all the main tools you will use while working in Storyboard Pro. In the default workspace, this toolbar is displayed vertically on the left side of the interface.
Each tool is explained in detail in the following chapters:
| • | Drawing |
| • | Adding Colour |
| • | Animatic |
| • | Layers |
Storyboard Toolbar

The Storyboard toolbar contains all of the basic commands related to adding and deleting panels, scenes, and transitions, as well as switching between the 2D and 3D workspaces.
Each command is explained in detail in the following chapters:
| • | Getting Started |
| • | Script and Panels |
| • | Working in a 3D Space |
| • | Animatic |
Playback Toolbar

The Playback toolbar lets you play back your storyboard. When you create an animatic with transitions and sound, you can play it back in real time in the Stage view to check the timing.
|
Button |
Name |
Description |
|
|
Go to First Frame of Selection | Automatically places the playback marker at the beginning of the panel selection. This selection can be one or many panels. In the Timeline view, you can see the red marker positioning itself at the first frame of the first panel of the selection. |
|
|
Play Selection |
Plays back a selection of panels. Select Play > Play Selection. Keyboard shortcut: [Shift]+[Enter] |
|
|
Play |
Starts and stops playback of the storyboard. Select Play > Play. |
|
|
Loop |
Repeats playback. Select Play > Loop. |
|
|
Sound |
Enables sound in the playback. Select Play > Audio Playback. |
|
|
Camera Preview |
Enables dynamic camera movements during playback. Select Play > Camera Preview. |
Play Menu Commands
In addition to the Playback toolbar, there are more playback commands available in the Play menu:
| • | First Panel: Selects the first storyboard panel and places the playback marker at the beginning of this panel. |
| • | Previous Scene: Selects the scene preceding the current one and places the playback marker at the beginning of that scene. |
| • | Previous Panel: Selects the panel preceding the current one and places the playback marker at the beginning of this panel. Default keyboard shortcut: [A]. |
| • | First Frame: Places playback marker at the first frame and selects the first panel of the storyboard. Default keyboard shortcut: [Home]. |
| • | Previous Frame: Use this to go to the previous frame of the storyboard. Default keyboard shortcut: [,]. |
| • | Next Frame: Use this to go to the next frame of the storyboard. Default keyboard shortcut: [.]. |
| • | Last Frame: Use this to place the playback marker at the last frame and select the last panel of the storyboard. Default keyboard shortcut: [End]. |
| • | Next Panel: Use this to select the panel next to the current one and place the playback marker at the beginning of that panel. Default keyboard shortcut: [F]. |
| • | Next Scene: Use this to select the scene next to the current one and place the playback marker at the beginning of that scene. |
| • | Last Panel: Use this to select the last panel of the storyboard and place the playback marker at the last frame. |
| • | Go to Scene: Use this to specify to a scene to go to in the storyboard. |
| • | Go to Frame: Use this to go to a specific frame of the storyboard. |
Refer to the Animatic chapter to learn more about frames and timing.
Panel View
The Panel view displays the different captions which are related to the current panel, as well as other useful information.
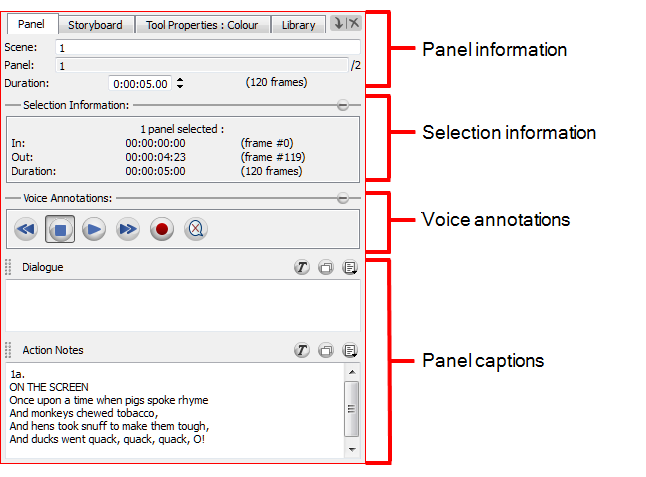
Panel Information
This section of the Panel view is where information, such as the duration of the current panel, name of the current panel and name of the scene in which it is part of is displayed. It is possible to edit some of the fields—see Script and Panels.
Selection Information
This collapsible section of the Panel view is where the information, such as the number of selected panels, the in and out of the current selection, as well as the duration of the selected panels. These fields are for reference only; they cannot be edited.
Click the Collapse ![]() button to hide the section and leave more room for the Script caption field. Once it is collapsed, you can click the Expand
button to hide the section and leave more room for the Script caption field. Once it is collapsed, you can click the Expand ![]() button to display the entire section again.
button to display the entire section again.
Voice Annotations
It is possible to add voice annotations to a panel. This collapsible section is used to control and edit these annotations—see Voice Annotations.
Panel Captions
There are several fields which are collectively known as panel captions. Captions are a method by which you can organize information in your project, and tie that information to a panel. They are fully customizable. These are the default names:
| • | Dialogue: Type or copy/paste dialogue from your script that occurs during this shot in the current panel. |
| • | Action Notes: Type or copy/paste notes related to the action occurring in the panel. |
| • | Slugging: Add notes referring to the timing of the storyboard. Slugging is the timing of the individual recorded lines of dialogue against the board. |
| • | Notes: Add anything relevant about the current panel or the shot it represents. For example, the crew working on the shot, required props, ambient sounds, continuity notes or required equipment to complete the shot. |
The caption fields are named by default, you can easily change the name of these fields by clicking the Caption Menu ![]() button and selecting the Rename Caption option. Once you have changed the names of the captions and you are certain that you want to keep these names throughout the project, you can set the new names as default by selecting Caption > Save Captions Layout as Default from the top menu.
button and selecting the Rename Caption option. Once you have changed the names of the captions and you are certain that you want to keep these names throughout the project, you can set the new names as default by selecting Caption > Save Captions Layout as Default from the top menu.
You can use the Caption Menu ![]() button to access the commands related to your caption fields, and the Text Formatting
button to access the commands related to your caption fields, and the Text Formatting ![]() button to display a toolbar to format your text.
button to display a toolbar to format your text.
Refer to the following chapters for more information about using the Panel view: Script and Panels, Animatic, and Storyboard Supervision.
Storyboard View
The Storyboard view is where you import or type your script. It also displays valuable information about your storyboard project. The Storyboard view is divided into two areas: Project information and Script caption.
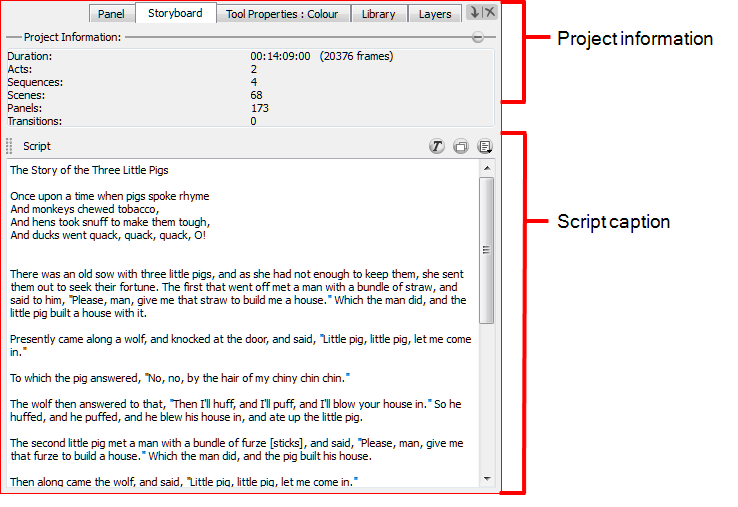
Project Information
This collapsible section of the Storyboard view is where information such as the duration, number of acts, sequences, scenes, panels, and transitions is displayed. You can click the Collapse ![]() button to hide the section and leave more room for the Script caption field. Once it is collapsed, you can click the Expand
button to hide the section and leave more room for the Script caption field. Once it is collapsed, you can click the Expand ![]() button to display the entire section again.
button to display the entire section again.
Script Caption
Like panel captions, storyboard captions are fully customizable. The difference is that the information that you store here is relevant for the entire storyboard, rather than for a specific panel. This default caption field is specifically there for your script. You can use the Caption ![]() menu to access the import commands and the Text Formatting
menu to access the import commands and the Text Formatting ![]() button to display a toolbar to format your text—see Script and Panels.
button to display a toolbar to format your text—see Script and Panels.
Tool Properties View
The Tool Properties view contains the most common options and operations related to the currently selected tool. As soon as you select a tool from the Tools toolbar, the Tool Properties view is updated.
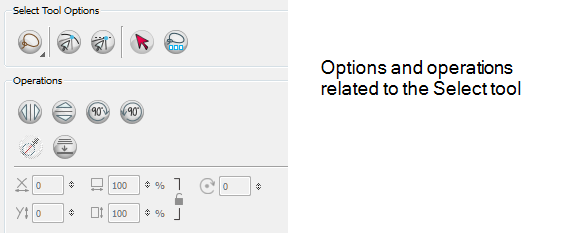
The content of the Tool Properties view is explained in detail in the following chapters:
| • | Getting Started |
| • | Drawing |
| • | Adding Colour |
| • | Animatic |
Colour View
The Colour view is where you create colours; it is also necessary for drawing and painting.
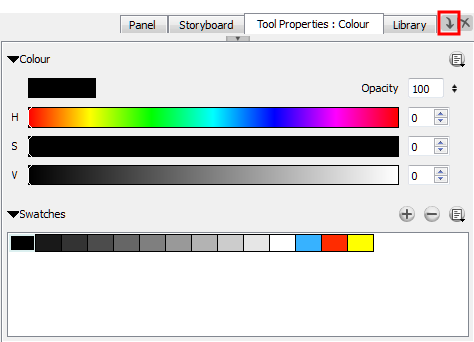
To access the Colour view:
| ‣ | In the Panel view, click the View Menu |
 Add Colour
The Add Colour button lets you creat a new colour swatch from the current colour. Click the Add Colour button to add a new swatch to the bottom of your colour list or swatches.
 Delete Colour
The Delete Colour button lets you delete a selected colour swatch from the Colour view.
 Colour View Menu
The Colour View menu lets you access commands related to the Colour view, such as creating and deleting colour swatches, changing the display mode, import and export colours, and create new textures.
For more information on colour, see Adding Colour.
Menus
In Storyboard Pro, you can access the commands from the following three menus:
| • | Top Menu |
| • | View Menus |
| • | Contextual Menus |
Top Menu
The top menu contains most of the commands. Depending on the view you are working in and the selected element, some commands are available and others not. The top menu is always located at the very top of the user interface.
View Menus
Some views have their own menu containing commands specifically related to that view.
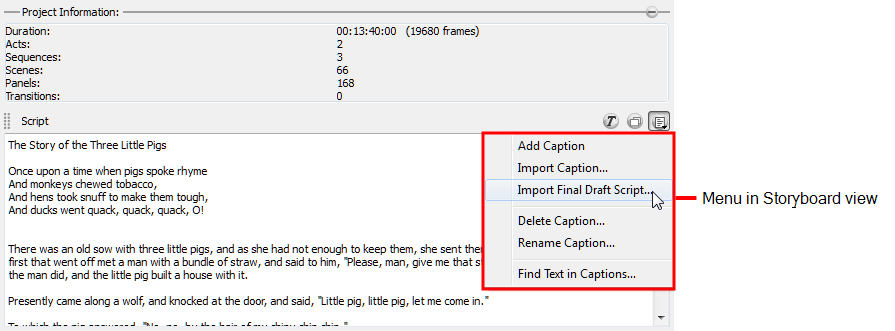
You can find View and Caption menus in the following views:
| • | Panel View |
| • | Storyboard View |
| • | Colour View |
To access the View menu:
| ‣ | In the top-right corner of the Panel, Storyboard, or Colour view, click the View Menu |
Contextual Menus
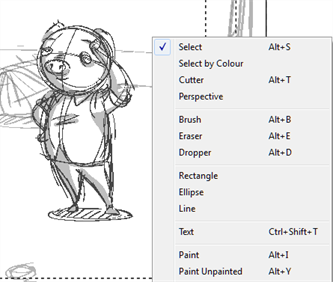
Each view has a contextual menu containing commands for recurring actions. This menu is accessed by right-clicking (Windows) or [Ctrl]+click (Mac OS X) anywhere in a view.
