
Project Optimization
If file size and speed of use are concerns, there are a few things you can do to optimize your project.
This section includes the following topics:
| • | Optimizing Your Project |
| • | Creating Optimized Drawings |
| • | Other Optimization Suggestions |
Optimizing Your Project
To optimize your current project:
- Select File > Optimize Project.
The Optimize project dialog box opens.
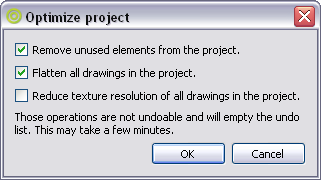
- Select one or more of the following options:
| ‣ | Remove unused elements from the project: As you create a storyboard you will delete panels or layers, update drawings, unlink sounds, and so on. Some of these files are kept for backup purposes, but they take up space and increase the size of your project on your hard drive. This option removes these unwanted elements. |
| ‣ | Flatten drawings in the project: Flattens all the brush or pencil line strokes of all the vector drawings in your project. This means that all overlapping strokes will no longer be editable as single strokes, but only as whole, drawn objects. |
| ‣ | Reduce texture resolution of all drawings in the project: Reduces the texture resolution and consequently makes the project file size smaller. The resolution is set so it cannot go below 72 dpi. |
Creating Optimized Drawings
When using any of the playback options in Storyboard Pro, the software has to calculate the positioning of all the *.tvgs (Toon Boom vector graphics), the file format that is created from all your drawing strokes. This calculation tends to slow down the rate of playback. There is, however, a way to circumvent this problem.
There is a a second file format, the *.tvgo (Toon Boom vector graphic optimized) that has all the pixel position information precalculated. Using these drawings should significantly speed up playback.
To optimize playback:
- Select Edit > Preferences.
The Preferences dialog box opens.
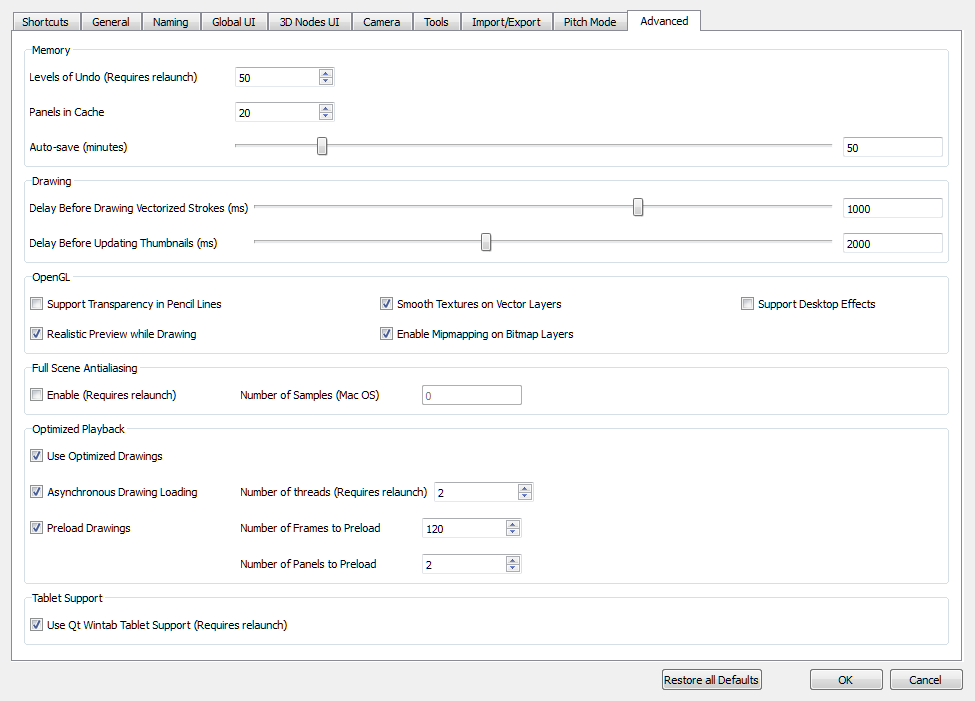
- From the Advanced tab, under the Optimized Playback section, select the Use Optimized Drawings option.
- Select the Asynchronous Drawing Loading option to optimize playback. There are cases in which, during playback, the software might encounter a particularly texture-heavy or complex panel. When this happens, and Asynchronous is deselected, there will be a pause in playback while the frame loads. If you select this option, then playback will continue and the drawings will load as soon as they are available. You may notice a short blink while the drawing loads. To reduce the possibility of seeing a blink, select the Preload Drawings option.
- Select the Preload Drawings option to enhance the playback further, by loading drawings in memory before you reach them during playback. The software will determine which, between the two options, has more drawings to preload, and it will choose the appropriate option on the fly during playback.
| ‣ | Number of Frames to Preload: The software looks ahead for the number of frames, and checks to see how many drawings are used. Each layer on each panel is a drawing. If you have many short panels, then you will have more drawings than if you had one long panel. |
| ‣ | Number of Panels to Preload: The software looks ahead for the specified number of panels to determine the number of drawings in those panels. Keep in mind that each layer on each panel is a drawing. If you have long panels, then it will want to look ahead several panels, instead of the specified number of frames. |
- Click OK.
- Select File > Create Optimized Drawings.
Other Optimization Suggestions
| • | Texture versus Plain Vector Brush |
| • | Flattening Your Drawings |
| • | Bitmap Integration |
Texture versus Plain Vector Brush
When you draw on a layer, all the strokes that you create with the Brush tool are vector elements. There are two kinds of brushes:
| • | Plain Brushes: By default, the brush tool creates vector strokes filled with either a colour or a gradient. Vector strokes use a very small amount of memory and can be used rapidly because they do nt contain any pixel information, only mathematical functions. |
| • | Texture Brushes: This type of brush also produces a vector contour for its strokes, but is filled with a bitmap texture. These textures allows you to produce drawings that have natural looking brush strokes that resemble lines drawn using a crayon or airbrush. |
Because you are using a bitmap image mapped inside vector strokes, texture brushes use much more memory and processing time than brush strokes filled with colour. Therefore it you wish to make your file size lighter and your drawing speed faster, use only regular brushes to draw your scenes. If you do choose to use texture brushes, is it important to use a reasonable size bitmap for your texture brush.
Flattening Your Drawings
In Storyboard Pro, strokes inside a vector layer are independent. You can select a specific stroke and edit its position, scale, rotation, skew, colour and so on, whenever you want. However, this flexibility increases the amount of memory and resources used, especially when you have a lot of strokes in your drawing (which frequently happens when you sketch).
You can flatten all your drawings in one go. However, you can retain partial flexibility and still minimize file size and resources needed by consciously flattening certain drawings as you draw, or even by selecting them after they have been drawn. You can take all strokes of the same colour with overlapping areas on the same layer and flatten them to create a single drawing with a vector contour.
To flatten strokes as you draw:
- From the Tools toolbar, select the Brush
 tool.
tool.
- In the Tool Properties view, click the Auto-Flatten
 button.
- In the Stage view, sketch your first drawing.
The drawing strokes will automatically be flattened.
To flatten an existing drawing:
- In the Stage view, use the Select tool to select a group of strokes.
| ‣ | If you do not select a group of strokes, the whole layer will be flattened. |
| ‣ | You can also select multiple layers, so they are flattened individually. |
- Select Tools > Flatten or press [Alt]+[Shift]+[F].
Crop Texture on Flatten
When you use the Flatten option in the Tools menu, Storyboard Pro automatically crops all textures, reducing the drawing size by removing the texture area which is not visible.
Bitmap Integration
Storyboard Pro allows you to create storyboards by importing scanned images or bitmaps drawn in another software. During the import process, images are vectorized and placed in a new scene in a vector bounding box as a bitmap fill. The bitmap image’s resolution can affect your project’s file size and the speed at which the software functions while handling your project. When importing bitmaps into a storyboard, there is rarely a need to use a high resolution. This will not increase the quality of your PDF or animatic. You should import bitmaps with a resolution close to the project resolution. For example, in an NTSC project, using a bitmap with a 720x480 resolution or a 72dpi quality will be fine.