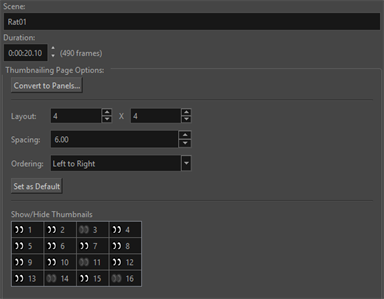
Thumbnailing Page Properties
Within the Panel view, you can locate the Thumbnailing Page properties which allow you to adjust the parameters of the Thumnailing Page. You can alter the appearance and arrangement of the thumbnail panels in your scene. Once your panels are arranged, you can begin drawing within your panels on separate drawing layers.
For more information about the Panel view see Adding Views.
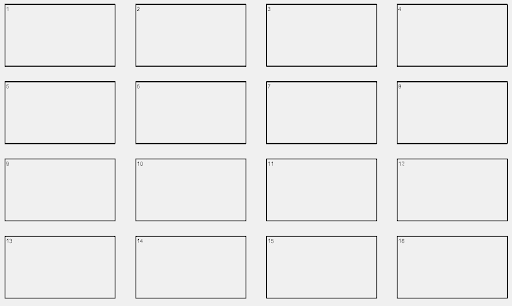
When a new Thumbnailing Page is created, a new Scene will be created in the Timeline view. The new scene will contain a 4x4 grid of drawing panels on a single drawing layer. These panels by default, will all be numbered and follow an ordering of left to right.
The Scene name and duration can be adjusted in the Panel view above the Thumbnailing Page properties.
The duration of the scene can be manipulated both manually and from the Panel view. The value in the Duration number box will increase or decrease in real time if the number of frames is manipulated on the timeline. To manually affect the duration, input a value into the Duration number box and the Scene on the timeline will adjust to match the new input value.
For more information about changing the duration of your Scene, see Changing the Panel Duration.
The following parameters can be altered in the Thumbnailing Page properties:
Layout
The Layout is the number of thumbnail panels on the Thumbnailing Page. The panels are loaded based on the value input for the rows and columns In the Panel view. Depending on how many panels you want in the Thumbnailing Page, or the orientation of the page, you can alter the values of both the horizontal and vertical values.
Spacing
The Spacing is the gap between the thumbnail panels. Each panel is spaced evenly apart from one another based on the value input into the Spacing parameter in the Panel view. You are able to draw between the gaps of the thumbnails. This will allow you to extend your drawings beyond the boundary of the panels as well as write notes and captions to accompany your thumbnails.
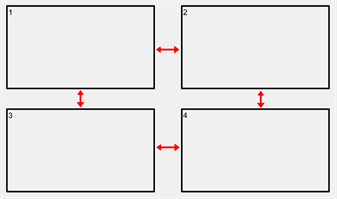
While you can draw in the gap between panels, if your strokes cross the midpoint of the field between two panels, your stroke will appear on the adjacent thumbnail panel when converted or exported. This means that strokes that enters the field of the adjacent panel will split and appear in both panels.
If the adjacent panel is empty, the stroke that crosses the midpoint of the field will be enough for Storyboard Pro to consider the panel to have a drawing inside it. In this scenario, if you select the Ignore Empty Drawings parameter in the Convert to Panels dialog, the adjacent panel will not be considered empty.
Ordering
The Ordering dictates the order and flow of your numbered thumbnail panels. When the thumbnail panels are generated on the drawing layer, they will follow a sequential order from left to right before dropping down to the next row. The Ordering can be changed in the Panel view.
The Ordering can be changed to the following orientations:
-
Left to Right.
-
Right to Left.
-
Top to Bottom, then Right.
-
Top to Bottom, then Left.
Changing the order will alter the flow of the numbering in the panels. This will allow you to change the orientation of the panels in order to accommodate working in another language or to change the view of your thumbnail panels.
Set as Default
The Set as Default parameter allows you to set the standard for all Thumbnailing Pages created in your Storyboard Pro project. Any alterations made to the Layout, Spacing and Ordering will be made the default when you select the Set as Default parameter.
Show/Hide Thumbnails
The Show/Hide Thumbnails parameter is a visual representation of the thumbnail panels in the Drawing view. This parameter will map out the layout and order of your panels as well as if your panels are active or inactive.
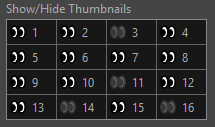
You can deactivate and reactivate panels by clicking the panel icon on the Show/Hide Thumbnails dialog. When a panel is disabled, the thumbnail panel will appear grey with a red X in the Drawing view.
Convert to Panels
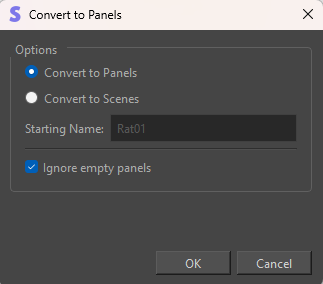
The Convert to Panels parameter will convert the Thumbnailing Page into thumbnail panels on the timeline. The thumbnail panels can be converted into either panels contained within a scene or each panel can be converted into individual scenes on the timeline.
-
Click Convert to Panels.
The Convert to Panels dialog will open.
-
Select one of the following:
-
Convert to Panels.
-
Convert to Scenes.
-
-
Select whether to Ignore Empty Panels.
-
Click OK
When converted to panels, the thumbnails will be evenly timed to fit within the duration of the Scene in the Timeline view. When you select Convert to Scenes, each thumbnail will be converted into a new Scene on the timeline. The new scenes will be evenly timed and occupy the duration that the original Scene containing the Thumbnailing Page occupied.
When you Convert to Scenes, you will be required to assign a Starting Name for the new scenes. The name can be both letters and numbers. The Starting Name will be applied to the first new Scene, the following scene names will increase sequentially off of the initial Starting Name.
For Example, if your Starting Name is A1, each following scene will increase numerically. A1 will be followed by A2, A3, A4, A5…A9. Following the number 9, the sequence will restart with B0 and so on.
Conversely, If your Starting Name is letters only, the letter will increase alphabetically until the letter Z.
For example, if your Starting Name is AA, the next scene will be named AB, AC,AD…AZ. After AZ, the sequence will restart with BA.
When converting your thumbnails to the timeline, you can omit certain panels from the Thumbnailing Page. You can omit select panels by selecting the Ignore Empty Panels option in the Convert to Panels dialog. When enabled, any panels that contain no drawings will be ignored during the conversion. Any disabled thumbnails will be ignored regardless.