By default, the clips in your video tracks follow the timing changes made to your animatic. For example, if you extend the duration of a panel, this moves all subsequent panels, and the video clips after this panel will also be moved to follow the movement of subsequent panels.
If you want to prevent this from happening, you can lock your video tracks. Locking a track will also prevent you from making any unwanted changes to the clips in the tracks. When a track is locked, it is impossible to move, delete, add or edit video clips in this track.
- In the Timeline view, just right of the name of the video track you want to lock, click on the Lock / Unlock
 button.
The Lock / Unlock button will display a "locked" ![]() icon, and the track will appear cross-hatched to indicate that you can't make changes to it.
icon, and the track will appear cross-hatched to indicate that you can't make changes to it.
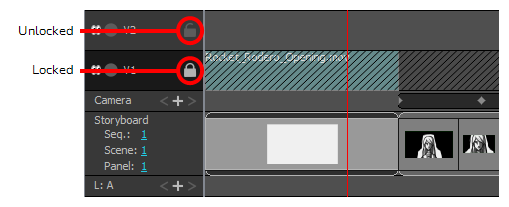
- If you want to unlock the video track, click on its Lock / Unlock
 button again.
The Lock / Unlock button will display an "unlocked" ![]() icon, and you will be able to edit the video track again.
icon, and you will be able to edit the video track again.
If none of your project's video tracks are locked, you can lock them all simultaneously.
- In the Timeline view, make sure that all video tracks are unlocked, or else, the Lock All Video Tracks command will be unavailable.
- In the top menu, select Storyboard > Tracks > Lock All Video Tracks.
If at least one video track is locked, you can unlock them all simultaneously.
- In the Timeline view, make sure there is at least one locked video track. Otherwise, the Unlock All Video Tracks command will be unavailable.
- In the top menu, select Storyboard > Tracks > Unlock All Video Tracks.