Storyboard Pro 24 Release Notes
Here is the list of changes in Storyboard 24 build 24.0.0.22883.
New Features
Drawing Tools
Symmetry Drawing Guides
Similarly to the perspective guides, the new symmetry guides are created and managed in the Guides view. The symmetry guides are available for the Pencil, Brush, Stencil Brush, Stamp, Eraser and the shape tools, except for Polyline. One of these tools must be selected in order for the symmetry guides to display.
The symmetry guides split the view and allow for strokes on one side of the guide to be replicated on the other side with a live preview.
The following types of symmetry guides are available in the + dropdown menu.
-
Vertical Symmetry
-
Horizontal Symmetry
-
Dual Axis Symmetry
Select one of the guides from the list to display it in the Stage or Camera view.
To move the guide, hover over the center pivot to activate the move cursor. Click and hold while positioning the guide. Click down and hold while positioning the guide. To rotate the guide, hover over one of the guides to activate the rotate cursor. Click and hold while rotating the guide. Rotating closer to the center pivot will be more sensitive. The rotational angle is displayed in the upper left corner of the view.
A symmetry guide and perspective guide can be used together.
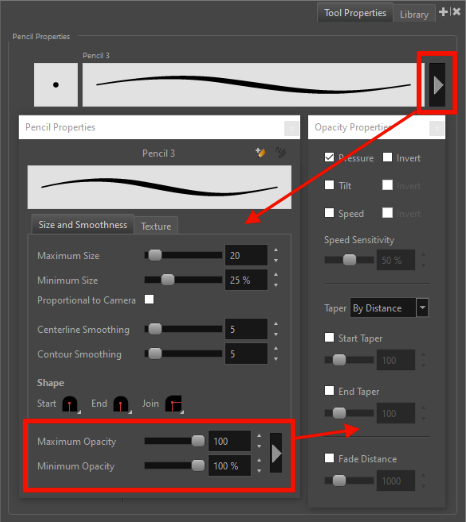
Variable Opacity using the Pencil Tool
The new Opacity Properties provide a more natural feel when drawing and greater control over the look of pencil lines when using a pressure sensitive pen tablet.
-
Maximum Size: Defines the maximum opacity of the stroke.
-
Minimum Size: Defines the minimum opacity of the stroke in relation to and as a percentage of the maximum size.
The opacity can be controlled further by clicking on the arrow button to open the Opacity Properties.
-
Pressure: Allows you to use pen pressure to decrease and increase opacity.
-
Tilt: Allows you to tilt the pen closer to the tablet for less opacity. You can check the box to invert this behaviour.
-
Speed: Allows you to reduce the opacity of the stroke by drawing at a faster speed. You can check the box to invert this behaviour.
-
Speed Sensitivity: This is used to control how fast the stroke must be drawn to reach the minimum value.
-
Taper: Allows you to reduce the opacity at the start and end of each stroke. The value can be expressed using Distance or Percentage.
-
Fade Distance: Allows you to fade the opacity value over a given distance.
New Brush Properties
New properties have been added to the vector and bitmap Brush and Stencil Brush Properties allowing randomized distribution of brush stamps along the length and width of the brush stroke. The new properties are available for the Tip and Dual Tip in the extended brush properties.
-
Count (from 1 to 20): Controls the number of stamps that are composited to each step along the brush stroke.
-
Random Count (from 0% to 100%): Varies the number of stamps at each step.
If the count value is 4, and the random count of 50%, the count will be chosen at random between the range [2, 6].
If the count value is 4, and the random count is 100%, the count will be chosen at random between the range [0, 8].
-
Random Offset X (from 0% to 300%): Adds a random offset for each stamp, lengthwise and parallel to the stroke.
-
Random Offset Y (from 0% to 300%): Adds a random offset for each stamp, perpendicular to the stroke.

Migration of Brush Presets
Migration of brush presets from previous versions had been disabled in Storyboard Pro 22. With the new version, launching Storyboard Pro 24 for the first time, the brush presets from the previous version can now be migrated by selecting Yes in the import dialog. Custom and modified brush presets from the previous version will be added to the default brush presets rather than overwriting them.
Paste Drawing Object in Place
A new command named Paste Drawing Object in Place is now available in the Edit menu. Unlike the Paste Drawing Object command, which pastes a copied drawing object with a slight offset, the new Paste Drawing Object in Place command always pastes the copied drawing object in the same position as the original. The new command can be accessed from the Edit menu and has the Ctrl+Shift+V (Command+Shift+V on macOS) shortcut assigned.
Select All Layers in Group
With any tool selected, pressing the Alt key (option key on macOS) and clicking on a group layer in the layer list quickly selects the group layer and all its child layers.
This new functionality allows the Select tool and a keyboard shortcut to be used together for manipulating grouped layers more efficiently.
PDF Export
PDF Export – New Features and Improvements
The PDF Profile Editor now has an interactive PDF Preview, a search filter, and a more organized and intuitive design. The new features and improvements make creating a customized printed or digital storyboard predictable and fast.
The PDF Profile options tabs have changed to a list format in a sidebar on the left side of the PDF Profile Editor window. New features and options have been introduced and some existing options have moved to new or different lists and groupings that make more sense.
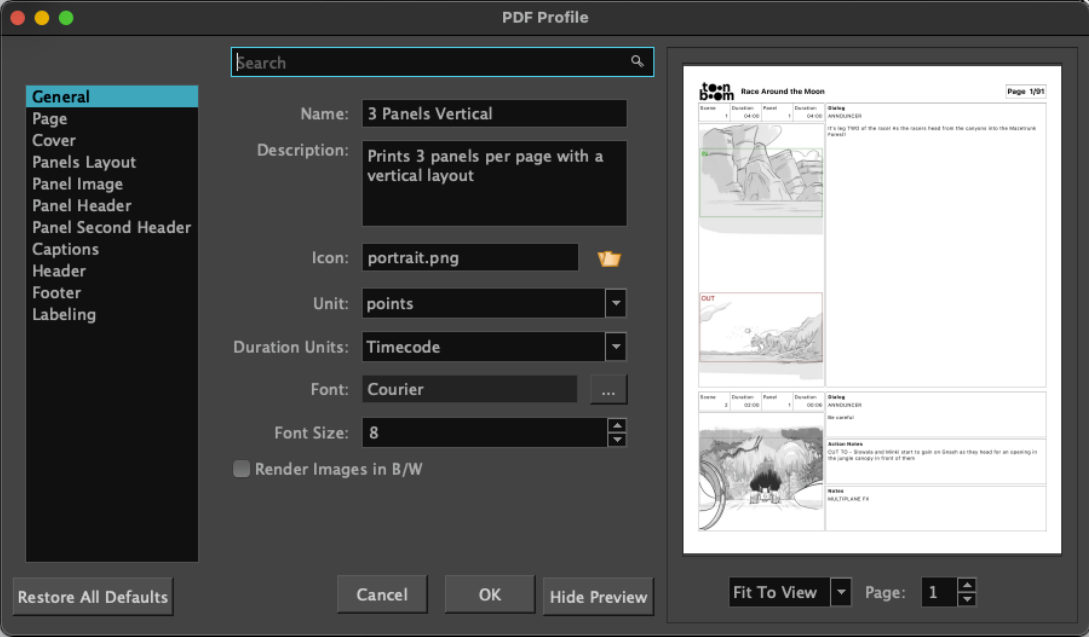
Interactive PDF Preview
An interactive PDF Preview is now part of the PDF Profile window. It will generate the entire storyboard as a preview, updating in real-time as changes are made to the PDF Profile options.
PDF Profile Editor Search Filter
The new Search Filter helps locate options in the PDF Profile editor more quickly.
-
Start typing in the Search field to see a list of options to choose from. Typing more will narrow the search.
-
Make a selection from the list to open the page with the selected option. The option will highlight momentarily to show its location on the page.
New “Panel Layout” Options
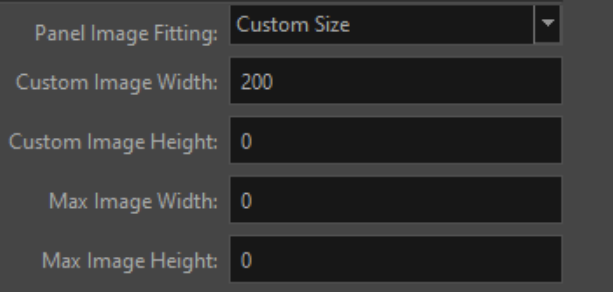
Image fitting Options
The new panel image fitting section in the Panels Layout options provides controls for how the image fits within the panels. The panel image will always respect the project resolution while the captions and panel headers adjust to fit in the space around it.
-
Panel Image Fitting: When Best Fit is selected, the panel image will use the width or height available in the panel.
-
Custom Image Width/Height: When Custom Size is selected, the Custom Image Width and Height can be specified and will be respected when possible. Best Fit is used when the value is 0.
-
Max Image Width/Height: Provides additional customization for Best Fit and Custom Size options. When the value is 0 the available space will be used to fit the image.
-
Show Transition Type: Displays the transition type in the Panel Header when Transition as Panel is selected.
-
Show separator between panels: Adds a separator line between panels when the Number of Columns option is 1 (single column layout).
-
Show separator between scenes: Adds a separator line between scenes when the Number of Columns option is 1 (single column layout).
Panel Image
When Frame Panel Image is selected the new Frame Thickness option allows the image frame to be customized.
Panel Header and Second Panel Header Options
A Second Panel Header with the same options as the Panel Header is now available. It can be placed either under the panel or to the right of the panel when the Vertical Layout is selected. Each panel header is configured independently.
The following new options have been added to the Panel Header and Second Panel Header options lists:
-
Frame Panel Header: The panel header frame can be displayed with or without content.
-
Display Scene Name
-
Display Selected Captions
-
Show Caption Name
-
Show Scene Name on first panel only
-
Show Scene Duration on first panel only
-
Show Scene Duration on last panel only
-
Display Continued Label: The label specified for the “Continued” option in the Labeling options will be displayed in all the panel headers except for the first panel in the scene.
-
Label on Same Line: If there is enough room, the labels and text will be placed on the same line.
-
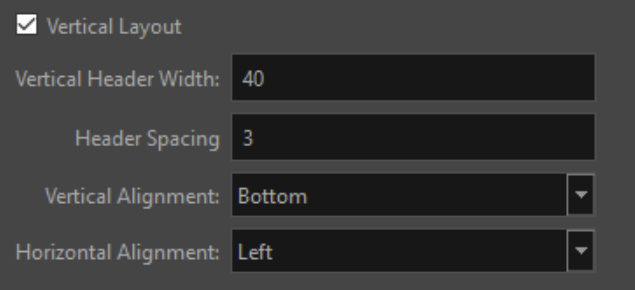
Vertical Layout: Panel headers can now be configured horizontally or vertically. When Vertical Layout is selected, the main Panel Header will be placed to the left of the panel and the Second Panel Header will be placed to the right of the panel. When Vertical Layout is unselected The Panel Header and Second Panel Header will be placed at the top and bottom of the panel respectively.
New Caption Options
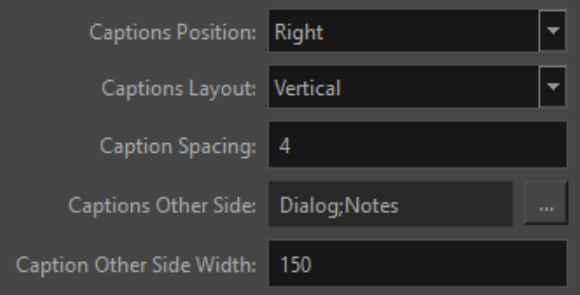
New Caption options have been added to allow more choices for caption placement. Most notably, it's now possible to place captions on both sides of the panel image
-
Frame Captions: The Frame Captions parameter now has a check box. When enabled the caption sections are framed with a choice of frame styles. When disabled there will be no frame around the captions.
-
Line Left: Line Left has been added to the pre-existing frame style options.
-
Caption Position: Choice of Below, Left, Right.
-
Caption Layout: Choice between Vertical or Horizontal.
-
Caption Spacing: The space between captions.
-
Captions Other Side: When Caption Position is Left or Right of the panel image the captions selected in the dialog will be placed on the opposite side.
-
Captions Other Side Width: The combined width of the captions on the other side. When the value is 0 it will use the available space to fit the caption. The width for the captions on the opposite side will also adjust accordingly.
-
Caption Align with Image: When this is selected and Captions Position is set to Left or Right, the caption will align with the top of the panel image frame. When unchecked the captions will line up with the top of the panel header.
3D
Faster loading, display and manipulation of 3D models
The technology used to load and display 3D models was completely overhauled using Vulkan Scene Graph to provide faster loading, display and manipulation of 3D models within Storyboard Pro. Large models can now be visualized and manipulated without any performance issues.
For now, Vulkan scene graph is disabled by default. To use the Vulkan scene graph, the “Enable Vulcan 3D Rendering” must be enabled from the General tab of the preferences. If the graphics card does not support Vulkan it is recommended to leave the preference disabled.
Improvements to Drawing Tools on 3D Planes
Improvements to the drawing tools allow them to work more predictably on a 3D plane that is rotated up to 60 degrees from the camera view plane.
The tool cursor will automatically change to a "Forbidden cursor" to provide feedback and disallow activity whenever it goes into a region that will introduce instability and poor results.
Parenting 2D layers to 3D models
2D layers can now be dropped onto 3D layers in the Layer list in order to attach them as children of the 3D model.
Improved Create Layer On Surface Tool
Using the Create Layer on Surface tool, you can create a new vector or bitmap layer at a precise location over a 3D object. The new layer will be positioned at the location on the X, Y and Z axis which you clicked over a 3D model. In previous versions, the layer was created perpendicular to the camera to easily allow drawing.
New modes have been added to the Create Layer on Surface that control the orientation the new layer will have when created: Align Layer to Surface. Align Layer to View, Align Layer Vertically.
The three modes are available in the Tool Properties view when the tool is active. Note that the icons are temporary and will change in subsequent builds. You can also cycle between the three modes using the left and right arrow keys while the tool is active.
-
Align layer to surface: This new option creates the layers parallel to the surface that was clicked. This is useful when details need to be added to walls or the ground on 3D sets or to the surface of a prop.
-
Align Layer to View: When this option is selected, the layer is created perpendicular to the current viewpoint.
-
Align Layer Vertically: The layer will be created with a rotation value on the Y axis so that it faces the current viewpoint, but will set a rotation value of 0 for the X axis, leaving the layer upright in the 3D world.
Other improvements to the tool include:
Proper intersection of the Drawing grid: When using the Create Layer on surface tool, clicking and holding the mouse will display the drawing grid. The grid will intersect with the 3D models around to show the location it will have in 3D space once created.
Distance to Surface: The distance at which the layer will be created can be adjusted by holding down ALT (option) while using the Create Layer on Surface tool. Click and hold the mouse to display the drawing grid. While still holding down the mouse, press the and hold the ALT key move the mouse to adjust the distance at which the layer will be created. Release the mouse while still holding ALT to create the layer.
Parenting the new layer to the model: Holding CTRL (command) before releasing the mouse will attach the newly created layer as a child of the 3D model that is under the mouse at that moment.
Posing characters built with deformation rigs
Characters built with bone armatures can now be posed in Storyboard Pro by manipulating their bones. Bone armature must be compatible with FBX.
To see and manipulate bones, enable the Bone Selection Mode in the Transform tool properties.

To select bones with the Transform tool, hold the CTRL (command) key and click the bone. Use the manipulator that appears to rotate, scale or offset the bone.
Bones can also be selected directly in the 3D Graph view.
Toon Shader Render Style
The new Toon-Shader rendering style can be used to provide a simple Toon Shader render of 3D models that blends in with the style of 2D animation. It draws a line around each of the geometries and can posterize the colours to provide a cel shaded look.
The Toon Shader effect and its properties are available by right-clicking on a 3D layer in the Layers panel or the Layers view, then selecting the “3D Effect” sub-menu. Vulkan 3D Rendering must be enabled in the Preferences > General tab to see the Toon Shader effects.
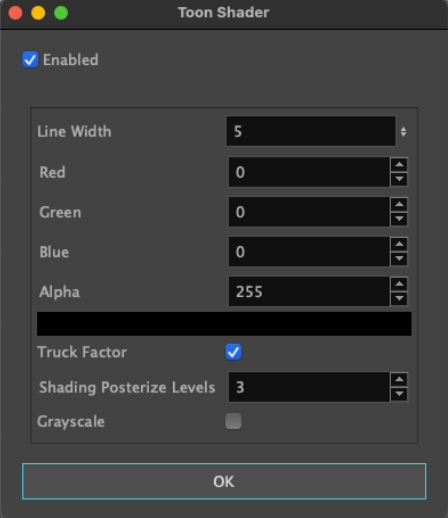
Line Width: Defines the line width of the contour line. This value is scaled to match the corresponding line width of the drawing tools on a default layer at the default camera position.
Red, Green, Blue and Alpha: Defines the colour of the contour line, with RGBA (8 bit) values.
Truck Factor: When enabled, the line weight is applied in relation to the distance of the drawing layer from the camera.
With the Truck Factor on, the line weight will change relative to the view position and the render plane’s position – the line should appear as if it is drawn on the plane of the object’s input matrix. If the object is moved away from the viewed position, the line appears smaller.
With the truck-factor off, the line weight will remain consistent relative to the rendering camera. It should appear as if it is being rendered on the device/viewport. If the object is moved away from the rendering camera, the line does not change in thickness.
Posterize: Applies a posterization effect, limiting the output of colours in the render to the given value. If the value is 0, no posterization is applied.
Greyscale: Converts the output to grayscale, with perceived luminance weighting.
Using 3D models in 2D scenes
3D models can now be imported in a 2D scene without converting the scene to 3D. When a model is imported in to a 2D scene, the following question appears:
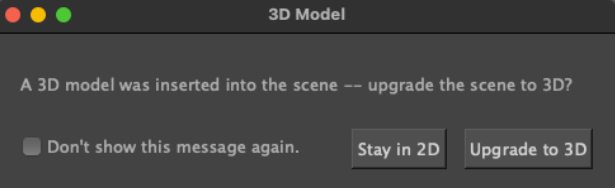
Clicking “Upgrade to 3D” will convert the scene to 3D and import the model in the scene.
Clicking “Stay in 2D” will import the 3D model without converting the scene to 3D.
Different display options are available for 3D models in 2D scenes. These option are available in the Layers View when a 3D layer is selected:

![]() 3D Model: Selecting this model will convert the scene to 3D.
3D Model: Selecting this model will convert the scene to 3D.
 Frozen 3D Model: This is the initial mode that is selected when a 3D model is inserted in a 2D scene.
In this mode, the model will be projected to a flat plane and composited in 2D with the other layers in the panel. The layer order will determine the compositing order in the panel. A layer can be in front or behind the model, there are no intersections with the 3D model in 2D scene.
Moving the camera in the scene does not change the viewpoint used to display the 3D model.
To manipulate, rotate and scale the model in the 3D space using the transform tool, the “Manipulate 3D Transform in 2D Mode” ![]() must be enabled. Alternatively, you can also unselect all the layers in the panel, hold the CTRL (command) key and click the model. This will enable the 3D manipulator on the 3D model as well.
must be enabled. Alternatively, you can also unselect all the layers in the panel, hold the CTRL (command) key and click the model. This will enable the 3D manipulator on the 3D model as well.
The camera used to render the 3D model can be adjusted by clicking the cogwheel button  that is available when the 3D layer is selected in the Layers View.
The settings in this dialog will change the camera that is used to render the model that is in the current layer.
 Frozen 3D Bitmap: Clicking this button will render the model in the selected layer to a 2D bitmap. Switch back to Frozen 3D Model if the position, angle or camera used to render the model needs to be changed.
 Snapshot Tool: Clicking this button opens the Render to 2D view that was available in previous versions.
3D Layer Shading Option
Existing 3D layer shading options have been moved to the new”3D Effects” sub-menu in the right-click context menu for 3D layers in the Layer list.
Create layer in front of the camera in 3D scenes
Creating a layer using the button at the bottom of the layer list or using the menu entry will now create the layer in front of the camera when the scene is set to 3D. Previously, the layer would have been created at the origin, 0, 0, 0.
Animatics and Audio Editing
Editing audio effects values over time
It is now possible to edit values of audio effects over time from the Effects Stack view.
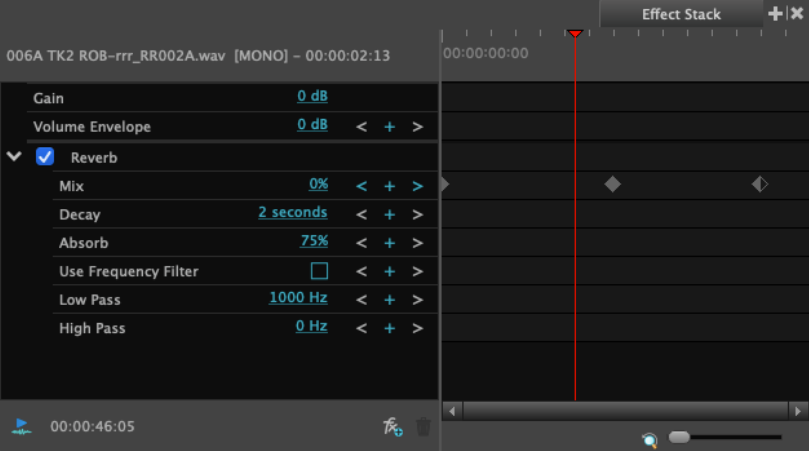
Keyframes can be created on parameters in the effects stack. They can be visualized and manipulated from the right part of the effect stack.
Retime Panels
Retime Panels allows you to extend or shorten a sequence of panels while automatically adjusting the duration of each panel proportionally.
The "Retime Panels..." dialog is available in the main Storyboard menu, or when right-clicking on a panel in the Timeline.
-
Time (%): The percentage by which the duration of the selection will be changed. Changing this value automatically updates the value in the Duration field below.
-
Duration: Displays the total duration of the selection of panels. Changing the Duration automatically updates the Time (%) value.
-
Ripple Edit: When enabled will result in subsequent scenes and panels to ripple backward or forward in the timeline. The Retime Panels feature ignores the Animatic Editing Mode state set in the Timeline. All the other elements in the timeline will adjust as they would normally.
-
When the Ripple Edit option is disabled, the options to resize the panel selection from either the start or the end of the selection are activated. The behavior and result will be similar to when Animatic Editing Mode is enabled.
Interactively Change Duration For a Selection of Panels
Changing the duration for a selection of panels can now be done interactively using the SHIFT modifier key.
-
Make a selection of contiguous panels.
-
Move the mouse over the left edge of the last panel while holding the Shift key. A new mouse cursor appears to indicate it is ready.
-
Continue holding the Shift key while dragging the panels backward or forward along the timeline.
Panel Duration Display in the Timeline
An option to display the panel duration as an overlay in the Timeline view is now available.
Right-click on the Storyboard track in the Timeline and select “Show Duration” to turn on/off the duration overlay for all panels.
The panel duration is displayed using the units specified in the Timeline View Overlays option that is located on the Interface page in the Preferences view.
Editing Layer Opacity in the Function Editor
The layer opacity is now represented as a bezier curve and can be edited in the Function Editor.
The ‘Show Other’ filter in the function Editor will show/hide the layer opacity function curve.
Editing Layer Opacity Keyframes in the Timeline
The layer's opacity keyframes can now be displayed and edited in the Layer Animation Track in the Timeline.
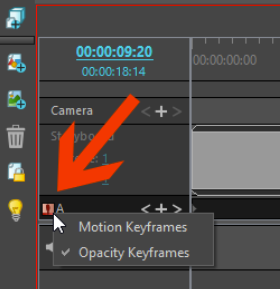
Click the small graphic on the left in the Layer Animation Track to display either the Motion Keyframes or the Opacity Keyframes.
As with the layer animation keyframes, opacity keyframes can be created, moved or deleted in the Layer Animation Track.
Editing the opacity in the timeline is not possible and is done in either the Layer Panel or Layers View.
Layer Keyframes Sync Mode
Similar to the "Camera Keyframes Sync Mode", the new “Layer Keyframe Sync Mode", which is accessible in the Layer top menu and when right-clicking in the layer track, can be used to select how keyframes will move in time when adjusting a panels duration.
The Layer Keyframe Sync Mode has two options:
Relative to Panels: When the panel duration is changed the layer keyframes will be adjusted to fit the new length of the panel.
None: When adjusting the length of a panel the layer keyframes remain on their actual frames.
When the Layers Keyframes Sync Mode is set to None and there are keyframes that fall outside of a shortened panel, in order to preserve the movement, a single keyframe will replace these keyframes at the end. The new keyframe has the interpolated values between the last keyframe inside the shortened panel and the first keyframe outside the shortened panel.
Rename Sound Clip
In previous versions of Storyboard Pro sound clips in the Timeline used the same display name as the audio file on disk. Using the Rename Clip command, it’s now possible to create unique sound clips names for display in the timeline.
To change the display name of a sound clip, select the sound clip then either right-click in the audio track and select “Rename Clip…” or select “Rename Clip…” from the Clips main menu.
Renaming a sound clip changes the name displayed in the Timeline. It does not rename the file on disk.
When hovering the cursor over the sound clip the tooltip will display the sound clip name and the source audio file name.
Previewing and Inserting Audio from the Library View
The content of a project’s Audio folder is now accessible from the Library view. The Audio folder in the Library view lists all the audio files that have been imported in the project. Audio files can now be imported directly to this folder by dragging from the Finder/File Explorer and dropping them directly to the Audio folder in the Library view.
Double-clicking an audio file in the Library loads it in the audio preview window on the left.
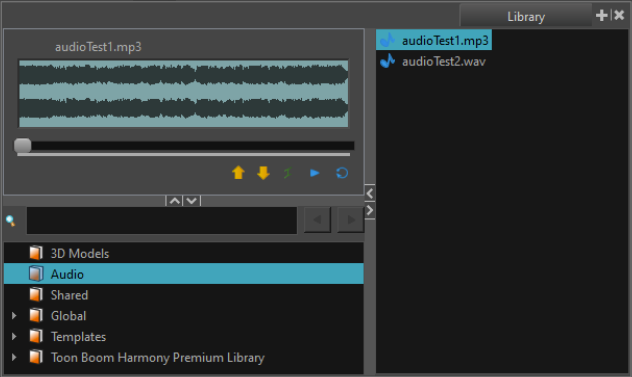
In the Preview window you can scrub the audio using the playhead or select the Play and Loop buttons for continuous play.
Set the IN and OUT points using the arrow buttons (which are not the final buttons), then select the Insert button to insert the clip at the playhead location in the project’s timeline. If no audio track is selected in the timeline, a new track is automatically created.
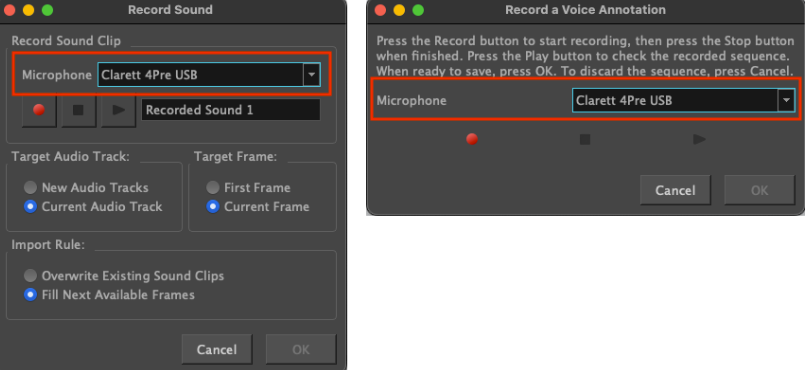
New Audio Input Options
When recording sound or a voice annotation Storyboard now recognizes other audio input devices connected to the system.
If an audio input device is detected it will be listed as an option in the Record Voice Annotation and Record Sound dialogs.
Export and Conformation
Expand Render Area When Exporting to Bitmap and XML/AAF
New options have been added to the dialog when exporting to XML or AAF for conformation (File > Conformation > Export Project), as well as the dialog when exporting to bitmap (File > Export> Bitmap).
-
Expand Render Area to Artwork: By default, exported panels include the area covered by the artwork in each panel that is being exported. When Expand Render Area to Artwork is enabled, exported panels will include the area covered by the artwork in all the panels in the scene, combined. This ensures that when all the exported panels in a scene are combined, (using non-linear editing software, for example) the elements of the scene will all be in their proper position respective to each other. Framing and timing can then be changed more easily.
-
Expand Render Area By: By default, only the area that is covered by the camera is rendered and images are cropped at the edges of the camera frame. Enabling the Expand Render Area option will include the area outside the camera frame and any details that may be there. The amount to expand is defined as a percentage of the rendering size.
Write Node Variables when Exporting to Harmony
Variables can now be used in the Write node of Harmony to build custom output paths and filenames when rendering scenes. These variables can be specified in the Custom Write Node Parameters section when exporting scenes to Harmony from Storyboard Pro. Here is the list of variables that can be used in Harmony’s write node:

Audio Export Improvements
The following improvements have been made to Export to Harmony and Export Audio commands to ensure that the files generated from both dialogs, using the same file pattern, will have consistent naming.
-
When using the Export to Audio command, it is now possible to specify a sub folder in the file pattern field to automatically create folders using the scene name variable. For example, the following file pattern “%s/Soundtrack” will create new folders for each of the scenes. Using the %s in the file pattern in this way will avoid conflicts and allow the final filename to match the "Export to Harmony" filename.
-
When using either Export Audio or Export to Harmony commands the %k (soundtrack name) variable can be used in the filename pattern to use the names of the audio track in the exported audio file.
-
When exporting to Harmony using the %t variable, the audio files will now be named correctly using the Project Title, not the Project name.
-
When using the option "Merge all Audio Tracks" during the export to Harmony, a number will no longer be appended to the audio filename automatically.
General
Improved Panel Selection Visualisation in the Timeline
An orange box is now drawn around selected panels in the Timeline to improve the visibility of the selection. A red box is drawn around the current panel, the panel that is currently displayed in the Stage, Camera and Panel views.
Import Vector Dialog
Importing PDF and AI files in the Library view is no longer available, instead the vector import command has been moved to the new “File > Import > Vector File…” dialog.
The SVG file type has also been added to the import dialog.

With this new import method PDF and AI files will create one panel per file or per artboard.
Welcome Screen Additions
It's now possible to create a project by using a Final Draft file (.fdx, .fdr) or Harmony Scene directly from the Welcome screen when starting up Storyboard Pro.
Additionally, there is also a new option to select either .sbpz or .sboard as the project format when creating a new project.
Performance Improvements
We’ve made significant improvements in performance when scrubbing, selecting, copy/pasting, and moving audio and video clips and panels. The improvements are especially noticeable when working on large projects.
Apple ProRes Support on Windows
Storyboard Pro on Windows now natively supports importing videos encoded with Apple ProRes. Importing ProRes videos is now faster since it’s not relying on a transcoder anymore. QuickTime no longer needs to be installed on the system to import videos in Apple ProRes formats.
Selecting which project version when opening a SBPZ file from the command line
When opening a SBPZ from the command line a specific version or the latest version of the project can be selected using the following arguments (Including the file extension is optional):
-
-openVersion
-
-openLatestVersion
Storyboard Project Cache Folder Location Change
In previous versions the StoryboardPro Project Cache folder was located in the Documents folder by default. Because both Apple and Microsoft sync the Documents folder in their respective cloud, every time a SBPZ project was opened, the operating system automatically uploaded the project from the cache to the cloud, resulting in a lot of unnecessary traffic as well as bloating the size of the cloud drive.
To fix this issue the StoryboardPro Project Cache default location has been changed to the following:
Windows: %LOCALAPPDATA%\Toon Boom Animation\StoryboardPro Project Cache
macOS: $HOME/Library/Application Support/Toon Boom Animation/StoryboardPro Project Cache
Update to OpenColorIO 2.2.0
The updated version of OpenColorIO in Storyboard Pro 24 provides faster conversions between colour spaces and out-of-the-box support for ACES, 4000 nits and other HiDPI colour profiles in the Storyboard Project Properties and the relevant export dialogs.
Pitch Mode View
The Pitch Mode View menu item has been removed from all extraneous menu locations except for its rightful place in the Workspace menu.
Preferences
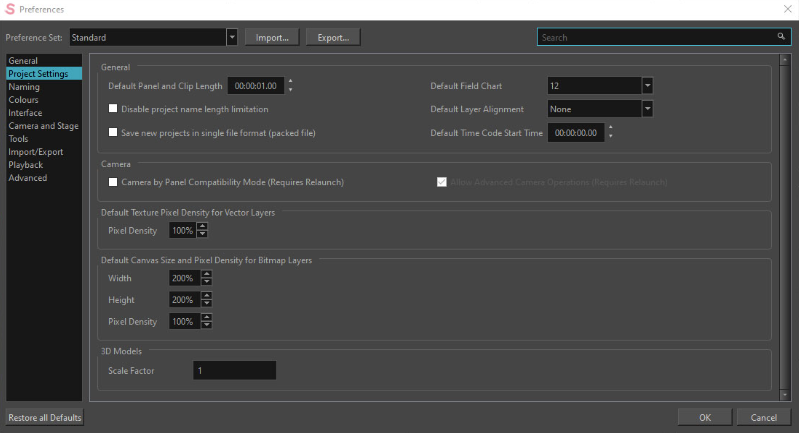
Search Filter and New Design
The Preferences window has a new look!
The tabs in the Preferences window have moved to a list format in a sidebar on the left side of the Preferences window and some preferences have moved to new or different lists and groupings that make more sense.
The new Search field in the upper right of the window will help to locate the options more quickly.
-
Start typing in the Search field to get a list of options to choose from. Typing more will narrow the search.
-
Select one of the options to open the page with the selected preference. The preference will highlight momentarily to show its location on the page.
Rendering Threads Preference
When renders fail due to memory allocation errors caused by the number of rendering threads being used by Storyboard Pro, setting the number of threads as a workaround can be done in the Preferences dialog in the Advanced tab in the Rendering section
Number of rendering threads (0 = auto).
Scripting
-
The bool setRenderImageAndVideo function has been added to the ExportManager scripting interface allowing exportToFCPXML and exportToAAF to export with or without rendering the associated images. Set to true by default.
-
“prores” has been added to the supported format when exporting using ExportManager.exportToMovie.
Fixes
-
Audio files generated when exporting multiple scenes to Harmony have a number appended at the end. SB-5507
-
Clips with multiple layers are not completely exported to Harmony SB-5265
-
Disabling the "Show Status Bar" preference hides the status bar in the Stage View but not the Camera View SB-1604
-
Cannot move keyframes on the Focal and angle z functions in the function editor more than once SB-161
-
Timecode overlay is appears over all clips that are part of the selection when moving them SB-2021
-
Movie sampling speed is not adjusted when importing a movie by doing a drag-and-drop operation from the Library or Finder SB-2096
-
Select Shortcut Alt+S not working in Reference (Model) View SB-3763
-
The "Remove Camera Keyframe current frame" shortcut is missing the word "at" and capital letters SB-4075
-
CLONE - Selecting multiple points on a 3D path by drawing a marquee in the function view does not work SB-4470
-
[Mac] Qt6 Performance drop in Playback view if Camera view is opened SB-4688
-
Cropped video track thumbnails on clips SB-4803
-
The wrong playback device is used for sound annotations and recorded sounds if the Default System device is changed while Storyboard Pro is running SB-4880
-
Performance issue with sound sync when the project contains a lot of audio clips with Speed/Duration effect SB-4897
-
Strokes appear darker on lower opacity video clip layers when Realistic Preview is turned On SB-4899
-
[Conformation] Video clips created from an animated panel are imported at the wrong scale in X SB-5177
-
First time importing this video does not work SB-4903
-
Video clip's keyframes are deselected after moving them SB-4907
-
Timeline refresh issue with Real-Time Playback: Red dirty frames remain after a render SB-4922
-
Split Panel doesn't work on last panel in scene when panel names are not in sequence SB-4929
-
Having a second SBC_SboardProject pointing to the current project can lead to freeze/crash SB-4932
-
Sound annotation output device selection issues SB-5279
-
Cannot delete panel when linked to a clip (more condition required) SB-4982
-
Link between clip and panel lost after undo SB-4983
-
Wrong timing once in Media Composer for AAF conformation with the “Export panels as movies on additional tracks" option SB-5037
-
Timeline panels disappear when changing duration of panel with transition in animatic editing mode SB-5086
-
There is no difference in height between medium and large audio track size SB-5149
-
Export movie drop the last audio frame. SB-5180
-
The horizontal scrollbar at the bottom of the Scene Rename dialog hides the last scene of the project SB-5182
-
Crash when opening application while using Overview workspace SB-5231
-
[group] wrong naming when adding New Group Layer SB-53
-
File->Import->Sound Clips... disabled when a soundtrack is not selected SB-838
-
Two warning messages about overwriting appear with Export Colours SB-4746
-
Audio clips with speed effect are not properly export (or import) in XML Conformation SB-5081
-
Audio tracks are renamed after importing an animatic project through conformation SB-1985
-
Track size is reset to Small upon Import Animatic Conformation SB-4804
-
Swap text not working in Caption in Storyboard tab SB-4420
-
Crash when opening project from 5.1.1 with soundtracks SB-4161
-
Crash when doing a drag and drop in the Library view after bringing up right-click menu SB-5381
-
Clips and Tracks toolbar entry is missing after open a second project SB-3277
-
Saving a resolution using a name that already exists doesn't work and there is no warning SB-5331
-
Transform animation is removed when splitting a group in video track layers SB-4053
-
Various issues with audio clips that have a invalid stop time (particular project) SB-5306
-
There is no right click menu in the Message Log SB-5310
-
Remove the Notify Flix option from the conformation export dialogs SB-5312
-
Spaces are ignored and number appears as garbage when directly after curly quotes when importing a Final Draft document SB-5320
-
The vertical scrollbar in the caption fields hides text under it SB-5325
-
Ease in/out values on layer animation or wrongly scaled when resizing panel SB-4084
-
Camera and layer keyframes don't move to the same frame changing a panel's duration SB-5261
-
Camera keyframes at the end of a panel are lost when reducing the duration of a panel if Camera Sync Mode is set to None. SB-5389
-
3D rotation does not work after keyframe has been removed or transformation reset SB-5199
-
The drawing grid appears behind 3D models when layer is empty SB-5416
-
SBP crashes when editing values in the Camera Tool properties after closing the Camera or Stage View SB-5502
-
The Transform tool's Snap to 3D Surface flips the layer when positioning on a flat horizontal surface SB-5422
-
Scene is converted to 3D but current layer remains in 2D mode after toggling from Pin to Camera to a different alignment setting SB-948
-
Layer position is wrongly changed when converting the shot from 3D to 2D SB-5230
-
Some layers are incorrectly moved when exported to Harmony SB-5229