The Layers view is where a scene’s layers are superimposed to form the final image.
When you import an image or draw in a panel, you are actually adding artwork to one of its layers. By default, each panel has two layers; a background layer (BG) and a foreground layer (A). As you add layers, they are automatically assigned subsequent letters in alphabetical order, but you can rename them. They are also placed on top of the selected layer or at the very top of other layers if there is no layer selected in the panel.
For tasks related to this view, see About Layers.
| ‣ | In the Panel view, click the Add View |
| Icon | Tool Name | Description |
|---|---|---|
|
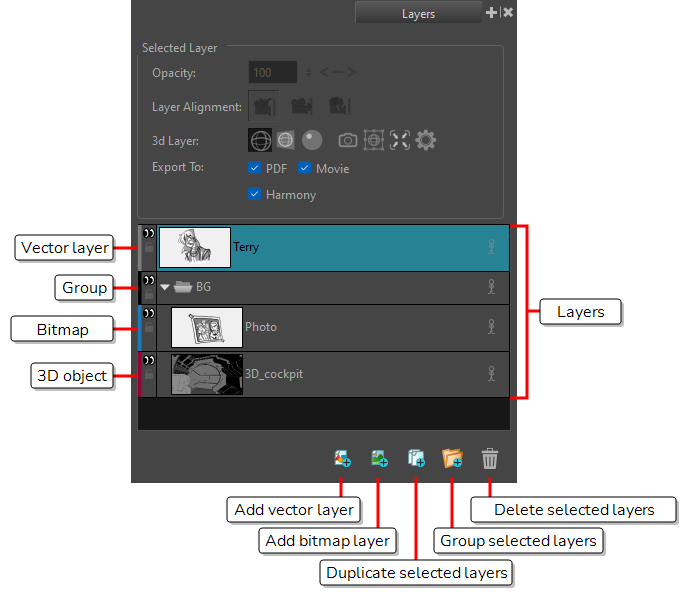
Selected Layer |
||
|
Opacity |
Allows you to adjust the opacity of the layer, to make it opaque or semi-transparent. |
|
|
Layer Alignment |
Allows you to select how the layer is aligned with the camera:
|
|
|
3D Layer |
Modes:
NOTE By selecting this mode, the Storyboard Pro scene will automatically Upgrade to 3D.
NOTE When you set your Storyboard Pro scene to Stay in 2D, your 3D model will automatically be set to this mode.
In this mode, the bitmap drawing that is rendered will be cropped to the resolution defined for the layer. This can be changed in the layer’s 3D options. TIP Once converted into a bitmap drawing, you are able to draw on and erase the 3D model.
NOTE Any changes applied to the converted bitmap layer will be lost if the 3D Layer Mode is changed.
Options:
|
|
|
Export To |
The following options allow you to control whether the selected layer appear in one of the three main export mediums for Storyboard Pro projects:
|
|
| Layers | The list of layers in the current panel. | |
|
|
Add Vector Layer |
Adds a |
|
|
Add Bitmap Layer |
Adds a bitmap layer to the Layers list. |
|
|
Duplicate Selected Layers |
Duplicates selected layers so you can quickly copy and paste in one operation. Unlike copying a layer, you cannot paste multiple copies of a layer on other panels. Duplicating layers is only available within one panel. Duplicated layers retain their names and are appended with a number. |
|
|
Group Selected Layers |
Groups selected layers. The grouped layer is named Group and appended with an underscore and a number. For example, Group_1. Each time you creat a group, the number is incremented. |
|
|
Delete Selected Layers |
Deletes the selected layers. |
 3D Mode: 3D Mode will convert your flattened model back into a 3D model. You will be able to transform the mesh of your asset with the 3D manipulator in 3D space.
 Flatten Mode:Flatten Mode will flatten a 3D model into a flattened 2D card.
 Bitmap Mode:Will convert a 3D model into a 2D bitmap drawing.
 Render to Bitmap:Captures a render of the 3D model and converts it into a bitmap drawing.
 Manipulate 3D Transform in Flatten: Allows you to manipulate a 3D model in a 2D scene.
 Move to Fit Camera View:Repositions a 3D Layer to fit within the boundaries of the Camera View.
 3D Layer Options is a settings window that allows you to adjust the camera options for the 3D Layer. For more information on the 3D layer options, see