T-SBANIM-003-007
Using the Function Editor view, you can fine-tune the animation of a layer or camera movement in very specific ways.
- In the Stage or Camera view, select a layer that contains animation. This is indicated by the yellow Animate
 icon.
icon. - From the Tools toolbar, click one of the following:
- Layer Transform
 button for layer animation.
 - Camera
 button for camera animation.
- In the Tool Properties view, click the Function Editor view
 button.
The Function Editor view is blank until you select the layer containing the functions you want to display.
- In the list of functions, check the functions that you wish to edit, and uncheck the ones you want to leave unchanged so that they do not clutter the graph view to the right.
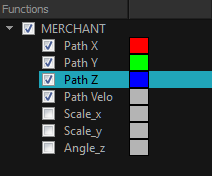
- In the function editor view, identify which functions are the coordinate (Path X, Path Y and Path Z) functions. If necessary, uncheck all other functions in the functions list so that only they are visible.
- If your functions appear too big, too small or cropped out of the view, adjust the graph view by doing one of the following:
- Click on the Reset View
 button to adjust the graph view to the size of the functions that are currently visible.
 - Click on the Reset View Vertically
 button if you only want the functions to fit within the view vertically.
 - While holding Spacebar, click and drag on the graph to pan it.
- Press 2 to zoom in on the graph or 1 to zoom out of the graph.
- Click on the Reset View
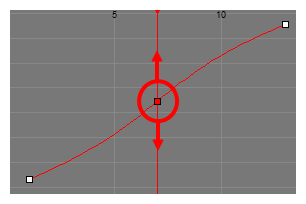
- Select one of the keyframes of one of the coordinate functions.
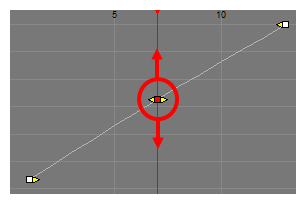
- To adjust the value of the coordinate, click on the keyframe and drag it up or down, or type in a new value in the Value field at the top.
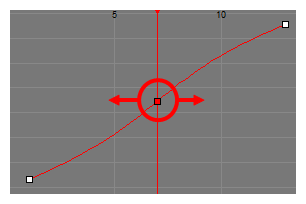
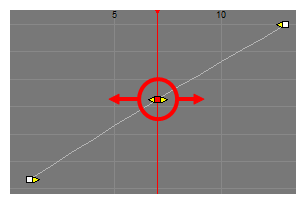
- To adjust the position of the keyframe in time, press and hold Alt, then click on the keyframe and drag it left or right. This will adjust the position of the keyframe in time for all corresponding coordinate functions (X, Y, Z and Velo).
- In the top of the function view, right of the Frame and Value fields, expand the extra parameters section. If the arrow is pointing towards the right
 , click on it so that it points to the bottom
  .
.
The Tension ![]() , Continuity
, Continuity ![]() and Bias
and Bias ![]() fields display at the right of the Frame and Value fields.
fields display at the right of the Frame and Value fields.
- In the Tension
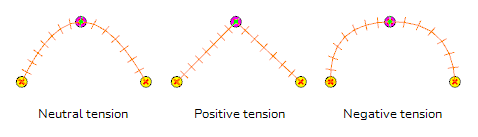
 field, enter a value between -1 and 1. A positive tension will reduce the curve of the path between keyframes. A negative tension will increase it.
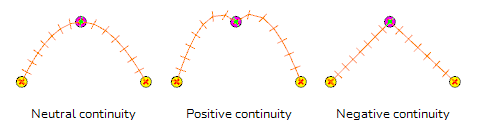
- In the Continuity field, enter a value between -1 and 1. A positive continuity will cause the path to curve beyond the trajectory between each keyframes. A negative continuity will have a reverse effect.
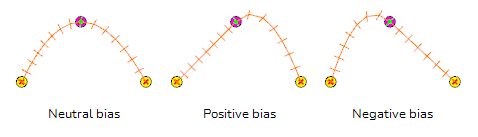
- In the Bias field, enter a value between -1 and 1. A high bias will make the curve more straight before the keyframe and more curved out after it. A negative bias will make the curve more curved out before the keyframe and more straight after it.
- In the function editor view, identify which functions are the coordinate (Path X, Path Y and Path Z) functions. If necessary, uncheck all other functions in the functions list so that only they are visible.
- If your functions appear too big, too small or cropped out of the view, adjust the graph view by doing one of the following:
- Click on the Reset View button to adjust the graph view to the size of the functions that are currently visible.
- Click on the Reset View Vertically button if you only want the functions to fit within the view vertically.
- While holding Spacebar, click and drag on the graph to pan it.
- Press 2 to zoom in on the graph or 1 to zoom out of the graph.
- Click on the Reset View
- Select one of the keyframes of one of the coordinate functions.
- To adjust the value of the coordinate, click on the keyframe and drag it up or down, or type in a new value in the Value field at the top.
- To adjust the position of the keyframe in time, press and hold Alt, then click on the keyframe and drag it left or right. This will adjust the position of the keyframe in time for all corresponding coordinate functions (X, Y, Z and Velo).
- Do one of the following to adjust the point's Bezier handles:
- Locate the yellow arrows pointing towards the left and towards the right of the keyframe. By default, those arrows will be at the same position as the keyframe. You can click and drag on the left Bezier handle to adjust the curve at the left of the function, or on the right Bezier handle to adjust the curve at the right of the function.
- In the top of the function view, right of the Frame and Value fields, expand the extra parameters section. If the arrow is pointing towards the right , click on it so that it points to the bottom . The Left Length
 , Left Angle
  , Right Length
  and Right Angle
  fields will appear at the right of the Frame and Value fields. You can use these fields to adjust the angle and length of their respective Bezier handles relative to the keyframes.
 NOTE Since extra parameters depend on the type of keyframe selected, if keyframes from several different types of functions are selected at the same time, no extra parameters will be visible. To remedy this, discard the selection by clicking anywhere inside the function graph, then click on the keyframe you wish to select.