You can select the font family, size, style, colour and alignment of text in your project's scripts as well as its captions. There are two methods to doing this:
- Using the Text Formatting toolbar, you can select text in the Script field or in any of your project's caption fields and apply formatting to that selection.
-
Using the Format Captions dialog, you can make changes to the format of all the text in all of your project's caption fields.
- If you change the alignment of your script or of a caption field, it will change the alignment of all the text in the selected text field. It is not possible to set the alignment of a specific paragraph in a text field.
- The Format Captions dialog does not affect the formatting of the text in your project's Script field.
-
In the Panel or Storyboard view, click the
 Text Formatting button above a caption field.
The Text Formatting toolbar appears, floating over the main application window.
- In the Script field of the Storyboard view or in a caption field of the Panel view, select the text you want to format.
-
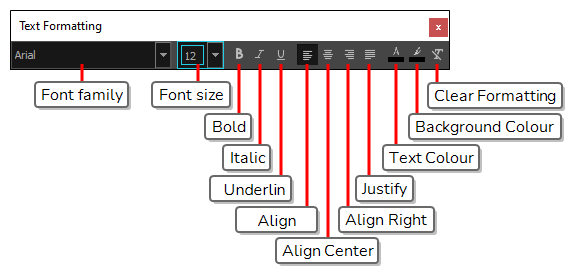
Use the Text Formatting toolbar fields and buttons to change the formatting of the text:
- Font family: Select the name of the font in which to display the selected text.
- Font size: Select the size of the font for the selected text.
 Bold: Make the selected text bold.
 Italic: Make the selected text italic.
 Underline: Make the selected text underlined.
 Align Left: Make all the text in the selected caption field aligned to the left.
 Align Center: Make all the text in the selected caption field aligned to the centre.
 Align Right: Make all the text in the selected caption field aligned to the right.
 Justify: Make all the text in the selected caption field justified. This makes the spacing between words automatically adjust so that every line of text takes all of the available horizontal space, except for the last line of each paragraph.
 Text Colour: Open the Select Colour dialog box and select a new colour for the selected text.
 Background Color: Open the Select Colour dialog and select a new background colour for the selected text.
-
Clear Formatting: Remove all font, size, style and colour formatting on the selected text. NOTE The Clear Formatting button does not affect text alignment.
- Font family: Select the name of the font in which to display the selected text.
-
In the top menu, select Captions > Format Captions.
The Format Captions dialog appears.
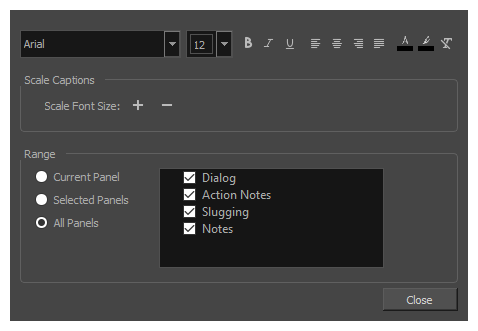 IMPORTANT Any changes made to the format of captions in your project using this dialog will take effect immediately on all the captions in all of the panels specified in the Range section of this dialog, and will override any local formatting.
 - In the Range section of the dialog, select the range of panels for which you want to reformat captions:
- To reformat the text in the caption fields of a specific panel, select Current Panel. Then, in the Thumbnails or Timeline view, select which panel for which you want to reformat the captions.
To reformat the text in the caption fields of several specific panels, select Selected Panels. Then, in the Thumbnails or Timeline view, select all the panels for which you want to reformat the captions.
TIPSTo select several panels, do one of the following:
- While holding Ctrl (Windows) or ⌘ (macOS), click on each panel you want to add to your selection.
- While holding Shift, click on the first panel you want to add to your selection, then on the last panel you want to add to your selection. Both panels you clicked on and every panel in-between will be added to the selection.
- To reformat the text in the caption fields of all the panels in your project, select All Panels.
- In the list of caption fields inside the Range section, make sure that all the caption fields that you want to reformat are checked, and that all the caption fields for which you want to preserve the current formatting are unchecked.
- In the text formatting controls at the top of the dialog, do all that applies:
- To change the font of all the captions in the specified range, select that font in the Font family drop-down.
- To specify a new font-size for all the captions in the specified range, select or type in that font size in the Font size drop-down.
- To make all the text in the specified range bold, click Bold once.
- To make all the bold text in the specified range not bold, click Bold twice.
- To make all the text in the specified range italic, click Italic once.
- To make all the italic text in the specified range not italic, click Italic twice.
- To make all the text in the specified range underlined, click Underline once.
- To make all the underlined text in the specified range not underlined, click Underline twice.
- To make all the captions in the specified range aligned to the left, click Align Left.
- To make all the captions in the specified range aligned to the centre, click Align Center.
- To make all the captions in the specified range aligned to the right, click Align Right.
- To make all the captions in the specified range justified, click Justify. This will make the spacing between words automatically adjust so that every line of text takes all of the available horizontal space, except for the last line of each paragraph.
- To change the text colour of all the text in the specified range, click on the Text Colour button and, in the Select Colour dialog, select the desired colour for the text, then click OK.
- To change the background colour of all the text in the specified range, click on the
 Background Colour button and, in the Select Colour dialog, select the desired colour for the text, then click OK.
 To remove all the formatting in the specified range, click on the
Clear Formatting button. All the text in the range will be the same font, size, style and color. NOTE The Clear Formatting button does not affect text alignment.
- In the Scale Captions section, do one of the following:
- To make all of the text in the selected range proportionally bigger, click
 Scale up point size.
- To make all the text in the selected range proportionally smaller, click
 Scale down point size.
- To make all of the text in the selected range proportionally bigger, click