In Storyboard Pro, you can create an animatic from your storyboard by using the Timeline view. The Timeline view is very much like the timeline in a video editing software. Among other things, it allows you to visually adjust the timing of each panel, to import, cue and clip sound and video clips, to animate camera movements, to animate layers and to add transitions between scenes. Hence, it will accompany you in each step towards making your animatic.
For tasks related to this view, see About Timing.
- Do one of the following:
- In the top-right corner of a view, click on the Add View
 button and select Timeline.
 - Select Windows > Timeline.#
| Icon | Functionality | Description | ||||||||||
|---|---|---|---|---|---|---|---|---|---|---|---|---|
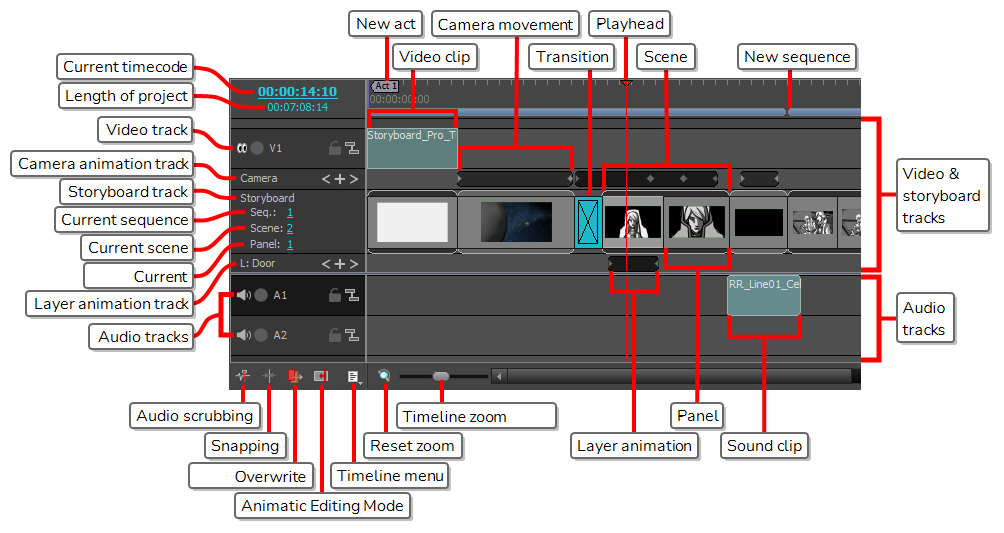
| -- | Current timecode | The timecode of at which the timeline cursor is. You can click and drag the timecode to move the timeline cursor. | ||||||||||
| -- | Length of project | The total length of the animatic. | ||||||||||
| Video & storyboard tracks | ||||||||||||
| -- | Video track |
Video tracks can be added below or above the Storyboard track to show images or videos in overlay or underlay. Each video track has the following toggle buttons:
TIP If you hold the Alt key and click on a toggle button for a video track, it will turn on the switch for that video track, and toggle it on or off for every other video track.
|
||||||||||
| -- | Camera animation track |
For scenes where the camera is animated, this allows you to see and manipulate the keyframes of the camera movements. A dark grey bar displays between camera keyframes to indicate that the camera moves.
|
||||||||||
| -- | Storyboard track |
The track containing the panels and scenes of your storyboard. Contrary to the Thumbnails view, the width of each panel and scene is relative to their length in the animatic. |
||||||||||
| -- |
Current sequence |
The number of the sequence in which the timeline cursor is. |
||||||||||
| -- | Current scene |
The number of the scene in which the timeline cursor is. |
||||||||||
| -- | Current panel |
The number of the panel in which the timeline cursor is. |
||||||||||
| -- |
Layer animation track |
If the currently selected layer is animated, this allows you to see and manipulate the keyframes of the layer. A dark grey bar displays between layer keyframes to indicate that the layer is animated.
NOTE The name of the currently selected layer is displayed in the layer animation track, just right of L:.
|
||||||||||
| Audio tracks section | ||||||||||||
| -- | Audio tracks |
Where you can put sound clips to play sound along with your animatic. Your project can have several audio tracks. Each audio track has the following toggle buttons:
TIP If you hold the Alt key and click on a toggle button for an audio track, it will turn on the switch for that audio track, and toggle it on or off for every other audio track.
|
||||||||||
|
|
Audio Scrubbing |
When enabled, the part of the soundtrack that is at the current frame will play every time you move the timeline cursor, allowing you to navigate the timeline of your animatic by sound. This makes it easier to synchronize the action and the audio in your animatic. |
||||||||||
|
|
Snapping |
Enable this option to make sound clips align with the beginning and end of panels in the animatic when you move or resize them. |
||||||||||
|
|
Overwrite Sound Clips |
Enable this option to be able to move a video or sound clip over another video or sound clip. The part of the target clip that meshes with the clip being moved will be cut out. |
||||||||||
|
|
Animatic Editing Mode |
By default, every change you make in the lengths of your scenes and panels will result in subsequent scenes and panels to ripple backward or forward, so as to make sure there is no hole in the timeline. When Animatic Editing Mode is enabled, you can reposition the in-point and out-point of each panel without affecting anything else in your your animatic. This means that, in this mode, shortening or deleting a panel creates a hole in the timeline in which another panel can be extended, moved or created. You can also delete panels or scenes and leave holes behind instead of rippling subsequent panels backward. Then, in the gaps you created in your animatic, you can move existing panels, create new panels or resize a panel next to the gap to fill it.
In this way, Animatic Editing Mode makes the workflow in Storyboard Pro more similar to that of a typical video editing software, which may make editing easier for users who are familiar with this kind of application. TIP You can also temporarily toggle Animatic Editing Mode by pressing and holding Ctrl (Windows) or ⌘ (macOS).
|
||||||||||
| -- | Timeline menu |
Opens a menu containing the following options:
|
||||||||||
| -- |
New act |
If acts are enabled, these markers indicate when a new act starts as well as the number of this act. NOTE Acts are disabled by default, and can be enabled in the General tab of the Preferences dialog.
|
||||||||||
| -- | Video clip | A video clip can contain a still image or a video. Each video clip is defined by a teal rectangle in a video track. You can change the duration of still images and clip videos by clicking and dragging the left or right edge of video clips. You can also click and drag video clips to move them backward or forward in time, or to move them from one video track to another. | ||||||||||
| -- |
Transition |
This indicates transitions between two scenes. The transition will have a specific appearance depending on the type of transition used:
|
||||||||||
| -- |
Timeline cursor |
Allows you to select a point in your timeline to work on your animatic. Dragging the timeline cursor displays the animatic at the precise point in time where the cursor is in the Stage and Camera views, allowing you to scrub through your animatic. It will also automatically set the current panel to the panel the cursor is over, allowing you to edit that panel. |
||||||||||
| -- |
Scene |
Scenes are defined by rounded rectangles with their upper and lower edges visible above and below their panels. |
||||||||||
| -- |
Camera movement |
Each keyframe in the Camera animation track defines a position for the camera. If two or more camera keyframes are in the same scene, the camera will be animated from each keyframe to the next keyframe, creating a camera movement. |
||||||||||
| -- | New sequence | If your project contains sequence, each sequence is defined in the Timeline view by a purple bar above the scenes the sequence contains. A new sequence is indicated by a break in the purple bar. | ||||||||||
| -- | Reset zoom | Sets the zoom level of the Timeline view to its default value. | ||||||||||
| -- | Timeline zoom slider | Allows you to change the zoom level of the Timeline view. The Timeline view only zooms horizontally, meaning zooming in will make panels, animations and sound clips span over more horizontal space, but they will take the same amount of vertical space. | ||||||||||
| -- | Layer animation | Each keyframe in the Layer animation track defines a position for the currently selected layer. If two or more layer keyframes are in the same panel, the layer will be animated from each keyframe to the next keyframe, creating a layer animation. | ||||||||||
| -- | Panel | Each panel displays a thumbnail and is separated by a black vertical bar in the storyboard track. You can change the length of each panel by clicking and dragging its right edge. | ||||||||||
| -- | Sound clip |
Each sound clip is defined by a teal rectangle in an audio track. You can clip sound clips by clicking and dragging their left or right edge. You can also click and drag sound clips to move them backward or forward in time, or to move them from one audio track to another. TIP You can enable the Show Waveform option to get a visual idea of the content of sound clips, which can help you synchronize the action with the audio. You can also enable the Show Volume option to display a volume envelope on each sound clip, to which you can add keyframes and modulate the volume of sound clips as they play. These options are available in the Sound top menu, in the right-click menu of audio tracks and in the Timeline menu
|
||||||||||