The PDF Profile dialog box allows you to create or modify a PDF profile, which is a set of options for exporting a storyboard as a PDF document.
The PDF Profile dialog contains the following tabs, each of which contains a specific type of options:
For tasks related to this window, see About Exporting to Portable Document Format (.pdf).
- Do one of the following:
- From the PDF Export view or window, click Edit.
- Access Top Menu > File > Export > PDF. In the Export to PDF dialog box, click
.
- Access Top Menu > File > Export > PDF. In the Export to PDF dialog box, click
and select Edit Profile.
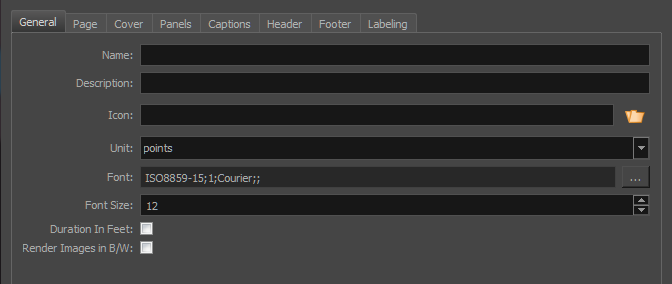
General Tab
The General tab lets you set up a personalized layout for your PDF.
|
Parameter |
Description |
|
Name |
Lets you enter a a name for your custom layout or edit the existing name. |
|
Description |
Lets you enter a short description of the layout. This description only appears in the PDF Profile dialog box. |
|
Icon |
Lets you Select an image file representing the custom layout you are creating; it will be displayed in the profile list. For best results, your image should be 45x45 pixels. |
|
Unit |
Lets you select the unit of measurement (points, mm, cm or inches) used in the Page, Panels, Header and Footer tab of the PDF Profile dialog box. The unit measurement is used for margin, spacing, height and width of a panel, header or footer. |
|
Font |
Lets you select any font installed on your system to use for all text in the PDF document. To export Unicode characters to your PDF document, click the [...] button to select the language encoding and the embedded PDF font that will be used to display the text in the PDF document. |
|
Font Size |
Lets you define the size of the font. |
|
Duration in Feet |
Lets you set the duration value in feet. The foot measurement was used mostly by traditional animators. In the XSheet, a foot contains 16 frames. |
|
Render Image in B/W |
Creates a black and white PDF instead of colours. |
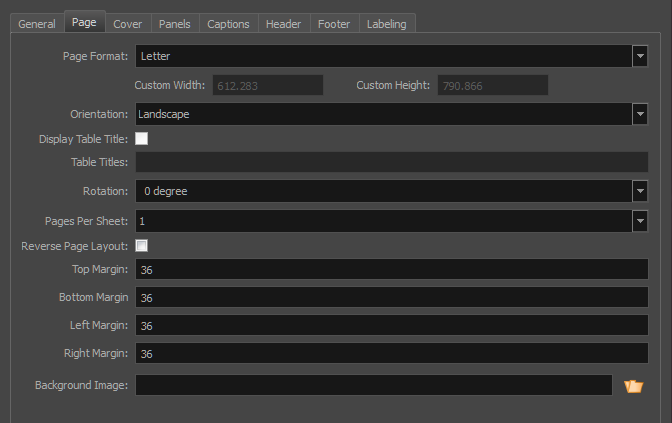
Page Tab
| Parameter | Description |
|
Page Format |
Select the type of page you want to print on:
If you select Custom, fill in the desired width and height. |
|
Custom Width |
Lets you enter the desired width of your PDF. The value will be written in a way to reflect the set unit type in the General tab of the PDF Profile dialog box. |
|
Custom Height |
Lets you enter the desired height of your PDF. The value will be written in a way to reflect the set unit type in the General tab of the PDF Profile dialog box. |
|
Orientation |
Lets you set the PDF to portrait or landscape orientation. Options include:
|
|
Display Table Title |
Lets you set the titles used in the main table. Use a semicolon (;) to separate each entry. You can also specify the font size after a title. If you write more titles than the number of columns in the storyboard, the PDF will only use those written first. The font size value must be written after the title and a coma. If you want to make sure that each title respects the naming of the captions, you can write <caption_titles> as the title. This entry will affect all of the captions in the storyboard. For example: Cut;Picture,15;Caption,15;Time |
|
Rotation |
Lets you set the degree of clockwise rotation of the storyboard on the printed page. |
|
Pages Per Sheet |
Lets you select the number of storyboard pages to print on each sheet. |
|
Reverse Page Layout |
Lets you reverse the position of the captions in relation to the panels. |
|
Top Margin |
Lets you enter the distance from the top page edge. The value will be written in a way to reflect the set unit type in the General tab of the PDF Profile dialog box. |
|
Bottom Margin |
Lets you enter the distance from the bottom page edge. The value will be written in a way to reflect the set unit type in the General tab of the PDF Profile dialog box. |
|
Left Margin |
Lets you enter the distance from the left page edge. The value will be written in a way to reflect the set unit type in the General tab of the PDF Profile dialog box. |
|
Right Margin |
Lets you enter the distance from the right page edge. The value will be written in a way to reflect the set unit type in the General tab of the PDF Profile dialog box. |
|
Background Image |
Lets you select an image to use as a watermark on all pages, except the cover. |
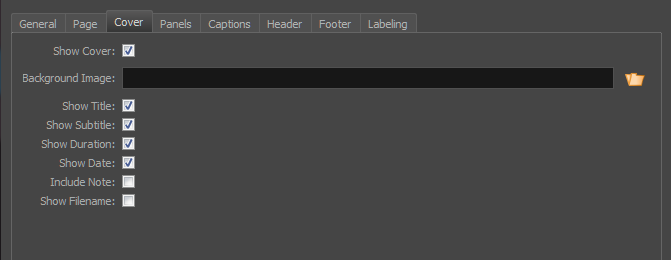
Cover Tab
| Parameter | Description |
|
Show Cover |
Lets you insert a cover as the first page of the PDF. |
|
Background Image |
Lets you select an image (.bmp, .jpg or .png) to use as a watermark on the cover. |
|
Show Title |
Displays the project title defined in the storyboard properties. |
|
Show Subtitle |
Displays the project subtitle defined in the storyboard properties. You can find the properties in the Top Menu > Storyboard > Properties. |
|
Show Duration |
Displays the duration (as a time code or frame) of the selected storyboard panels. |
|
Show Date |
Displays the date of export. |
|
Include Note |
Lets you include a revision note on the cover page. |
|
Show Filename |
Displays the filename of the PDF on the cover. |
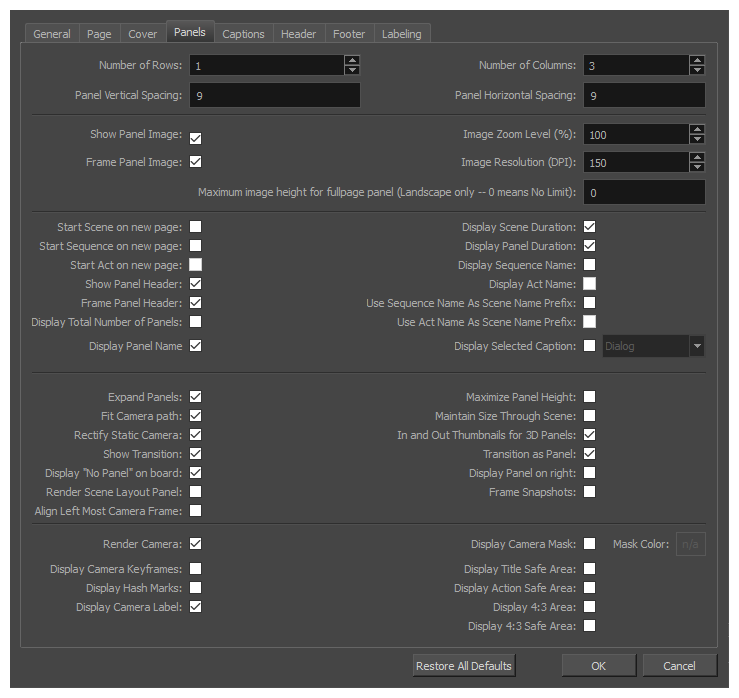
Panels Tab
| Parameter | Description |
|
Number of Rows |
Defines the number of panel rows displayed per page. |
| Panel Vertical Spacing |
Defines the vertical spacing between panels. The value will be written in a way to reflect the set unit type in the General tab of the PDF Profile dialog box. |
| Panel Horizontal Spacing | Defines the horizontal spacing between panels. The value will be written in a way to reflect the set unit type in the General tab of the PDF Profile dialog box. |
| Number of Columns |
Defines the number of panel columns displayed per page. |
|
Show Panel Image |
Displays each panel’s visual content. |
|
Frame Panel Image |
Displays a rectangle around the panel’s visual content on each page. |
|
Image Zoom Level (%) |
Displays the image in the panel at a percentage of the original size. |
|
Image Resolution (DPI) |
Defines the DPI value of the exported images in the PDF storyboard. The default value is 150. A higher value increases the sharpness of the images, as well as the final file size of your PDF. |
|
Maximum image height for fullpage panel (Landscape only - 0 = No Limit) |
Defines the maximum height a panel can have when it is full page. |
|
Start Scene on New Page |
Makes each new scene start on a new page. |
|
Start Sequence on New Page |
Makes each new sequence start on a new page. |
|
Start Act on New Page |
Makes each new act start on a new page. |
|
Show Panel Header |
Displays each panel’s shot name, panel number, and duration as a header. |
|
Frame Panel Header |
Displays a rectangle around the panel header on each page. |
|
Display Total Number of Panels |
Displays the total number of panels in the scene in the panel header. |
|
Display Scene Duration |
Displays the duration of each scene. |
|
Display Panel Duration |
Displays the duration of each panel. |
|
Display Sequence Name |
Displays the name of the sequence. |
|
Display Act Name |
Displays the name of the act. This option is grayed out by default. To activate it, enable the option called Enable Acts in the General tab of the Preferences dialog box. |
|
Use Sequence Name as Scene Name Prefix |
Displays the sequence name as part of the scenes’ names. For example, if scene 18 appears in the second sequence, it will be written like this: 2-18. This option can also be set at the same time as Use Act Name As Scene Name Prefix. If so, the prefix for the act will appear before the prefix for the sequence. Thus, if scene 18 from the second sequence is in the first act, it will be written like this: 1-2-18. |
|
Use Act Name as Scene Name Prefix |
Displays the act name as part of the scenes’ names. For example, if scene 18 appears in the first act, it will be written like this: 1-18. This option can also be set at the same time as Use Sequence Name As Scene Name Prefix. If so, the prefix for the sequence will appear after the prefix for the act. Thus, if scene 18 from the second sequence is in the first act, it will be written like this: 1-2-18.
|
|
Display Selected Caption |
Displays the content of the selected caption. |
|
Expand Panels |
Displays camera motion (such as pan, tilt, or zoom) in the image across several panels. |
| Fit Camera Path |
Ensures the camera movement is included in a single panel space. |
| Rectify Static Camera | If the camera in a panel is at an angle and there is no camera movement in the panel, it will be rendered as if the camera was straight, preventing it from taking extra space in the storyboard. |
|
Show Transition |
Displays transition information (Transition type and duration). |
|
Display "No Panel" on Board |
Replaces the panel’s image with an X and the text “No Panel” above it. This is used when there is not enough space to display a panel on the same page. The panel with the image is normally displayed on the next page or the nearest one with enough space to show the image on. |
| Render Scene Layout Panel |
When a scene has a camera movement, this adds an extra thumbnail for the scene's layout before the thumbnails for the scene's panels. This thumbnail contains the camera movement for the entire scene, as well as the artwork in the first panel of that scene. |
| Align Left Most Camera Frame | Aligns the left most camera keyframe with the panel frames in the exported PDF. The artwork and camera movement will spread over the caption columns and to the other rows depending on the range of camera movement. It works best with the Japanese PDF profiles. |
|
Maximize Panel Height |
Displays the panel at the maximum of its height. |
|
Maintain Size Throughout Scene |
Keeps every panel of your printed storyboard the same size. |
|
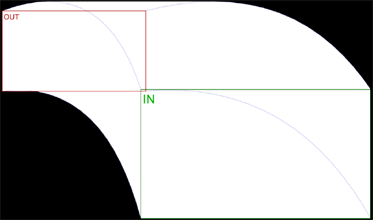
In and Out Thumbnails for 3D Panels |
Renders an in thumbnail and an out thumbnail for the 3D panel, as if the user would have added a snapshot at both ends of the panel. |
|
Transition as Panel |
Displays a transition as a panel. |
| Display Panel on Right |
When using the Vertical profile, displays images on the right side of the page instead of the left. |
| Frame Snapshots | When a panel contains snapshots, this renders the snapshots as framed by the camera at the time of the snapshot. This means that the thumbnail is rendered from the camera's point of view, that artwork outside the camera frame is not rendered, and that the camera movements are not rendered over the artwork. |
|
Render Camera |
Displays the camera frame and camera path on the PDF export. NOTE
Enabling this option is required for the following options to have an effect:
|
|
Display Camera Keyframes |
Prints the different camera keyframes on the exported images. The actual camera keyframes on each panel are rendered instead of just the in and out frames. To see this change, enable the Render Camera option. |
|
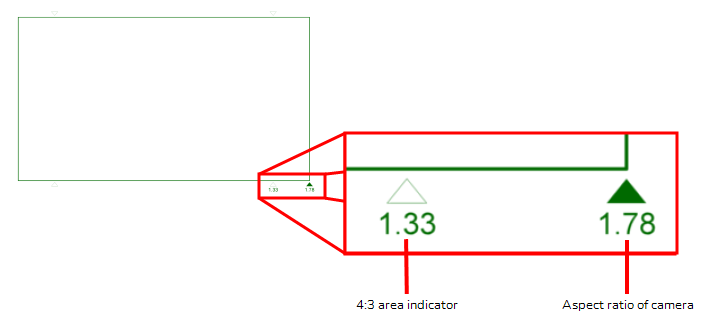
Display Hash Marks |
Displays the hash marks below each camera frame, which indicate the aspect ratio of the camera and the position of the horizontal limits of the 4:3 area
|
|
Display Camera Label |
Prints the In and Out camera labels of your camera moves to your storyboard. But if the Display Camera Keyframes option is selected, In and Out will be replaced by letters (A, B, C, and so on), representing each camera keyframe. To see this change, enable the Render Camera option. |
| Display Camera Mask |
Covers everything outside of the camera frames and the camera's trajectory with a solid colour.
|
|
Mask Color |
The colour of the camera mask. |
|
Display Title Safe Area |
Prints the Title Safe Area over the picture. By default, this area is 20% smaller than the camera frame. It is used as a guideline of the area that CRT displays might crop out of the picture. Visual elements such as text and logos should be placed within this area. NOTE The size of this area can be changed in the Camera tab of the Preferences dialog
|
| Display Action Safe Area |
Prints the Title Safe Area over the picture. By default, this area is 20% smaller than the camera frame. It is used as a guideline of the area that CRT displays might crop out of the picture. Visual elements such as text and logos should be placed within this area. NOTE The size of this area can be changed in the Camera tab of the Preferences dialog
|
|
Display 4:3 Area |
Prints the 4:3 area on each panel of your storyboard which has a camera movement. To see this change, enable the Render Camera option. |
|
Display 4:3 Safe Area |
Prints the 4:3 safe area on each panel of your storyboard which has a camera movement. To see this change, enable the Render Camera option. |
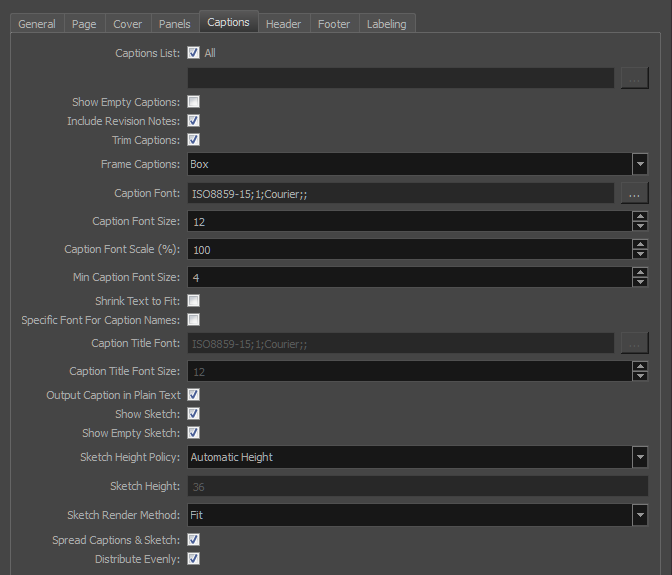
Captions Tab
| Parameter | Description |
|
Captions List |
Includes every caption in the PDF. You can deselect this option to activate the browsing button. Click the Browse button to display a list of all the captions. Select the ones to export. |
|
Show Empty Captions |
Includes the empty captions of your project in the PDF. |
|
Include Revision Notes |
Adds revision notes as a new caption. Revision notes can only exist on panels that were marked as changed |
|
Trim Captions |
Removes empty lines after captions. |
|
Frame Captions |
Lets you decide how captions are framed. Options include:
|
|
Caption Font |
Lets you select the font for the caption. |
|
Caption Font Size |
Lets you define the size of the font. |
|
Caption Font Scale (%) |
Determines the scale factor used when converting a font to a PDF font (screen resolution versus print resolution). |
|
Min Caption Font Size |
Lets you set the minimum font size to use when shrinking captions. |
|
Shrink Text to Fit |
Reduces size of captions if they do not fit in the panel. |
|
Specific Font for Caption Names |
Enables the Caption Title Font and Caption Title Font Size options. |
|
Caption Title Font |
Lets you select the font for the caption title. |
|
Caption Title Font Size |
Lets you set the size of the font for the caption title. |
|
Output Caption in Plain Text |
Ignores text formatting, such as bold, italics, that may be in the caption fields in the interface. |
|
Show Sketch |
Prints the Sketch captions to your storyboard. This option needs to be enabled to give access to:
|
|
Show Empty Sketch |
Prints the Sketch captions even if they are empty. To see this change, enable the Show Sketch option. |
|
Sketch Height Policy |
Sets the height rule for the Sketch captions:
To see this change, enable the Show Sketch option. |
|
Sketch Height |
Defines the maximum height a Sketch caption can be. Set the Select Max Height in the Sketch Height Policy to make this option available.The value will be written in a way to reflect the set unit type in the General tab of the PDF Profile dialog box. To see this change, enable the Show Sketch option. |
|
Sketch Render Method |
Sets the rule of how your sketch will appear in the Sketch caption.
To see this change, enable the Show Sketch option. |
|
Spread Captions & Sketch |
Adapts the box to the text or sketch and spreads it across the next panel if necessary. When this option is deselected, the caption text or a sketch that is too long or big for the space available in the box will be cut. |
| Distribute Evenly |
Keeps the same size of caption boxes throughout the storyboard. When this option is deselected, the caption boxes are set to fit the content. |
Header Tab

| Parameter | Description |
|
Display Header |
Displays a header on each page (except the cover). The header includes the project title, project subtitle, and project episode defined in the storyboard properties. |
|
Header Height |
Lets you enter the size of the footer for each page except the cover. The value will be written in a way to reflect the set unit type in the General tab of the PDF Profile dialog box. |
|
Header Logo |
Lets you select an image (.bmp, .jpg or .png) to display on the header. Scale the logo to match header's height. |
|
Position of Logo |
Sets the position of your logo in the header. |
|
Show Title |
Displays the project title defined in the storyboard properties. You can find the properties in the Top Menu > Storyboard > Properties. |
|
Show Subtitle |
Displays the project subtitle defined in the storyboard properties. You can find the properties in the Top Menu > Storyboard > Properties. |
|
Show Filename |
Displays the filename of the PDF on the cover. |
|
Show Page Number |
Displays a page number in the header on each page (except the cover). Affects the following options:
|
|
Use Sequence Name as Page Number Prefix |
Displays the sequence name as part of the page number. For example, if the panels (or at least the first panel) on page 25 are in the third sequence, the page number will appear as Page 3-25. This option can also be set at the same time as Use Act Name As Page Number Prefix. If so, the prefix for the act will appear before the prefix for the sequence. Thus, if the panels from page 25 are also in the first act, the page number section will display as: Page 1_3-25. In this example, the underscore is used after the act number because it is followed by the prefix of the sequence. |
|
Use Act Name as Page Number Prefix |
Displays the act name as part of the page number. For example, if the panels (or at least the first panel) on page 25 are in the first act, the page number will appear as Page 1-25. This option can also be set at the same time as Use Sequence Name As Page Number Prefix. If so, the prefix for the act will appear before the prefix for the sequence. Thus, if the panels from page 25 are also in the third sequence, the page number section will display as Page 1_3-25. In this example, the underscore is used after the act number because it is followed by the prefix of the sequence. |
|
Show Total Page Number |
Shows the current page number, as well as the total number of pages of the storyboard. To see this change, enable the Show Page Number option. For example, if this option is enabled, Page 3/7 will display, but if this option is disabled, Page 3 will display. |
|
Start Page Number |
Defines the first number to start the page numbering. To see this change, enable the Show Page Number option. |
|
Sub Page Number |
If you already printed your storyboard, but have recently added new panels or a new scene to your project, using this option allows you to create a PDF of the new panels or new scenes in your storyboard that can be inserted into the existing print without causing issues with the page numbers. This option does the following:
For example: Let's say you have a storyboard printed out, but a new scene was added to the Storyboard Pro project, and this new scene is to be inserted at page 100 of the original printed storyboard. Instead of reprinting the whole storyboard, you can simply print out the scene. In this case, you could set the Start Page Number option to 100, and then type -1 in the Sub Page Number field. This would result in each page in the PDF for the new scene to be numbered like so: 100-1, 100-2, 100-3, etc. With the pages numbered in this way, the printed PDF can be inserted at page 100 of your original printed storyboard, without affecting the existing page numbers. TIP This option can also use letters to number sub-pages. In the previous example, setting this option to a would result in pages numbered like so: 100a, 100b, 100c, etc.
|
|
Frame Page Number |
Displays a rectangle around the page number in the header on each page. |
|
Font |
Lets you select any font installed on your system for the footer text in the PDF document. |
|
Font Size |
Lets you define the size of the font. |
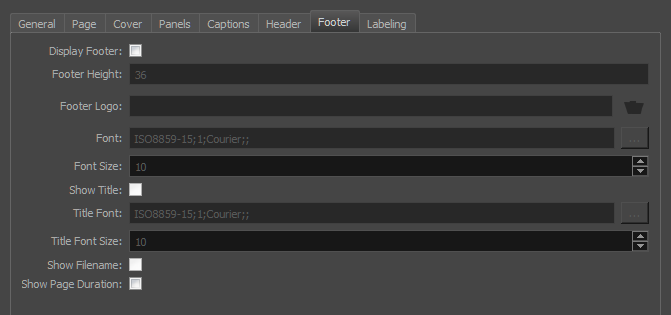
Footer Tab
| Parameter | Description |
|
Display Footer |
Displays a footer on each page (except cover). The footer includes the project copyright, defined in the storyboard properties. |
|
Footer Height |
Lets you enter the size of the footer for each page except the cover. The value will be written in a way to reflect the set unit type in the General tab of the PDF Profile dialog box. |
|
Footer Logo |
Lets you select an image file (.bmp, .jpg or .png) to use as the logo in the footer. Scale the logo to match footer's height. |
|
Font |
Lets you select any font installed on your system for the footer text in the PDF document. |
|
Font Size |
Lets you define the size of the font. |
|
Show Title |
Displays the project title defined in the storyboard properties. |
|
Title Font |
Lets you select the font for the title in the footer. |
|
Title Font Size |
Lets you set the font size for the title in the footer. |
|
Show Filename |
Displays the filename of the PDF on the cover. |
|
Show Page Duration |
Displays the duration per page. For example, (03:11). |
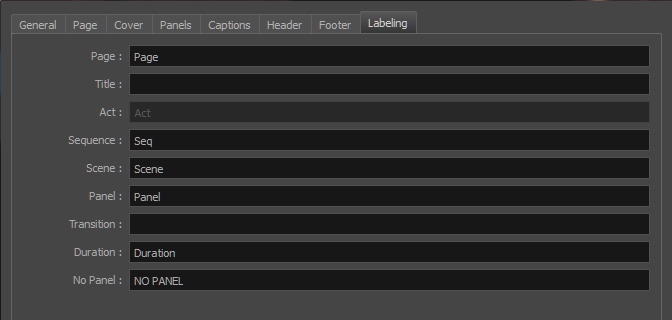
| Parameter | Description |
|
Page |
Lets you enter a substitute for the word page. |
|
Title |
Lets you enter a substitute for the word title. |
|
Act |
Lets you enter a substitute for the word act. This option is grayed out by default. To activate it, enable the Enable Acts option in the General tab of the Preferences dialog box. Then, select the Display Act Name option in the Panels tab of the PDF Profile dialog box. |
|
Sequence |
Lets you enter a substitute for the word sequence. To see this change, select the Display Sequence Name option in the Panels tab of the PDF Profile dialog box. |
|
Scene |
Lets you enter a substitute for the word scene. |
|
Panel |
Lets you enter a substitute for the word panel. |
|
Transition |
Lets you enter a substitute for the word transition. To see this change, select the Transition As Panel option in the Panels tab of the PDF Profile dialog box. |
|
Duration |
Lets you enter a substitute for the word duration. |
|
No Panel |
Lets you enter a substitute for the words no panel. To see this change, select the Display "No Panel" on board option, in the Panels tab of the PDF Profile dialog box. |