The Import Videos/Images as Clips dialog allows you to import still images or movie files into video tracks in your projects. Video tracks are independent from your animatic. They can be put above the storyboard track to display video and image clips over the elements in the storyboard, or underneath the storyboard track to display its clips behind the storyboard.
Movie files can be imported as video clips to be played in your projects. Still images can be imported as static video clip which can be made to last any amount of time.
You can import any image file supported by Storyboard Pro as a video clip. You can also import movie files in QuickTime Movie (.mov) or MPEG-4 (.mp4, .m4v) format which are encoded with the H.264. On Windows only, you can also import Windows Media Video (*.wmv) files, and on macOS only, you can also import QuickTime Movie (.mov) files encoded in Apple ProRes.
- Do one of the following:
- In the top menu, select File > Import > Videos/Images as Clips.
- Right-click on the video track in which you want to import clips, then select Import Videos/Images as Clips.
- Right-click on the empty space above or below the tracks in the Timeline view, then select Import Videos/Images as Clips.
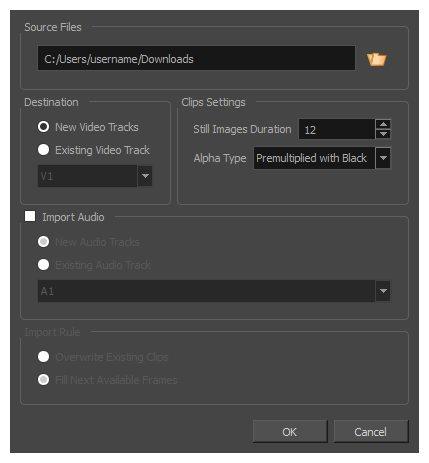
The Import Video Clips dialog box opens.
| Parameter | Description |
|---|---|
|
Source Files |
Allows you to browse for and select the image or movie files to import as clips. |
|
Destination |
Allows you to select the video track in which to import the clips. |
|
New Video Tracks |
Creates a new video track and imports the clip in this new track. If you are importing several clips, a video track will be created for each clip. Each clip will be placed into its own video track and cued at the same time. NOTE If you choose to import your movie's audio streams into the same audio track, the audio clips will have to be cued one after the other. Hence, the video clips will also be cued one after the other despite being imported into different video tracks.
|
|
Existing Video Track |
Allows you to select, using the drop-down below, a video track in which to import the clips. If you are importing several clips, the imported clips will be added to the same video track, one after the other. |
| Clip Settings | |
|
Still Images Duration |
If you are importing still images, clips will be created from these images by displaying the static image for a certain amount of frames. This allows you to set the length, in frames, of the image clips that will be imported in your project. For example, if you want to import image clips that last 1 second each, and the frame rate of your project is 24 frames per second, set this option to 24. This option is ignored when importing movie files, as they have their own length. |
|
Alpha Type |
If you are movie files with transparency, this allows you to select the transparency mode of your clips, so that they are rendered properly. The transparency mode is how the colour values in semi-transparent pixels have been encoded relative to their alpha value. Selecting the right alpha type for your video clip will ensure that it is properly blended with the other visual elements in your animatic.
TIP
If you are not sure about the alpha type of your movie file, select Straight. Then, once your clips are imported, view them in the Stage view. If the semi-transparent pixels in your movie appear too dark, change the clip's Alpha Type to Premultiplied with Black. If the transparent pixels in your movie appear too light, change the Alpha Type of the clip to Premultiplied with White. You can change the Alpha Type of a video clip by right-clicking on the clip in the Timeline view, then selecting Alpha Type in the context menu. NOTE If you are importing image files, this option will be ignored. Image clips are imported using straight alpha.
|
| Import Audio |
If checked, Storyboard Pro will import the audio stream of the selected video file as a sound clip and insert it in an audio track in your project. |
|
New Audio Tracks |
Creates a new audio track and imports the movie file's audio stream in this new track. If you are importing several movie files, an audio track will be created for each movie file that contains an audio stream. Each audio stream will be imported as a sound clip into its own audio track and cued at the same time. NOTE If you choose to import your video clips into the same video track, the video clips will have to be cued one after the other. Hence, the audio clips for these movie files will also be cued one after the other despite being imported into different audio tracks.
|
|
Existing Audio Track |
Allows you to select, using the drop-down below, an audio track in which to import the movie file's audio stream. If you are importing several movie files, the sound clips imported from these movie files will be added to the same audio track, each cued at the same time as the video clip imported from the same movie file. |
|
Import Rule |
When importing in an existing video track, this decides what happens if the clips are imported where videos clips are already present.
NOTE These options are unavailable if no video track is selected.
|