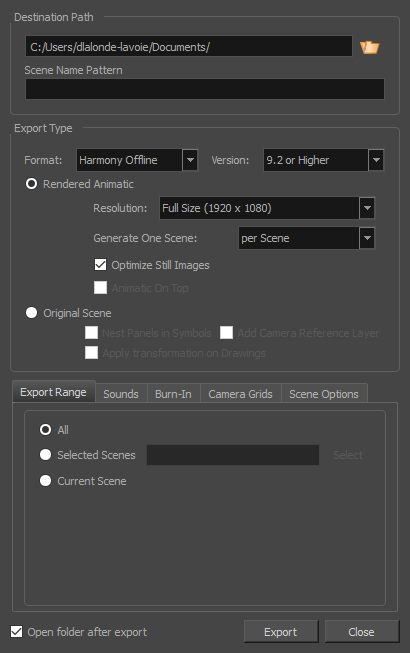
The Export to Harmony dialog allows you to export your animatic into a set of Harmony scenes. After the export, you can open the scenes Toon Boom Harmony right away and kickstart the production of your animation project. If you are working with Harmony Server, you can export a package of scenes that can be imported into your database using Control Center. The resulting Harmony scenes will be the same length as the scenes in your Storyboard Pro project, they will contain each of their panels so that you may animate over them, and they will contain their respective part of the animatic's soundtrack.
You can choose to export your animatic in rendered frames, which will not be editable in Harmony and can only be used as reference, or to export the drawings, 3D objects, images, videos and camera movements of each scene in your project directly into the Harmony scenes, allowing you to reuse its elements in Harmony. If you are rendering your animatic, you can choose whether you want to export one scene for the whole project, for each sequence or for each act, whereas if you want to export original scenes, you can only export one Harmony scene for each scene in your animatic.
- Transitions in your project are not exported to Harmony.
- In the top menu, select File > Export > Export to Harmony.
The Export to Harmony dialog box opens.
| Parameter | Description | |||||||||||||||||||||||||||||||||||||||||||||||||||||||||||||||||||||||||||||||||||||||||||||||||||||||||||||||||||
|
Destination Path |
||||||||||||||||||||||||||||||||||||||||||||||||||||||||||||||||||||||||||||||||||||||||||||||||||||||||||||||||||||
|
Path |
Allows you to specify the directory in which to save the exported files. You can click on the Browse |
|||||||||||||||||||||||||||||||||||||||||||||||||||||||||||||||||||||||||||||||||||||||||||||||||||||||||||||||||||
|
File Pattern |
Allows you to enter the prefix or the pattern for the names of the exported files. You can leave this field blank to use the default file naming pattern, type in a file name to use it as a prefix, or type a full pattern using the following variables:
TIP Numbers used in file naming patterns are automatically padded by zeros as needed. You can type a number between the % sign and the variable letter to determine the amount of characters you want the variable to use. For example, with the variable %4s, scene 1 would appear as scene 0001.
|
|||||||||||||||||||||||||||||||||||||||||||||||||||||||||||||||||||||||||||||||||||||||||||||||||||||||||||||||||||
|
Export Type |
||||||||||||||||||||||||||||||||||||||||||||||||||||||||||||||||||||||||||||||||||||||||||||||||||||||||||||||||||||
|
Format |
Lets you select whether to export your animatic into Harmony Offline scenes, Harmony Database scenes or Animate/Animate Pro scenes. | |||||||||||||||||||||||||||||||||||||||||||||||||||||||||||||||||||||||||||||||||||||||||||||||||||||||||||||||||||
|
Version |
When exporting Harmony Offline or Harmony Database scenes, lets you select whether to export scenes that are compatible with Harmony version 7.8 or with Harmony version 9.2 or Higher. |
|||||||||||||||||||||||||||||||||||||||||||||||||||||||||||||||||||||||||||||||||||||||||||||||||||||||||||||||||||
|
Export Style |
||||||||||||||||||||||||||||||||||||||||||||||||||||||||||||||||||||||||||||||||||||||||||||||||||||||||||||||||||||
|
Rendered Animatic |
Renders the animatic into a sequence of bitmap images that are assembled into the exported Harmony scenes. This ensures that the content of your animatic is accurately rendered in Harmony, especially if you intend to use an older version. |
|||||||||||||||||||||||||||||||||||||||||||||||||||||||||||||||||||||||||||||||||||||||||||||||||||||||||||||||||||
|
Resolution: Allows you to select the resolution of rendered frames relative to the project resolution between the following options: Full Size, Half Size or Quarter Size. |
||||||||||||||||||||||||||||||||||||||||||||||||||||||||||||||||||||||||||||||||||||||||||||||||||||||||||||||||||||
|
Generate One Scene: Allows you to select how to separate the project into Harmony scenes:
|
||||||||||||||||||||||||||||||||||||||||||||||||||||||||||||||||||||||||||||||||||||||||||||||||||||||||||||||||||||
|
Optimize Still Images: When there is no animation or camera movement for a certain time span, a single drawing is rendered and its exposure is rendered until there is movement. If this option is disabled, one frame is rendered for every frame in your animatic, regardless of if there is movement or not. |
||||||||||||||||||||||||||||||||||||||||||||||||||||||||||||||||||||||||||||||||||||||||||||||||||||||||||||||||||||
|
Animatic on Top: If you generate scenes based on sequences or acts, this option becomes available. When enabled, the animatic is rendered and placed as the top layer and column in Harmony or Animate. |
||||||||||||||||||||||||||||||||||||||||||||||||||||||||||||||||||||||||||||||||||||||||||||||||||||||||||||||||||||
|
Original Scene |
Exports the animatic directly into Harmony scenes without rendering it. This preserves the layers, drawings, 3D objects, images, videos and camera movements so that they can be used in Harmony. |
|||||||||||||||||||||||||||||||||||||||||||||||||||||||||||||||||||||||||||||||||||||||||||||||||||||||||||||||||||
|
Nest Panels in Symbols: Upon export to Harmony or Animate, the panel's content will be nested inside symbols. Instead of having several layers in your root timeline, you will have a single one. You will need to enter the symbol to edit its content. |
||||||||||||||||||||||||||||||||||||||||||||||||||||||||||||||||||||||||||||||||||||||||||||||||||||||||||||||||||||
|
Add Camera Reference Layer: Adds a layer containing the different camera frames on top of the other layers to use as a reference in Harmony and Animate. |
||||||||||||||||||||||||||||||||||||||||||||||||||||||||||||||||||||||||||||||||||||||||||||||||||||||||||||||||||||
|
Apply Transformation on Drawings: Applies transformation on the first and last position of each panel. The in-between animation will be lost. |
||||||||||||||||||||||||||||||||||||||||||||||||||||||||||||||||||||||||||||||||||||||||||||||||||||||||||||||||||||
|
Export Range Tab |
||||||||||||||||||||||||||||||||||||||||||||||||||||||||||||||||||||||||||||||||||||||||||||||||||||||||||||||||||||
|
All |
Exports the entire storyboard. |
|||||||||||||||||||||||||||||||||||||||||||||||||||||||||||||||||||||||||||||||||||||||||||||||||||||||||||||||||||
|
Selected Scenes |
Select this option to export a specific selection of scenes. Then, click on the Select button to open the Scenes Picker dialog box, in which you can:
|
|||||||||||||||||||||||||||||||||||||||||||||||||||||||||||||||||||||||||||||||||||||||||||||||||||||||||||||||||||
|
Current Scene |
Exports only the currently selected scene. |
|||||||||||||||||||||||||||||||||||||||||||||||||||||||||||||||||||||||||||||||||||||||||||||||||||||||||||||||||||
|
Sounds Tab |
||||||||||||||||||||||||||||||||||||||||||||||||||||||||||||||||||||||||||||||||||||||||||||||||||||||||||||||||||||
|
Processing |
|
|||||||||||||||||||||||||||||||||||||||||||||||||||||||||||||||||||||||||||||||||||||||||||||||||||||||||||||||||||
|
File Pattern |
TIP Numbers used in file naming patterns are automatically padded by zeros as needed. You can type a number between the % sign and the variable letter to determine the amount of characters you want the variable to use. For example, with the variable %4s, scene 1 would appear as scene 0001.
|
|||||||||||||||||||||||||||||||||||||||||||||||||||||||||||||||||||||||||||||||||||||||||||||||||||||||||||||||||||
|
Sample Rate |
Sets the frequency rate of the exported audio files. It is recommended to export sound files at the rate at which they were originally created. For reference, the standard sample rate is 48.0 kHz for broadcasting and DVD. | |||||||||||||||||||||||||||||||||||||||||||||||||||||||||||||||||||||||||||||||||||||||||||||||||||||||||||||||||||
|
Bit Depth |
Sets the precision level of each wavelength in the sound file. The standard bit depth is 16 bit. Setting this to 8 bit will cut the size of audio files in half, but will significantly impact sound quality. NOTE On Windows, audio can only be exported in 16 bit unless QuickTime Player is installed.
|
|||||||||||||||||||||||||||||||||||||||||||||||||||||||||||||||||||||||||||||||||||||||||||||||||||||||||||||||||||
|
Channels |
Allows you to select whether to export sound in Mono or Stereo. Stereo sound uses a separate track for the left and right speakers, which allows to simulate a realistic sound environment. Mono uses a single track for both speakers, which saves disk space. | |||||||||||||||||||||||||||||||||||||||||||||||||||||||||||||||||||||||||||||||||||||||||||||||||||||||||||||||||||
|
Burn-In Tab |
||||||||||||||||||||||||||||||||||||||||||||||||||||||||||||||||||||||||||||||||||||||||||||||||||||||||||||||||||||
|
Print Time Code |
Prints the project timecode on the video as an overlay on your video. |
|||||||||||||||||||||||||||||||||||||||||||||||||||||||||||||||||||||||||||||||||||||||||||||||||||||||||||||||||||
|
Print Scene Names and Panel Numbers |
Prints the scene names and panel numbers as an overlay on your video. |
|||||||||||||||||||||||||||||||||||||||||||||||||||||||||||||||||||||||||||||||||||||||||||||||||||||||||||||||||||
|
Print Additional Duration |
Prints another time code counting the time for the current panel, scene or sequence, depending on what is selected in the Repeat drop-down. |
|||||||||||||||||||||||||||||||||||||||||||||||||||||||||||||||||||||||||||||||||||||||||||||||||||||||||||||||||||
|
Units |
Displays additional duration information using Time Code or Frames units. |
|||||||||||||||||||||||||||||||||||||||||||||||||||||||||||||||||||||||||||||||||||||||||||||||||||||||||||||||||||
|
Repeat |
Displays additional duration information per panel, scene or sequence. |
|||||||||||||||||||||||||||||||||||||||||||||||||||||||||||||||||||||||||||||||||||||||||||||||||||||||||||||||||||
|
Camera Grid Tab |
||||||||||||||||||||||||||||||||||||||||||||||||||||||||||||||||||||||||||||||||||||||||||||||||||||||||||||||||||||
|
Title Safe Area |
Prints the Title Safe Area over the picture. By default, this area is 20% smaller than the camera frame. It is used as a guideline of the area that CRT displays might crop out of the picture. Visual elements such as text and logos should be placed within this area. NOTE The size of this area can be changed in the Camera tab of the Preferences dialog
|
|||||||||||||||||||||||||||||||||||||||||||||||||||||||||||||||||||||||||||||||||||||||||||||||||||||||||||||||||||
|
Action Safe Area |
Prints the Action Safe Area over the picture. By default, this area is 10% smaller than the camera frame. It is used as a guideline of the area that CRT displays might crop out of the picture. Characters and action should be placed within this area. NOTE The size of this area can be changed in the Camera tab of the Preferences dialog
|
|||||||||||||||||||||||||||||||||||||||||||||||||||||||||||||||||||||||||||||||||||||||||||||||||||||||||||||||||||
|
4:3 Safety |
Prints the title safe area and the action safe area for the 4:3 camera frame over the exported image. They can be used to position elements in projects that are meant to be displayed in both widescreen and 4:3 proportions. |
|||||||||||||||||||||||||||||||||||||||||||||||||||||||||||||||||||||||||||||||||||||||||||||||||||||||||||||||||||
|
4:3 Reference |
Prints the 4:3 camera frame over the exported image. This frame corresponds to the camera frame if the aspect ratio of the picture was 4:3. It can be used to position elements in projects that are meant to be displayed in both widescreen and 4:3 proportions. |
|||||||||||||||||||||||||||||||||||||||||||||||||||||||||||||||||||||||||||||||||||||||||||||||||||||||||||||||||||
| Scene Options Tab | ||||||||||||||||||||||||||||||||||||||||||||||||||||||||||||||||||||||||||||||||||||||||||||||||||||||||||||||||||||
|
Custom Write Node Parameters |
When enabled, you can use the options below to set the parameters of the Write node for the exported Harmony scenes, so that you won't have to configure the Write node for each exported scene individually in Harmony. If this option is disabled, the Write node in the exported Storyboard Pro scenes will have the following default options:
|
|||||||||||||||||||||||||||||||||||||||||||||||||||||||||||||||||||||||||||||||||||||||||||||||||||||||||||||||||||
|
Image Render Path |
The path to the folder in which to save the rendered frames. This path can be absolute or relative to the scene's folder. For example, the default path for rendered frames is frames, which means the images are saved in the frames subfolder of the scene folder. If you want to select an absolute path, you can click on the You can type a simple path, so that every exported scene has the same image render path, or you can define a different image render path for each scene by typing in a pattern using the following variables:
|
|||||||||||||||||||||||||||||||||||||||||||||||||||||||||||||||||||||||||||||||||||||||||||||||||||||||||||||||||||
|
Image Filename |
The prefix for the file name of each exported frame. Frames will be named with this value, followed by the frame number and their image type extension. It is recommended to leave the hyphen (-) at the end of the prefix to separate the prefix from the frame number. You can type a simple prefix, so that it is the same for all the exported scenes, or you can define a different prefix for each scene by typing in a pattern using the following variables:
|
|||||||||||||||||||||||||||||||||||||||||||||||||||||||||||||||||||||||||||||||||||||||||||||||||||||||||||||||||||
|
Image Format |
The image format in which the exported frames will be saved. Storyboard Pro can export in the following formats:
|
|||||||||||||||||||||||||||||||||||||||||||||||||||||||||||||||||||||||||||||||||||||||||||||||||||||||||||||||||||
|
Open folder after export |
Opens the folder in which files were exported in a file browser once the export is done. |
|||||||||||||||||||||||||||||||||||||||||||||||||||||||||||||||||||||||||||||||||||||||||||||||||||||||||||||||||||