The basic structure of a storyboard consists of scenes, each of which are composed of one or several panels. A panel is a drawing that represents an action in the script. Panels and scenes in a storyboard are ordered in chronological order, from left to right.
An animation project typically requires creating a new scene every time the layout needs to be changed. This means for example that you need to create a new scene in your storyboard each time a change in camera angle requires to use a different drawing or rendition of the background, as well as each time the script takes the action to a different setting.
You can create the basic structure of your storyboard by adding a scene for each scene your script requires, then adding a panel for each action in each scene that needs to be visually represented.
In live action terminology, this definition of a scene is actually referred to as a shot. A scene in live action is actually a sequence of shots occurring in the same setting.
If you are working on a storyboard intended for a live action movie, you can make Storyboard Pro use live action terminology by selecting the Live Action terminology style option in the General tab of the Preferences dialog. For readability, this guide will mainly use animation terminology.
Creating Scenes
A new project will contain one scene, with a single panel in it. Creating a new scene will always automatically create it with one panel inside it.
- Select any panel in the last scene of your storyboard.
- Do one of the following:
- In the Storyboard toolbar, click the
 New Scene button.
 - Right-click on a panel and select New Scene.
- In the top menu, select Storyboard > New > New Scene.
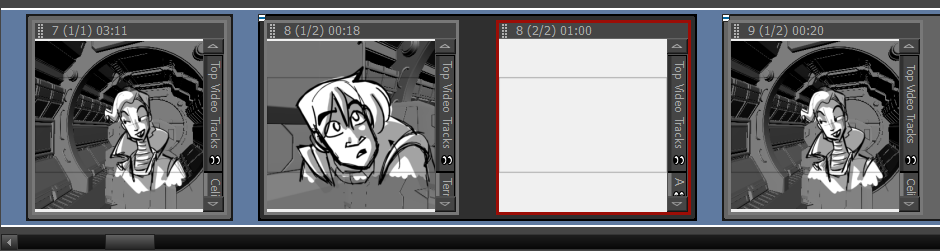
A new scene, containing one blank panel, is added after the current scene.
Each scene is assigned a number. When you create a scene at the end of your project, Storyboard Pro automatically assigns it the number that comes right after the number of the last scene. If you try to insert a scene between two existing scenes, you will be prompted to indicate how this new scene should be named, and if scenes after the new scene should be re-numbered.
- Select any panel the scene after which the new scene should be inserted.
- Do one of the following:
- In the Storyboard toolbar, click the New Scene button.
- Right-click on a panel and select New Scene.
- In the top menu, select Storyboard > New > New Scene.
The Rename Scene dialog appears.
- Do one of the following:
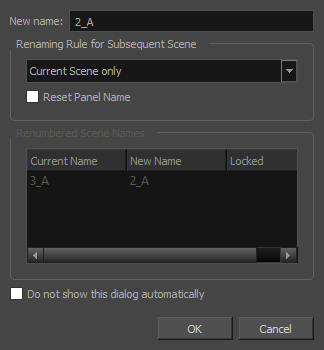
- If you want the new scene to have a suffix, to indicate that it was inserted between existing scenes, you do not have to edit any of the fields. The New name field already contains the name of the currently selected scene followed by a letter suffix. For example, if you tried inserting a scene before scenes 2 and 3, Storyboard Pro will name the new scene 2_A by default.
- If you want the scene to have the number after the number of the currently selected scene, and to renumber all subsequent scenes accordingly, enter this number in the New Name field. For example, if you're inserting a scene between scenes 2 and 3, type 3 in the New Name field. Then, in the Renaming Rule for Subsequent Scene dropdown menu, select Renumber Scenes.
- If you intend to use the same options whenever you insert a scene, check the Do not show this dialog automatically option.
- Click OK.
A new scene, containing one blank panel, is added after the current scene, numbered according to your selected settings.
Creating Panels
A panel is used to visually represent an action in a scene.. You should add as many panels to a scene as necessary to explicitly describe each action in that scene.
- In the Thumbnails view, select the panel after which you want to insert a new panel.
- Do one of the following:
- In the Storyboard toolbar, click the
New Panel button.
- In the top menu, select Storyboard > New > New Panel.
- Press P.
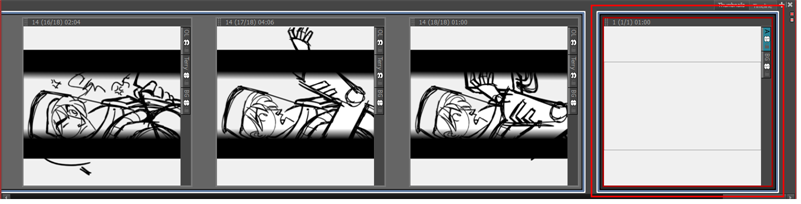
A new panel is added to the storyboard and is part of the same scene as the current panel.
Creating Sequences
A sequence is a way of grouping scenes together. Using them is optional, but they can help organize your storyboard. For example, you can use sequences to group scenes that are part of the same setting together.
When you start building a storyboard, by default, your scenes will not be part of any sequence. To use sequences in your project, you can take one of the two following approaches:
- After you have created all the scenes that should be part of your first sequence, simply use the New Sequence command to create your next scene. All the scenes that are already in your project will be grouped together in the first sequence of your project, and a new scene, which will kick off the second sequence, will be added at the end of your project.
- After you have created all the scenes required for your project, you can split your storyboard into sequences by selecting scenes that should be part of the same sequence, grouping them together in a new sequence, and repeating the process until every scene is in the appropriate sequence.
From that point on, you can use the New Sequence command whenever you have to create a scene that should start off another sequence.
- Do one of the following:
- In the Storyboard toolbar, click the
 New Sequence button.
 - In the top menu, select Storyboard > New > New Sequence.
A new scene is added to your project and is now the starting point of a new sequence.
If this is the first sequence you add to a project, all scenes prior to it will be combined into a separate sequence. Violet-coloured sequence markers will also become visible in both the Thumbnails and Timeline views.
- In the Thumbnails or Timeline view, select all the scenes you want to put into a new sequence. To do this, while holding Shift, click on the first scene to be part of the new sequence, then on the last scene to be part of the new sequence. This selects every scene between the scenes you clicked on, inclusively.

- Do one of the following:
- In the top menu, select Storyboard > New > New Sequence from Selection.
- Right-click on the selection, then select New Sequence from Selection.
Your selection becomes a new sequence.
If this is the first sequence you add to your project, all the scenes before the selection will be grouped together into a separate sequence, and all the scenes after the selection will be grouped together into another sequence. Violet-coloured sequence markers will become visible in both the Thumbnails and Timeline views.

Reordering Panels
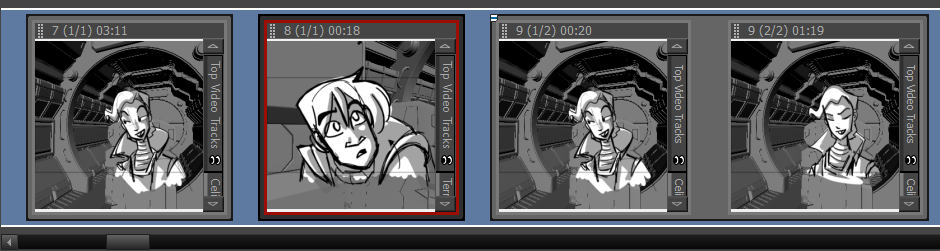
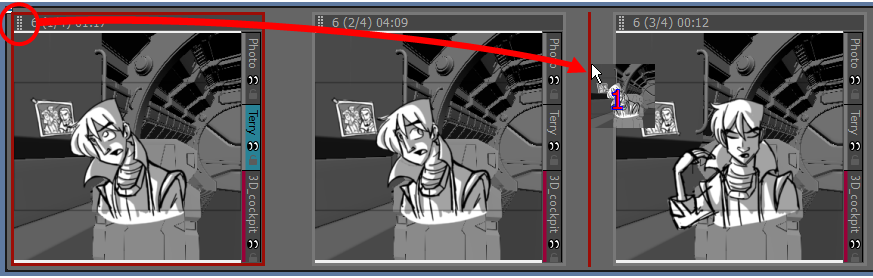
You can reorder panels by clicking on the  drag and drop handle in the top left corner of the panel, then dragging the panel between the two panels where you want it to be moved. A red line will appear between two panels near your mouse cursor to indicate where the panel will be moved.
If you want to move several panels together, you can select them together, then click and drag the drag and drop handle of any panel in the selection. To select several panels in the Thumbnails view, do one of the following:
- Draw a rectangle in the Thumbnails view around all the panels you want to select.
- While holding Shift, click on the first panel you want to add to your selection, then on the last panel you want to add to your selection. Every panel in-between will also be selected.
- While holding Ctrl (Windows) or ⌘ (macOS), click on each panel that you want to add to your selection.
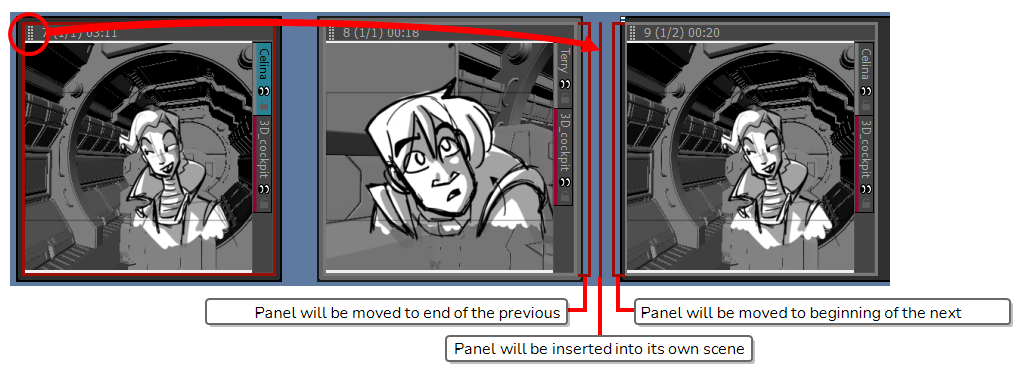
If you move a panel to the space between two scenes, you have the option of attaching the panel to the scene before or after this space, or to drop it into its own new scene. Where the scene will end up depends on how close to either scene you drop it. The red line that appears between the two scenes will indicate whether it will be attached to the scene before or after the space where the panel is being dropped, or moved to its own new scene.