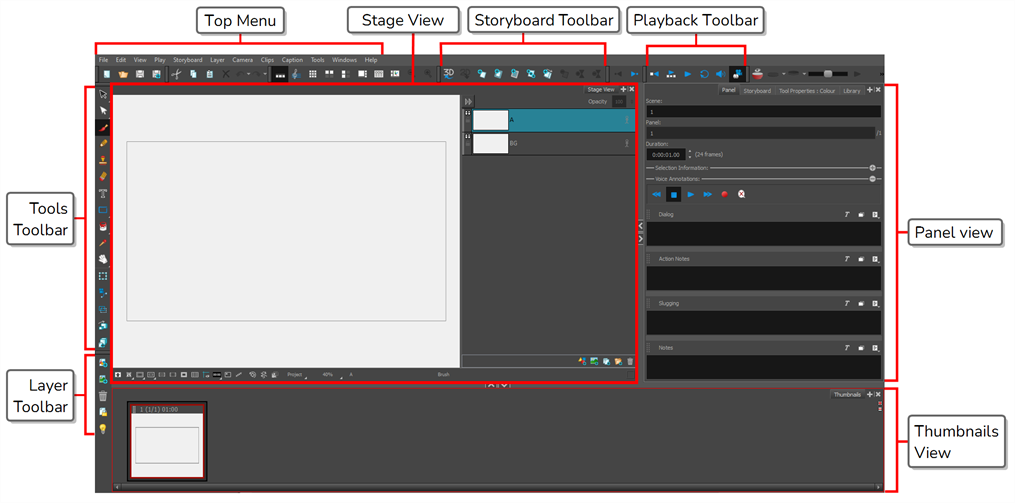
When you start Storyboard Pro for the first time, the default workspace is displayed. It contains all of the main elements you need for creating a storyboard.
Views
The Storyboard Pro user interface is mainly comprised of views, which are sections of the workspace with a specific purpose and a set of functionalities. Each view has a tab over it, and can be docked into the main application window or made to float over it, in its own window.
- In the top-right corner of an existing view, click the
 Add View button
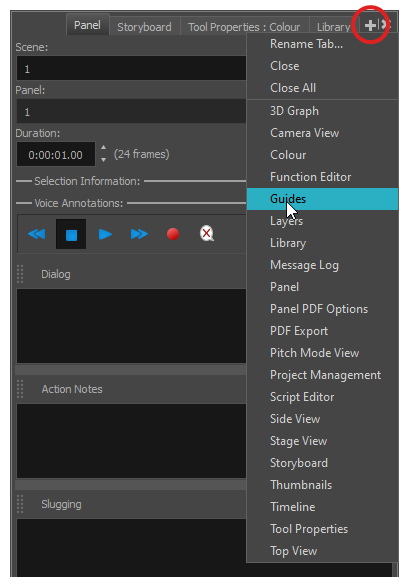
- Select the desired view from the list.
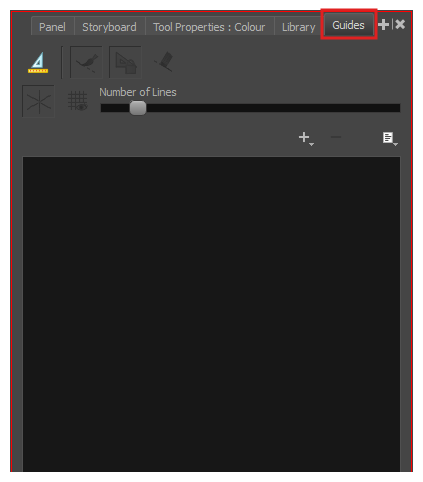
The view appears as a new tab, in the section of your workspace where you added it.
- Open the Windows menu.
- In the Windows menu, select the view you wish to add.
The view will appear as a new window over Storyboard Pro's main application window.
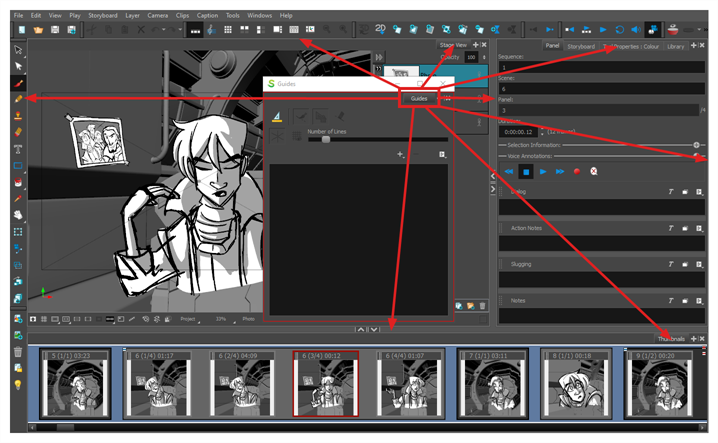
- Click and drag the floating view by its tab and do one of the following:
- Drop the window over another tab to add it to that set of tabs.
- Drop the window above, below or beside an existing view. When you get close to the edge of a view, a cyan rectangle appears, indicating where the view will be docked.
Stage & Camera Views
The Stage view is the main view in Storyboard Pro. It is used to view and edit the selected panel. You can draw on layers in the panel, manipulate elements in it as well as create and visualize camera movements.
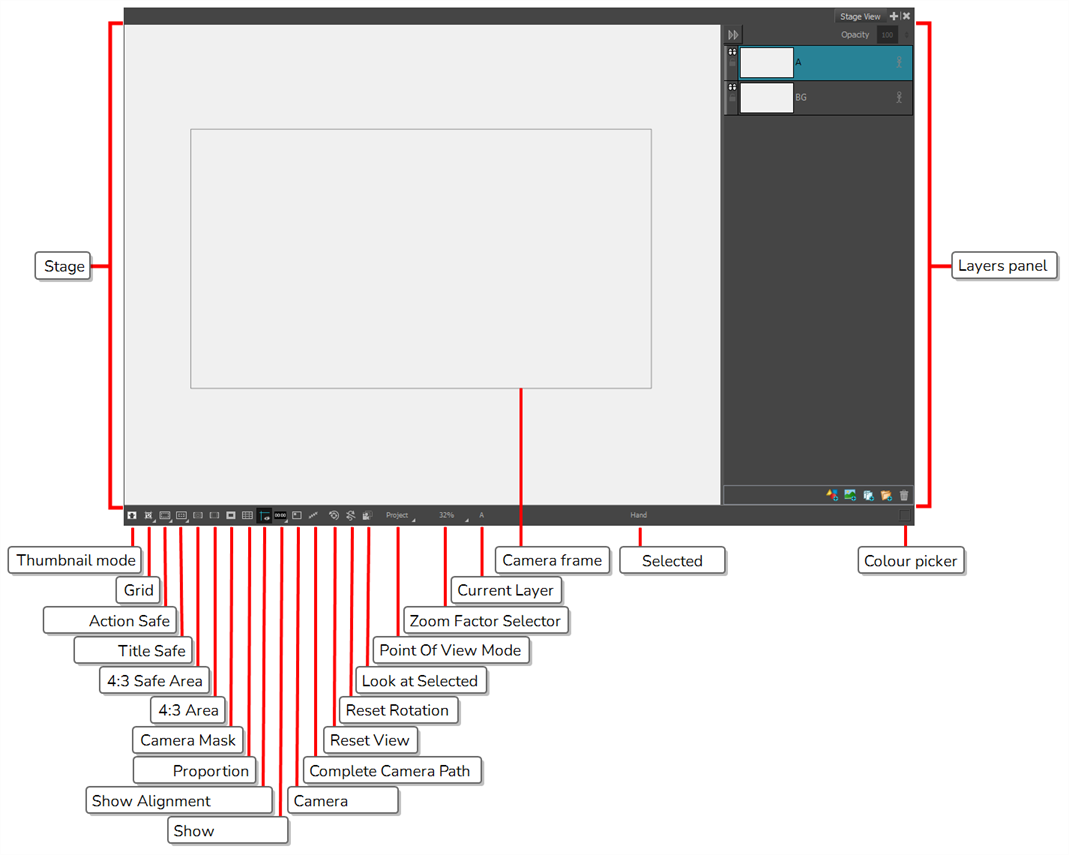
The Camera view is a lot like the Stage view, and it is not necessary to use it if you only intend to work in 2D. However, if you intend to work with 3D models, to position elements at different distances from the camera or rotate layers in 3D, the difference becomes important: When working in 3D, the Stage view allows you to view the stage from any point of view in the 3D space, whereas the Camera view always previews the stage from the point of view of the camera lens, which means it accurately represents what will appear when you export your storyboard.
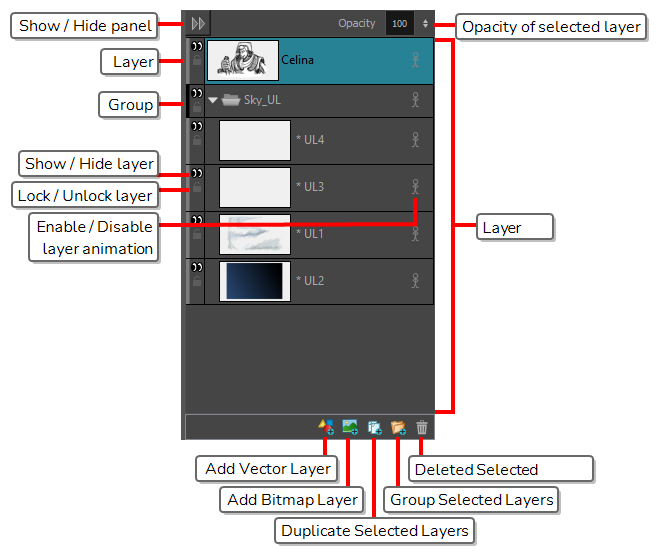
Layers Panel
The Layers panel displays in a section to the right of both the Stage and Camera views. It allows you to add, delete, duplicate, group, reorder, hide, unhide, lock or unlock layers, to enable or disable animation on layers, to change a layer's opacity and to select which layer to draw on, to manipulate or to animate.
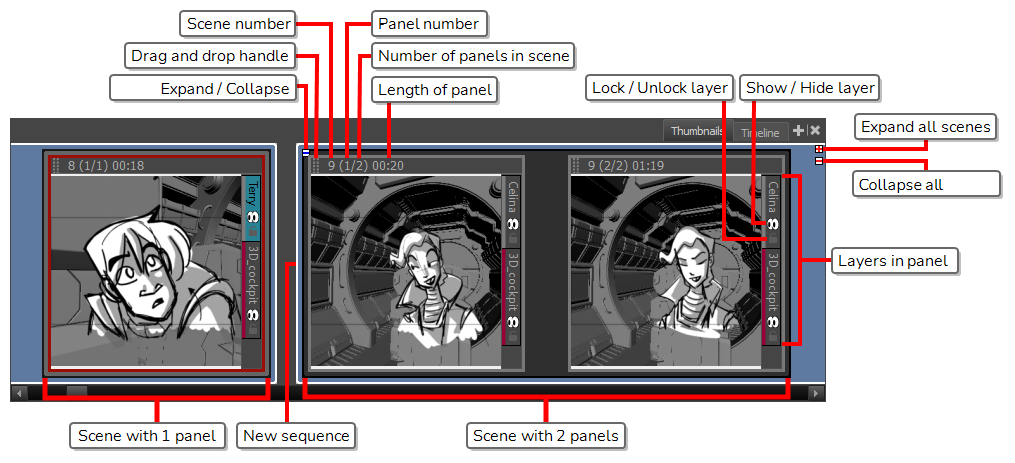
Thumbnails View
The Thumbnails view displays all the panels in your storyboard, in chronological order, from left to right. Using this view, you can navigate through your storyboard, rearrange panels and scenes, and select which panel to display and edit in the Stage or Camera view.
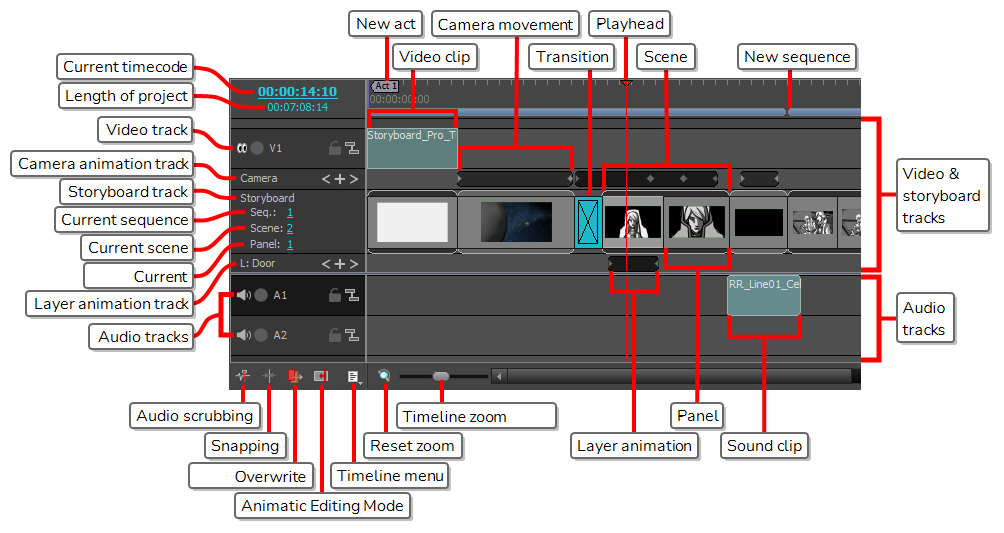
Timeline View
The Timeline view is the view to use instead of the Thumbnails view when you want to make an animatic. An animatic is a video based on your storyboard, in which each panel is timed to appear for roughly the length of the action they represent, and in which the camera movements are animated, to serve as the basis for the timing in your movie. Just like the Thumbnails view, the Timeline view allows you to create and to manage panels and scenes. It also allows you, among other things, to decide how much time each scene and each panel takes in the animatic, to animate camera movements, to animate layers and to add sound clips, images and videos to your animatic.
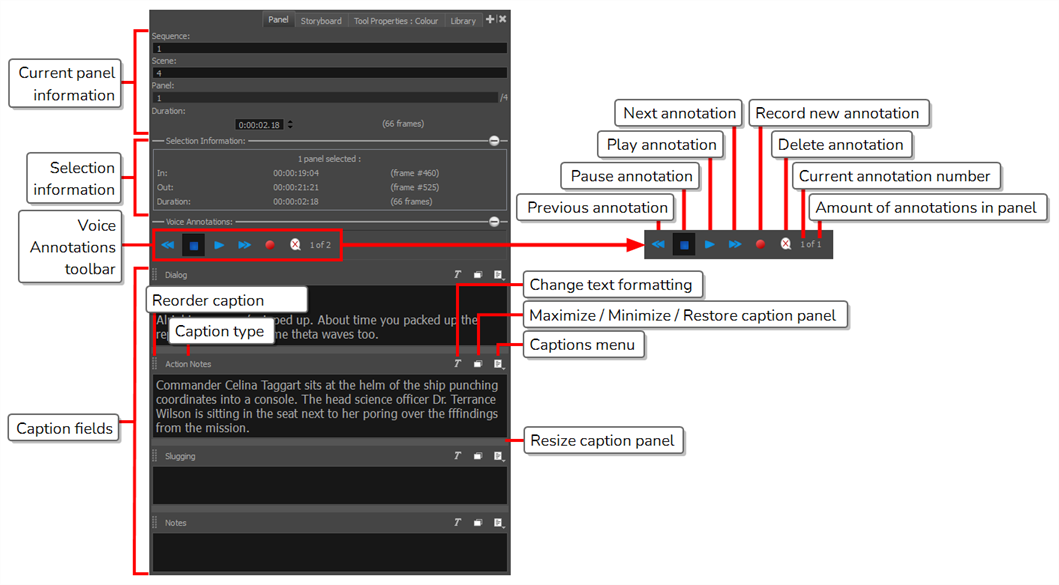
Panel View
The Panel view displays the basic information about the currently selected panel. It also allows to view and edit captions in the current panel, as well as to add sketches or voice annotations to the panel.
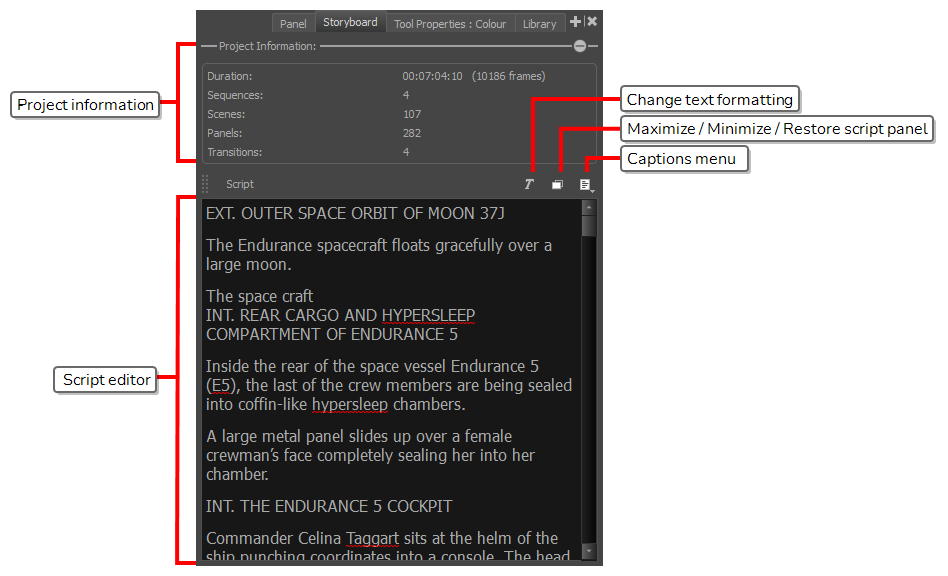
Storyboard View
The Storyboard view displays basic information about your project. It also allows you to write, import, view and edit the script for your storyboard.
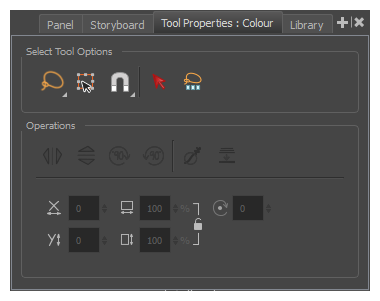
Tool Properties View
The Tool Properties view contains the options and operations available for the currently selected tool. When you select a tool in the Tools toolbar, the Tool Properties view updates to display its available options.
Toolbars
The Storyboard Pro interface contains toolbars that quicky give you you access many useful tools. You can add, move and remove toolbars in your workspace.
The most important toolbars in Storyboard Pro are the Tools toolbar, the Storyboard toolbar and the Playback toolbar.
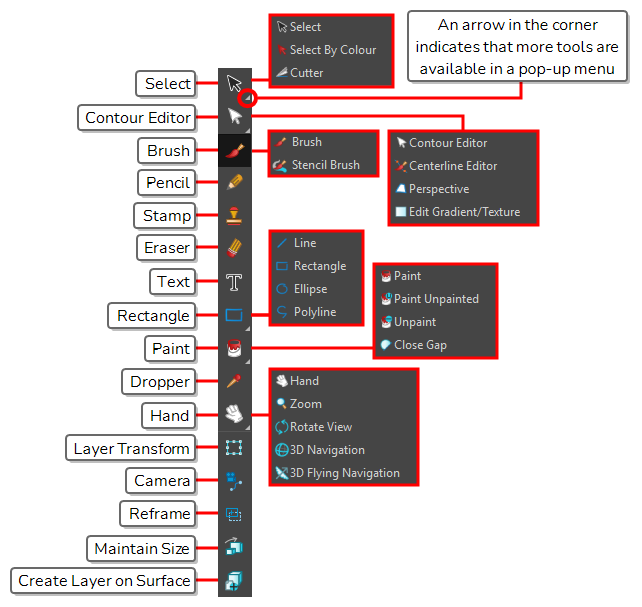
Tools Toolbar
The Tools toolbar contains the main tools you need to work in Storyboard Pro. In the default workspace, this toolbar located on the left edge of the application window.
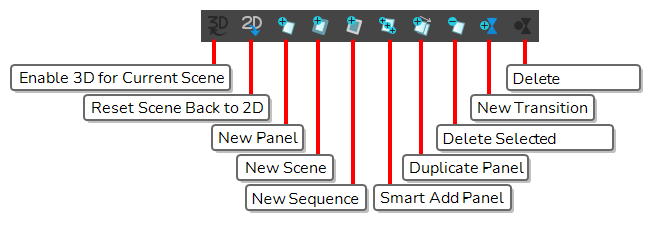
Storyboard Toolbar
The Storyboard toolbar contains all of the basic commands related to adding and deleting panels, scenes, and transitions, as well as switching between the 2D and 3D workspaces.
In the default workspace, this toolbar is located at the top of the interface.
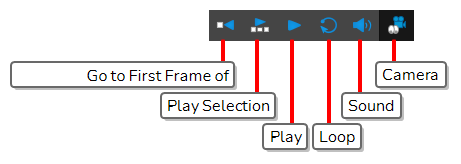
Playback Toolbar
The Playback toolbar lets you play back your storyboard. When you create an animatic with transitions and sound, you can play it back in real time in the Stage view to check the timing.
In the default workspace, this toolbar is located at the top of the interface.
Top Menu
The top menu contains most of the commands available in Storyboard Pro. Depending on the view you're working in and the selected element, some commands are available and others not. The top menu is always located at the very top of the interface.

Here is a short introduction to the purpose of every menu in the top menu:
| Menu | Description |
|---|---|
|
Storyboard Pro 20 |
Allows you to access the About dialog as well as the Preferences dialog. This menu is available on macOS only. |
| File |
Contains items related to creating, saving, exporting and importing your projects. |
| Edit |
Contains commands for cutting, copying and pasting selected panels or layers, for selecting panels or drawings and for grouping or ungrouping layers. On Windows, it is also the location of the Preferences menu. |
| View |
Allows you to pan, zoom or rotate the current view, reset it to its default point of view, to enable or disable certain view modes such as the Onion Skin or the Light Table. |
| Play |
Allows you to play and pause the animatic as well as to navigate the panels and scenes of your storyboard. |
| Storyboard |
Allows you to manage your project's scenes, panels and sequences, to add transitions, markers, snapshots and to track the changes made to the project. It is also where the Project Properties dialog can be accessed. |
| Layer |
Contains a wide set of commands to manage the drawing layers in the current panel, as well as effects you can apply on layers. |
| Camera |
Contains a few commands to help manage the position and animation of the camera in a scene. |
| Clips | Contains commands for editing and previewing video and sound clips. |
| Caption | Allows you to add, remove, search through and set the format for captions. |
| Tools | Allows you to select one of the tools in the Tools toolbar as well as to arrange, transform and convert the shapes and lines that compose your drawings. |
| Windows |
Allows you to switch between workspaces, to manage workspaces, and to access the different views and toolbars available in Storyboard Pro. |
| Help |
Allows you to access documentation, the Toon Boom forums, to opt in or out of the Customer Experience Improvement program and to check for updates. On Windows, it is also where you can access the About dialog. |
Navigating the Interface
With the help of menu commands and keyboard shortcuts, some views let you navigate their content by zooming in, zooming out, panning and rotating them. You can also reset the zoom level, pan and rotation angle of these views as needed.
The navigation commands in the table below can be used in the following views, with some exceptions:
- Stage
- Camera
- Timeline
- Function
- Side and Top
Keyboard shortcuts can be customized. You can view, search for and change keyboard shortcuts for Storyboard Pro in the Keyboard Shortcuts dialog. To access the Keyboard shortcuts dialog:
- Windows: In the top menu, select Edit > Keyboard Shortcuts.
- macOS: In the top menu, select Storyboard Pro 20 > Keyboard Shortcuts.