After creating your storyboard, the next step is to make it into an animatic. An animatic is a video that plays out each panel of your storyboard. Each panel should be timed to match the intended timing of actions, and each scene should be timed to match the intended pace of the story. Camera movements can be animated to simulate what the action will look like relative to the camera movements and framing. Layers in the storyboard can also be animated to make the action and its timing more legible.
Sound effects, voice clips and music tracks, be them provisional or final, can be added so that action can be paced around them, as well as to make a draft of the sound mix for the final product. Videos and still images, such as opening or ending sequences, overlays, captions, logos, or live action footage can also be added to the animatic to be used as references or so that they do not have to be sketched into panels.
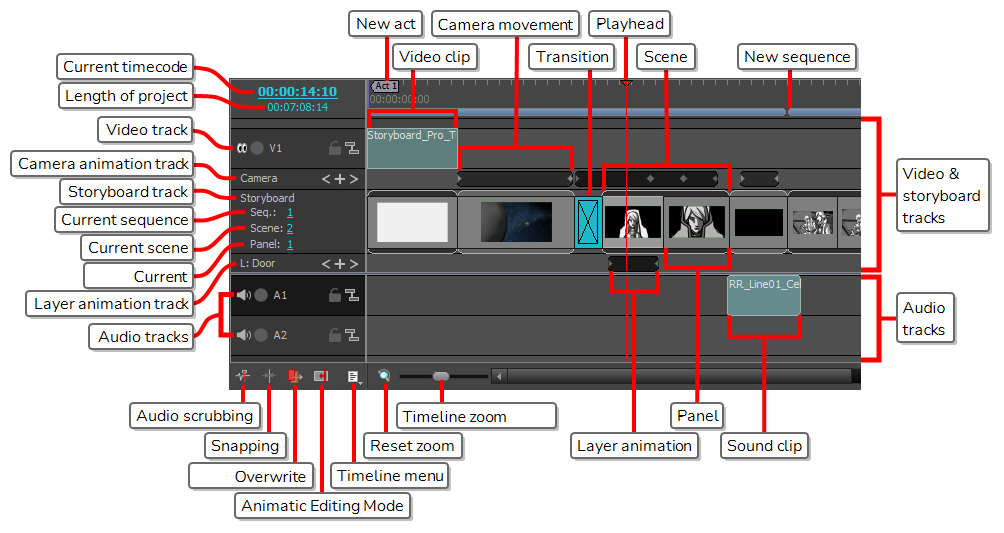
In Storyboard Pro, you can create an animatic from your storyboard by using the Timeline view. The Timeline view is very much like the timeline in a video editing software. Among other things, it allows you to visually adjust the timing of each panel, to import, cue and clip sound and video clips, to animate camera movements, to animate layers and to add transitions between scenes. Hence, it will accompany you in each step towards making your animatic.
- Do one of the following:
- In the top-right corner of the Thumbnails view, click on the
 Add View button and select Timeline.
 - Select Windows > Timeline.
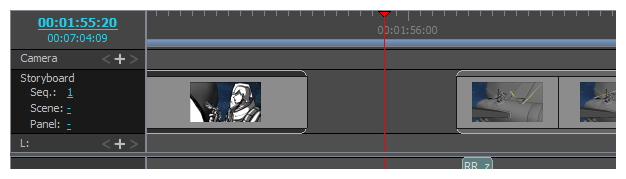
When you first open the Timeline view after creating a storyboard, you might notice that all the panels of your storyboard are already in the track, and that they are all already timed to last one second each. Therefore, your storyboard is already a basic animatic. The next step from that point is to adjust the length of each panel to match the intended timing of the actions and the intended pace of the scenes.
Before, while and after adjusting the timing of your panels, you can see how your animatic plays out and feels with its current timing by previewing it.
- In the Timeline or Thumbnails view, select the panel where you want the playback to begin.
- In the Playback toolbar, click the
 Play button
In the end, an animatic can be exported into video files or even Toon Boom Harmony scenes—see How to Export your Project.
Setting the Panel Duration
There are several ways of setting the duration of a panel. The panel view allows you to type in the exact duration of the current panel. The Timeline view allows you to visually extend or shorten panels. You can also fine-tune the duration of a panel using the Add Frame to Panel and Remove Frame to Panel keyboard shortcuts.
By default, when you adjust the duration of a panel, it offsets, or ripples all subsequent panels. This keeps every panel and scene stitched into a single continuous sequence and allows you to adjust the timing of each panel separately.
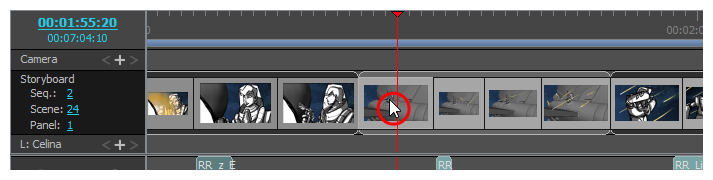
- In the Timeline or Thumbnails view, select a panel.
- Do one of the following:
-
In the Panel view, type in the exact length for the panel in the Duration field.
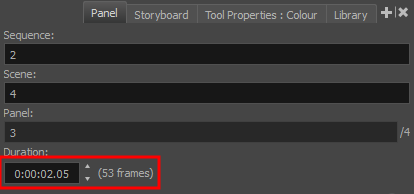 NOTE The format of the duration is H:MM:SS:FF, where H means hours, M means minutes, S means seconds and F means frames.
 - In the Panel view, right of the Duration field, click on the
 Up arrow to extend the panel by one frame, or on the
  Down arrow to shorten the panel by one frame.
 - Press + to add a frame to the panel, or - to remove a frame from the panel.
- In the top menu, select Storyboard > Add Frame to Panel or Storyboard > Remove Frame from Panel.
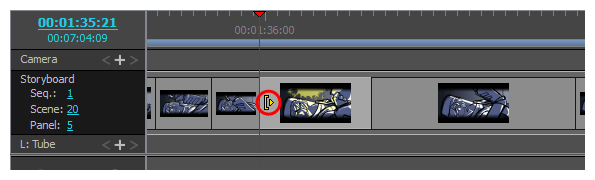
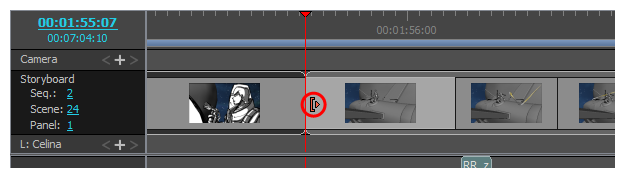
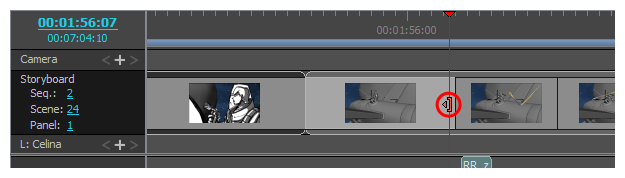
- Place the cursor near the right edge of the panel you want to resize.
The resize icon  displays. Make sure that it points towards the inside of the panel you want to resize.
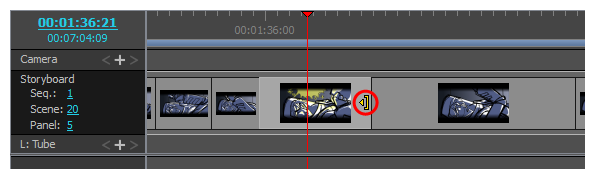
-
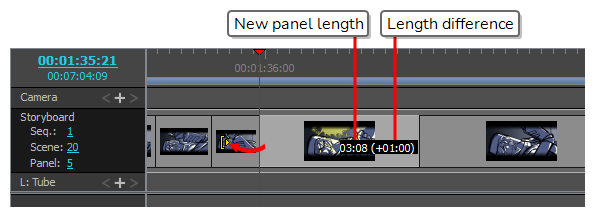
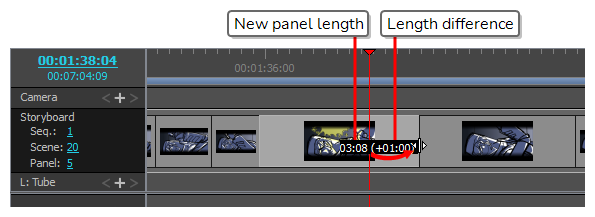
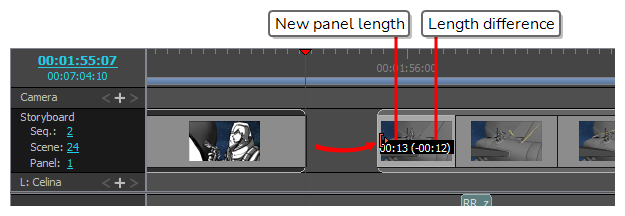
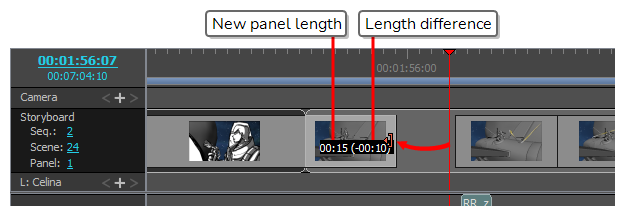
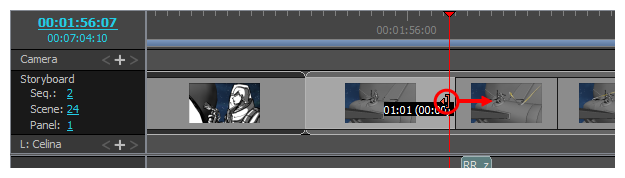
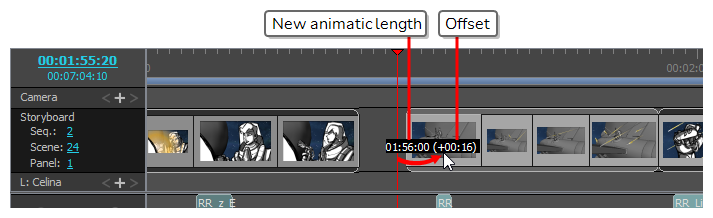
Click and drag the edge to the right to extend it, or to the left to shorten it.
As you drag, the new length of the panel is indicated, along with the amount of time you are adding or subtracting from it.
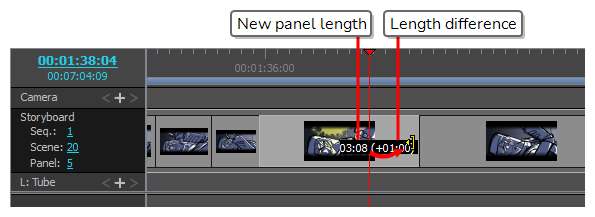
All subsequent panels will be rippled forward or backward to preserve their length.
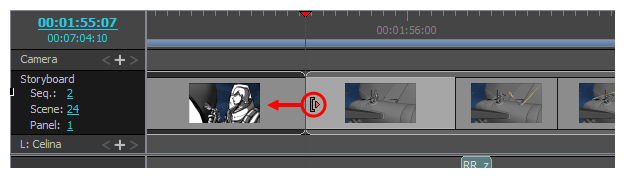
You can also extend or shorten a panel by clicking and dragging on its left edge.
When you do that, dragging towards the left will extend it, and dragging towards the right will shorten it.
It is also possible to adjust the length of a panel while simultaneously adjusting the length of the following panel to compensate. This prevents subsequent panels from being offset, and can be useful if you need to adjust the timing of your panels without affecting the timing of the remainder of your animatic.
- While pressing and hold the Alt key, position the mouse cursor over the right edge of the panel you want to resize.
The resize icon  displays.

-
While holding the Alt key, click and drag the edge of the panel to the right to extend it, or to the left to shorten it.
As you drag, the new length of the panel is indicated, along with the amount of time you are adding or subtracting from it.
The length of the following panel will be adjusted to avoid shifting subsequent panels.
Animatic Editing Mode
By default, every change you make in the lengths of your scenes and panels will result in subsequent scenes and panels to ripple backward or forward, so as to make sure there is no hole in the timeline.
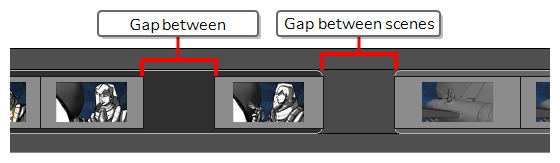
When Animatic Editing Mode is enabled, you can reposition the in-point and out-point of each panel without affecting anything else in your your animatic. This means that, in this mode, shortening or deleting a panel creates a hole in the timeline in which another panel can be extended, moved or created. You can also delete panels or scenes and leave holes behind instead of rippling subsequent panels backward.
Then, in the gaps you created in your animatic, you can move existing panels, create new panels or resize a panel next to the gap to fill it.
In this way, Animatic Editing Mode makes the workflow in Storyboard Pro more similar to that of a typical video editing software, which may make editing easier for users who are familiar with this kind of application.
-
In the bottom-left corner of the Timeline view, click on the
 Animatic Editing Mode button.
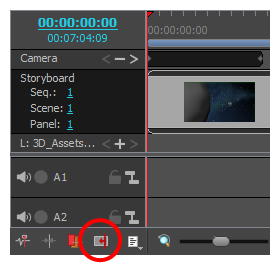
- Once you are done using Animatic Editing Mode, simply click on the button again to disable it.
- When Animatic Editing Mode is disabled, you can press and hold the Ctrl (Windows) or ⌘ (macOS) to temporarily enable Animatic Editing Mode while making changes to your animatic. Likewise, when Animatic Editing Mode is enabled, pressing and holding the Ctrl (Windows) or ⌘ (macOS) key will temporarily disable it.
- You can also assign a keyboard shortcut to the Toggle Animatic Editing Mode command in the Storyboard section of the Keyboard Shortcuts dialog, which toggles it by pressing the key, without requiring you to hold the key.
- Place the cursor near the left edge of the panel.
The resize icon displays. Make sure that it points towards the inside of the panel you want to edit.
-
Click and drag the edge to the right to move the in-point forward, or to the left to move the in-point backward.
As you drag, the new length of the panel is indicated, along with the amount of time you are adding or subtracting from it.
You cannot move the in-point of a panel or scene before the out-point of the previous panel or scene.
- Place the cursor near the right edge of the panel.
The resize icon  displays. Make sure that it points towards the inside of the panel you want to edit.
-
Click and drag the edge to the left to move the out-point backward, or to the right to move the out-point forward.
As you drag, the new length of the panel is indicated, along with the amount of time you are adding or subtracting from it.
You cannot move the out-point of a panel or scene past the in-point of the next panel or scene.
-
Select the panels you want to delete.
 TIPS
TIPS- You can select multiple panels by holding Ctrl (Windows) or ⌘ (macOS) and clicking on each panel you want to delete.
- You can select a sequence of multiple panels by clicking on the first panel you want to select and, while holding Shift, clicking on the last panel you want to select. Every panel in-between will be selected.
- Do one of the following:
- Right-click on the selection and select Clear Panels.
- In the top menu, select Edit > Clear Panels.
- Press Del (Windows) or ⌫ (macOS).
The selected panels will be deleted, leaving a gap where they used to be.
In Animatic Editing Mode, panels do not ripple forward or backward, which may be constraining. To get the most out of Animatic Editing Mode, it is useful to know how to ripple panels on the fly.
At any time, you can press and hold the Ctrl (Windows) or ⌘ (macOS) key before editing your animatic to temporarily enable or disable Animatic Editing Mode. This means that, when Animatic Editing Mode is enabled, pressing and holding Ctrl (Windows) or ⌘ (macOS) will temporarily disable it, making any change you make to your animatic while holding this key offset all the panels after the affected panel. When there are gaps in your timeline, those gaps also get rippled forward or backward.
If you need to create a gap, or to adjust the size of a gap, you can do so by selecting all the panels from a specific point until the end of the animatic, then moving the selection.
- Press and hold Ctrl (Windows) or ⌘ (macOS), Alt and Shift.
-
While holding those keys, in the Timeline view, click on the first panel of the sequence of panels you want to offset.
The panel you clicked on as well as every panel after it until the end of the animatic will be selected.
-
Click and drag on the selection to offset it.
Adding Transitions
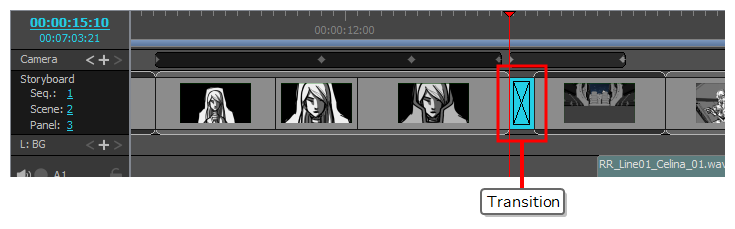
Transitions are animated effects that can be added between two scenes to move from one scene to the next gradually, such as a dissolve or an edge wipe. Among other things, adding transitions can help fine-tune the pace between your scenes, or mark changes in the story setting.
- In the Thumbnails or Timeline view, select the first of the two scenes between which you want to add a transition. For example, if you want to add a transition between scenes 2 and 3, select any panel from scene 2.
![]()
-
Do one of the following:
- From the Storyboard toolbar, click the New Transition
 button.
 - Select Storyboard > Add Transition.
- Right-click the scene thumbnails and select Add Transition.
- From the Storyboard toolbar, click the New Transition
- Click on the transition to select it.
- Open the Panel view. When a transition is selected, the Panel view displays its properties and allows you to change them.
- In the Type drop-down, select which type of transition you want to use:
- Dissolve: Fades the first scene out to black, then fades the second scene in from black.
- Edge Wipe: Wipes the first scene out with the second scene, with a straight line going all the way across the screen. The angle of the line can be customized.
- Clock Wipe: Wipes the first scene out with the second scene, with a line going from the centre of the screen to its edge, which rotates 360 degrees to cover the whole screen. The initial angle and direction of the line can be customized.
- Slide: When set to Slide In, this makes the second scene slide from the edge of the screen over the first scene. When set to Slide Out, this makes the first scene slide towards the edge of the screen, leaving the second scene on the screen as if it had always been behind it. The angle at which the scene slides in or out can be customized.
- Determine the length of the transition by doing one of the following:
- In the Timeline view, click and drag the right edge of the transition towards the right to extend it, or towards the left to shorten it.
-
In the Panel view, right of the duration field, click on the Up arrow to extend the transition by 1 frame, or on the Down arrow to shorten the transition by one frame.
-
In the duration field of the Panel view, type in the duration of the transition.
NOTE The format of the duration is H:MM:SS:FF, where H means hours, M means minutes, S means seconds and F means frames.