Storyboard Pro allows you to manipulate drawing layers in the 3D space as well as to integrate 3D models into your storyboard. If your project uses 3D models, you can import them into your project, then insert them into your panels instead of having to draw them.
Converting a Scene to 3D
When you create a scene, it is in 2D mode by default. This means layers are locked at the same position on the z-axis and can only be rotated on the z-axis. This is to avoid incumbering your workflow with 3D functionalities that are not needed.
You can easily convert a 2D scene to 3D, and back and forth. In a 3D scene, you can move layers on the z-axis and rotate them in any direction. You can also rotate the camera in any direction and make it move across the depth of the stage. Likewise, you can rotate the Stage view in any angle and navigate the stage in its depth, allowing you to look at it from various points of view.
- In the Thumbnails or Timeline view, select the scene you want to convert to 3D.
- Do one of the following:
- In the Storyboard toolbar, click the
Enable 3D button.
- Select Storyboard > Enable 3D for Current Scene.
Resetting a Scene to 2D
You can reset a 3D scene back to 2D. When you do this, the following changes are made to your scene:
- Imported 3D models are removed.
- 3D camera movements are converted to 2D camera movements. Camera movements on the z-axis will be converted to 2D camera zoom-ins and zoom-outs, but 3D rotations will be ignored.
- 3D transformations on layers are converted to 2D transformations. Layers that have been moved on the z-axis will be scaled up or down to preserve their apparent proportions, but 3D rotations will be ignored.
- Do one of the following:
- In the Storyboard toolbar, click the
Reset Scene to 2D button.
- Select Storyboard > Reset Scene to 2D.
Viewing Objects from the Top and Side
When working in 3D, you can use the Stage view to look at your stage from any point of view and any angle, allowing you to see how objects are positioned in space, and you can use the Camera view to look at your stage from the point of view of the camera. However, you may often need to have precise control over how objects and layers are positioned on the z-axis.
The Top and Side views allow you to view the stage from its top and from its side, respectively. Because these views do not apply perspective to the stage, they can be used to position elements with more precision. Using the Side view, you can view and position layers and objects on the front-back (z) axis , as well as on the north-south (y) axis. Using the Top view, you can view and position layers and objects on the front-back (z) as well as the east-west (x) axis. Hence, both views combined can help you position objects on the z-axis without losing sight of their position on the other axes.
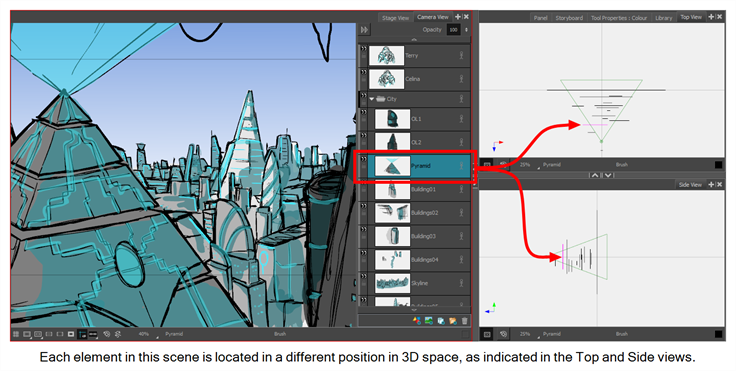
The Top and Side views display 2D layers as thin segments, as if you were looking at sheets of paper from the side. You can manually select and manipulate 2D layers right from these views.
- In the top-right corner of any view, click on the
Add View button and select Side View or Top View.
- From the top menu, select Windows > Side View or Top View.
Positioning 2D Elements in 3D Space
In a 3D scene, drawing layers can be manipulated like 3D objects. You can position them closer to or further away from the camera, allowing you to create a multiplane effect. You can also rotate them in any direction, allowing you to make pseudo-3D constructions such as open-faced rooms.
- In the Tools toolbar, select
Layer Transform button.
- In the Stage view, select the element you want to reposition.
A 3D transformation manipulator appears over the layer in the Stage, Camera, Top and Side views.
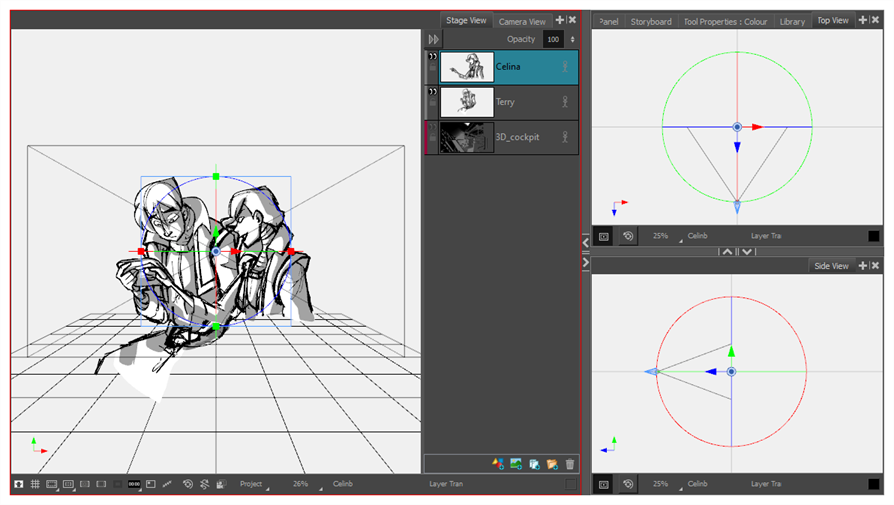
- This 3D manipulator has a blue arrow that you can click and drag to move the layer on the z-axis. However, since this blue arrow is directly facing the Stage view, you cannot click and drag it. Instead, you must take one of the following approaches:
- Click and drag the blue arrow in the Top View or Side View. If you drag the layer closer to the tip of the camera cone, it will move closer to the camera and appear bigger. If you drag it away from the tip of the camera cone, it will be further back and appear smaller.
- Rotate the point of view of the Stage view by holding Ctrl + Shift (Windows) or Shift + ⌘ (macOS), then clicking and dragging the view. When the Stage view is in any angle but the default one, you will be able to click and drag the blue arrow and move the layer across the z-axis.
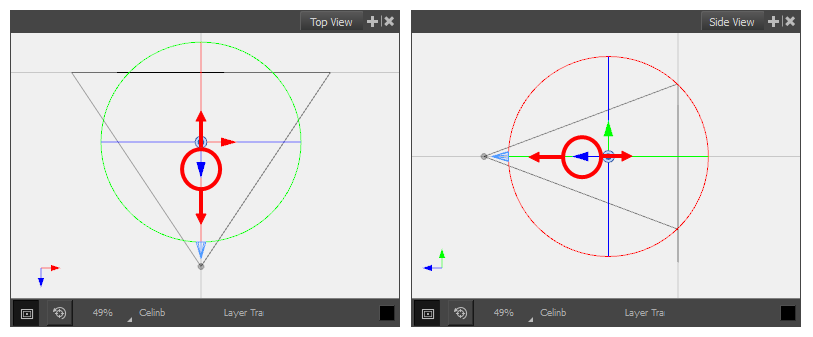
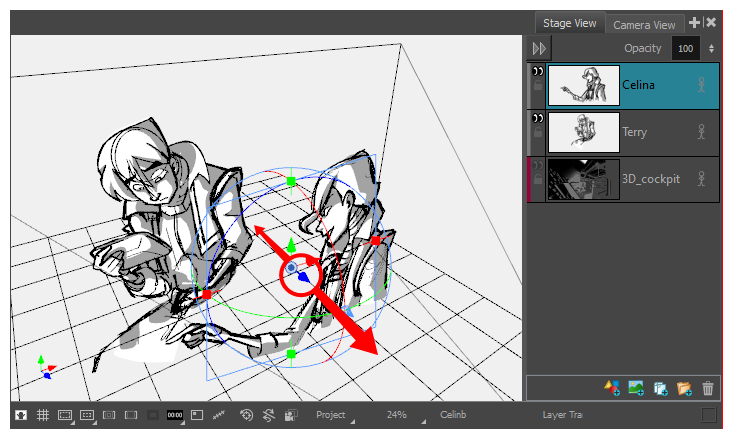
As you drag the element around in 3D space, the position of the element will also update in the other views.
Importing 3D Models
You can integrate 3D models to your project by importing them to your library, then dragging and dropping them into your panels where needed. Each Storyboard Pro project has its own 3D Models library. Since each instance of the model is sourced from your project's library, Storyboard Pro does not have to store a copy of your model for each panel that uses it.
Storyboard Pro supports the following types of 3D models:
- Filmbox (.fbx)
- 3DS Max (.3ds)
- Wavefront OBJ (.obj)
- Allembic (.abc)
- Collada (.dae)
- In the Library view, right-click on the 3D Models library folder, then select Import Files.
- In the file browser, locate and select your 3D model, then click on Open.
The following prompt appears.
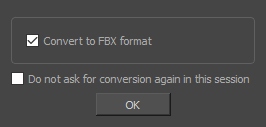
If you want, you can choose to import your model in its original format. Converting it to FBX will however make sure its textures are consolidated with the model in your project.
- Click on OK.
The selected model appears in the 3D Models folder of the Library view.
- Drag and drop the 3D model from the Library view to the Stage or Camera view:
- To insert it between two specific layers, drop it between those layers in the Layer panel of the Stage or Camera view.
- If you want to insert it over all the other layers, you can drop it directly in the Stage or Camera view.
The 3D model is inserted into your panel, in its original size, in the centre of the stage. A layer for the 3D model is added to the layer list.
Manipulating 3D Objects
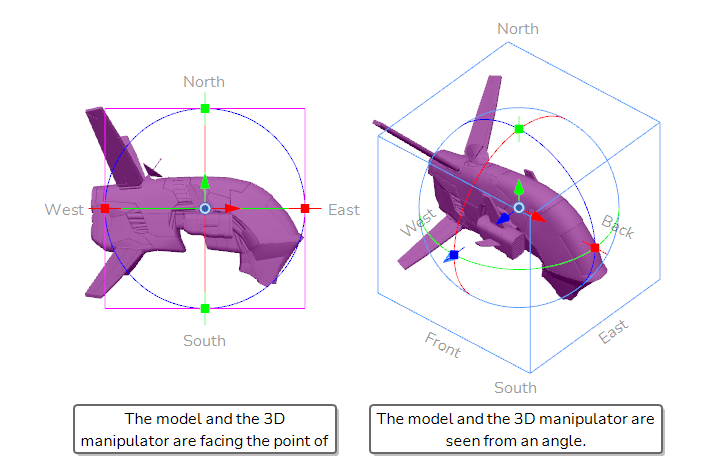
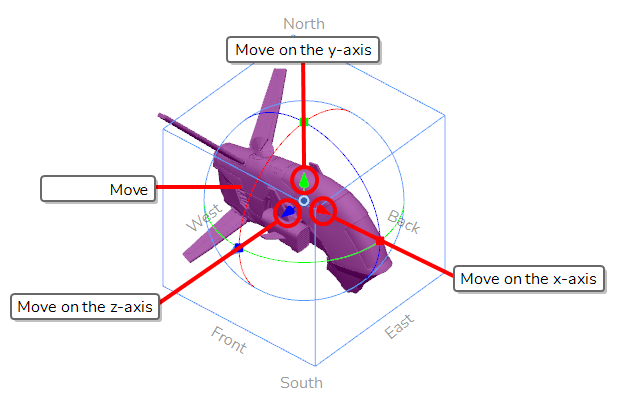
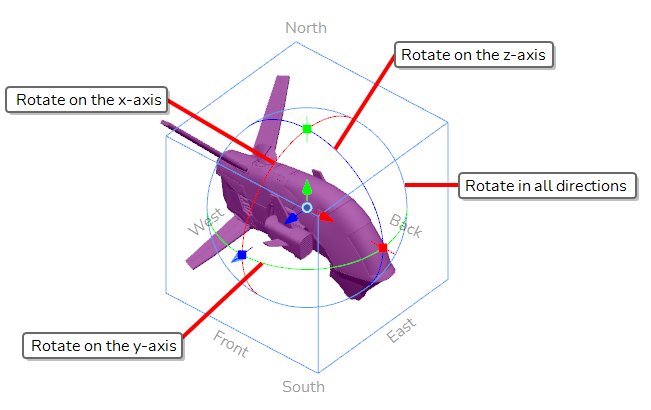
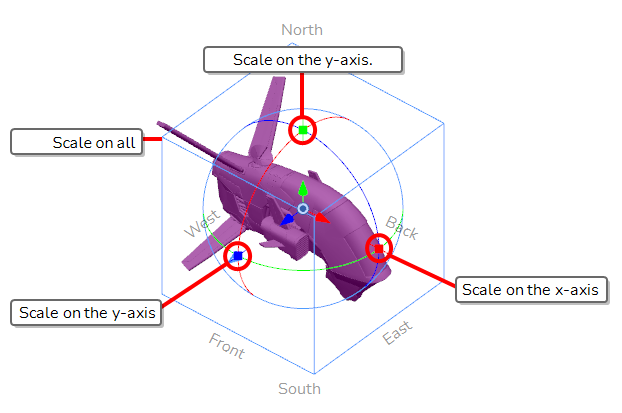
If you select a 3D model with the Layer Transform tool, a 3D transformation manipulator will appear over it in the Stage, Camera, Top and Side views. The transformation manipulator for 3D models is a cube with controls within it to move, rotate and scale the model on any of the three axes.
A 3D model that has just been imported into a panel will be facing the camera. Consequently, the cube of its 3D manipulator will also be facing the camera, making it look like a square. At this angle, it will not allow you to move or scale the model on the z-axis. To work around this, you must either rotate the Stage view, use the Top or Side views, or rotate the model itself.
- Do one of the following:
- In the Tools toolbar, double-click on the Hand
tool and select the 3D Navigation
tool.
- Press and hold Ctrl + Shift (Windows) or Shift + ⌘ (macOS).
- In the Tools toolbar, double-click on the Hand
- Click and drag the inside of Stage view to rotate it in all directions.
- In the Tools toolbar, select the
Layer Transform tool.
- Select the 3D model you want to manipulate.
- In the Stage view, Camera view, Top view or Side view, do one of the following:
- To translate the model on the x-axis, click ad drag the red arrow.
- To translate the model on the y-axis, click and drag the green arrow.
- To translate the model on the z-axis, click and drag the blue arrow.
- To translate the model laterally relative to your point of view, click and drag on its geometry.
- To rotate the model on the x-axis, click and drag the red circle.
- To rotate the model on the y-axis, click and drag the green circle.
- To rotate the model on the z-axis, click and drag the blue circle.
- To rotate the model in any direction, click and drag on its outer circle.
- To scale the model on the x-axis, click and drag on the red square dot.
- To scale the model on the y-axis, click and drag on the green square dot.
- To scale the model on the z-axis, click and drag on the blue square dot.
- To scale the model on all axes, click and drag on any vertex of the cube.
 pivot in the middle of the manipulator. The manipulator and its pivot will move, but not the model.
 Previewing 3D Scenes
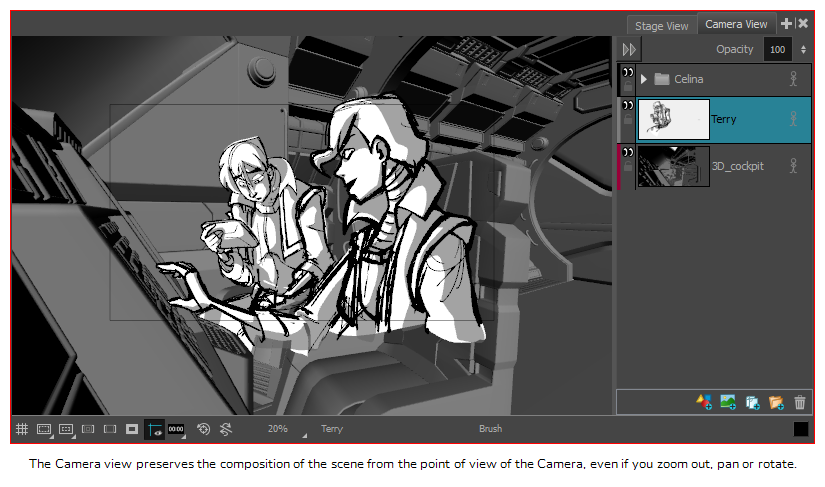
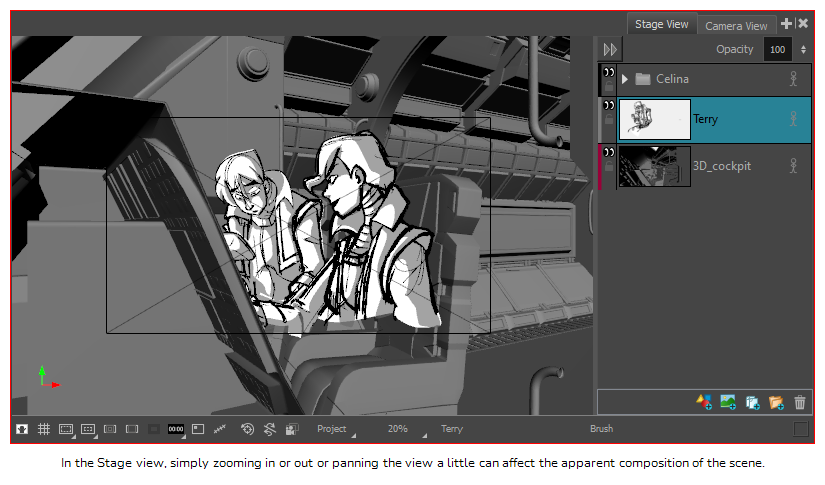
In Storyboard Pro, the Stage view is the default view in which to draw and manipulate objects. However, when working in 3D, it has one pitfall: When you pan, rotate, zoom into or zoom out of the stage view, you are changing the point of view from which you are looking at the stage. This means that the apparent position and size of elements may not be representative of what will appear in your storyboard or animatic.
If you want to see a 3D scene exactly as it will look in your storyboard, you must use the Camera view. The Camera view always displays the stage from the point of view of the camera, even if you pan, rotate or zoom it. Therefore, you should always preview your scene from the Camera view if you make changes to the position of the Camera or of 3D objects, to make sure the composition of the scene is as expected.
- Do one of the following:
- In the top-right corner of the Stage view, click on the
Add View button, then select Camera View.
- In the top menu, select Windows > Camera View.
- In the top-right corner of the Stage view, click on the