Interface Highlights
The Harmony Scan module is composed of five major sections.
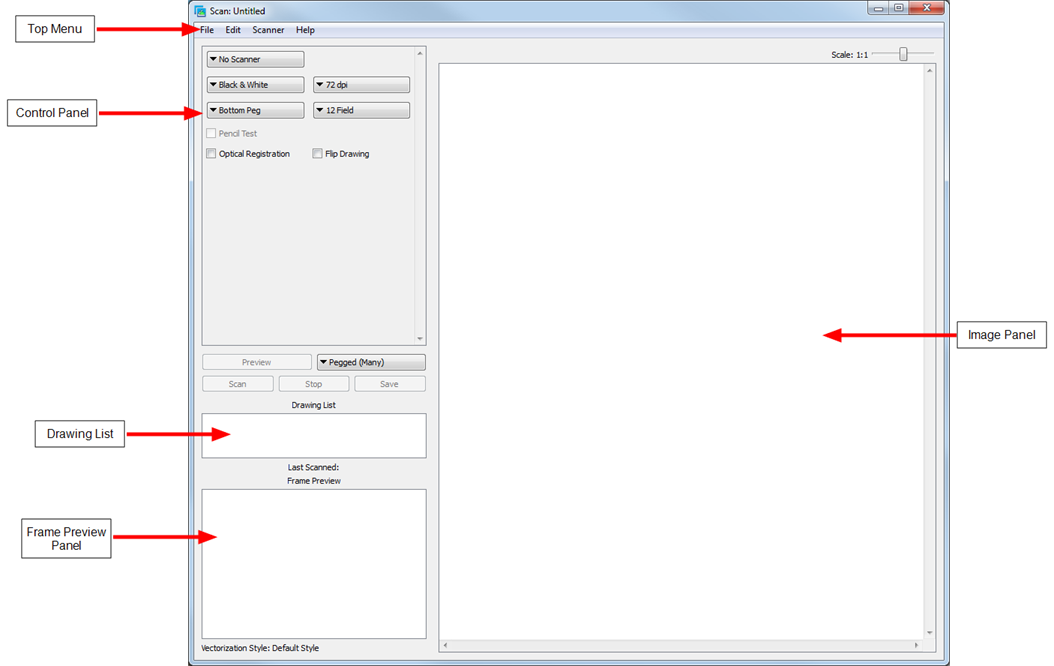
Top Menu
The top menu contains most of the commands available in the Harmony Scan module.
The menu categories are:
Use this menu to load drawings and manage exposure sheet elements.
Use this menu to modify the Drawing List, apply vectorization options and create a text file of scan details for each scanned drawing.
Use this menu to eject a page from the scanner and display scanner information.
Use this menu to access the integrated help system and Harmony Scan module version information.
In the Mac OS X version, there is a Scan category containing the following commands:
Control Panel
Located at the top left of the Scan module window directly below the menu bar, the buttons allow you to set up the scan.

Press this button to display a menu. Use this menu to select how drawings will be fed through the scanner
|
•
|
Autofeed: Feed the drawings into the Automatic Document Feeder (ADF). |
|
•
|
Autofeed (One): Set the scanner to accept one drawing from the ADF when the Scan button is pressed. |
|
•
|
Pegged: Set the scanner to scan a drawing from the flatbed each time the Scan button is pressed. |
|
•
|
Pegged (Many): Set the scanner to automatically scan a drawing from the flatbed every five to ten seconds (depending on the time required to process the drawings). |
|
•
|
Pan Cel: Set the scanner to scan a drawing that is bigger than the scanner window in separate sections. |
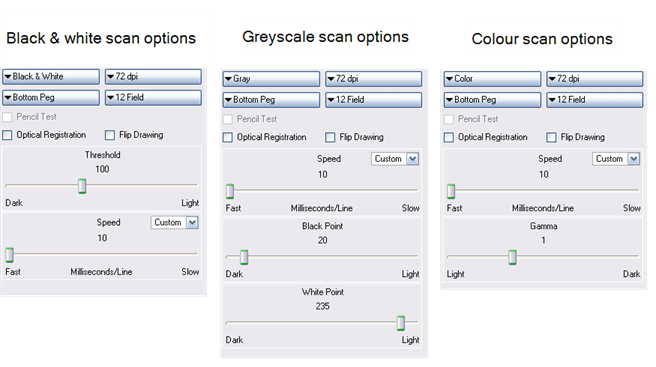
Press this button to display a menu. Use this menu to indicate the size of paper of the drawing you want to scan.
Press this button to display a menu. Use this menu to select the location of the peg or registration holes on the paper you are scanning. The system rotates the images automatically based on your selection.
|
•
|
Bottom Peg: The peg holes appear below the drawing. |
|
•
|
Top Peg: The peg holes appear above the drawing. |
|
•
|
Left Peg: The peg holes appear to the left of the drawing. |
|
•
|
Right Peg: The peg holes appear to the right of the drawing. |
Press this button to test various exposures without saving the image.
Press this button to display a menu. Use this menu to adjust the capture resolution, which determines the quality and the size of scanned images. The resolutions that appear depend on the scanner that you selected using the Scanner button.
Save the previewed drawing to the file currently selected in the Drawing List.
Press this button to begin the scanning process.
Press this button to display a menu. Use the menu to select scan type that applies to your image. If you have more than one scanner connected to your computer, only the scanners that support the selected scan type will be active.
|
•
|
Black and White: Select this option if you are scanning a drawing that you will paint in the Stage or Paint module. |
|
•
|
Greyscale: Select this option to capture the shades of grey in the drawing. |
|
•
|
Colour: Select this option to scan a pre-coloured drawing, such as a background or an overlay. |
Press this button to display a menu. Use the menu to select one of the scanners that is connected to the host machine. The default model is the one that appears first in your scanner configuration file, scan.conf.
Press this button to interrupt a scan that is in progress.
Checkboxes

|
•
|
Flip Drawing: Select this option to flip the scanned image horizontally and realign the registration holes. |
|
•
|
Optical Registration: Select this option to automate the alignment of your drawings using the registration holes on your drawing paper. |
|
•
|
Pencil Test: Select this option to create a black and white image with no paintable colour art regions. |
Scan Options
Located at the left of the Scan module directly below the button bar, the scan options allow you to control the following:
|
•
|
Time required to scan a line, measured in lines per millisecond. |
Drawing List
The drawing list displays the names of the drawings which are loaded for scanning. As each drawing is scanned this is indicated.
Frame Preview Panel
This shows the upcoming frame to be scanned.
Image Panel
The current drawing which is being scanned is shown in this panel.