Toon Boom Harmony 10 Release Notes
Version 10.0.1
If you are a standalone user working with a studio, verify that you are using the same version of Harmony as the studio.
Here are the new features and improvements in Toon Boom Harmony 10.0.1:
Here are the new features and improvements in Toon Boom Harmony 9.2 SP2:
Toon Boom Harmony 10.0.1
64-Bit
Harmony boasts a 64-Bit engine, allowing you to export content faster, including elaborate scenes, large bitmaps, gradients and complex backgrounds. Users can output sophisticated scenes with particles, complex effects, as well as 2D-3D integration.
Some modules are still running on a 32-bit engine. Therefore, you will find both win32 and win64 in the program's folders: Configuration Wizard, Configuration Editor, Media Server, Control Panel and TWAIN.
Scripting
Toon Boom Animation has changed the scripting language.
|
•
|
Scripting language used in Harmony 10.3: Qt script |
|
•
|
Reason for changing the scripting language: better and faster scripting environment |
Toon Boom Animation has changed the scripting language to Qt Script from QSA used in earlier versions. Script's storage is now done as plain text, *.js instead of *.qsa format.
This change to the api was made in the interests of improving the software so that it could support 64-bit platforms. As always, we have made every effort to enable backward compatibility between this version and earlier versions which used QSA script.
|
•
|
Simple functions should port seamlessly. |
|
•
|
Class definitions must follow the new QT Script syntax, so that existing scripts may be modified. |
Detailed instructions on moving QSA script to Qt Script can be found in the "Moving from QSA to Qt Script" documentation at this link:
For a general overview of the QT UI toolkit, refer to the following:
For a tutorial on coding in JavaScript, refer to the following:
New and Updated Built-in Scripting Objects
|
•
|
CopyPaste > pasteActionTemplateIntoNode |
|
•
|
PaletteManager > getCurrentPalettePath |
|
•
|
PaletteManager > getPalettePath |
|
•
|
Render > frameReady (QT signal) |
|
•
|
Render > renderFinished (QT signal) |
|
|
•
|
Scene > currentVersionName |
|
•
|
ToolProperties > setLineAutoGapClosing |
|
•
|
ToolProperties > setPencilTipMode |
|
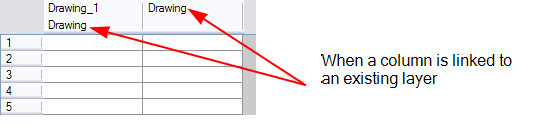
Linking New Columns to Existing Folders
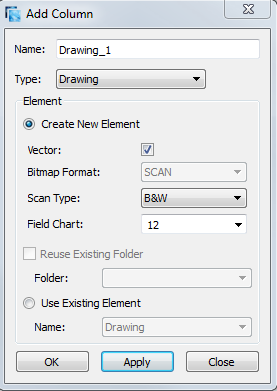
There is a new option available in the advance Add Column dialog box, which serves to link your new column to an existing folder within the Element folder.
|
‣
|
Create New Element: Select this option if you want your column to be an independent column with its own drawing folder. |
|
‣
|
Reuse Existing Folder: Select this option if you want to link your column to an existing folder within the Element folder of your scene. |
If you select the Reuse Existing Folder option, in the Folder drop-down field, select the folder to which you want to link your new column.
|
‣
|
Use Existing Element: Select this option if you want your column to use drawings from an existing column. Both columns will be attached to the same set of drawings, but their timing will remain independent from one another. If you modify one of the drawings, it will be modified in both columns. This is the same principle as the Clone column.
|
If you select the Use Existing Element option, in the Name drop-down field, select the column to which you want to link your new column.
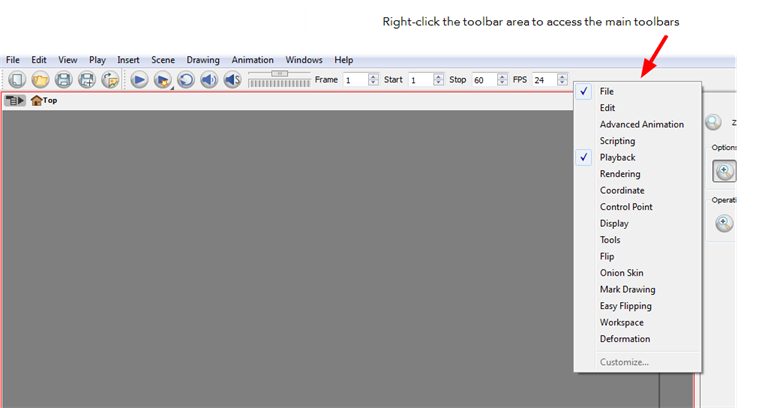
View Toolbar Access and Shortening Toolbars
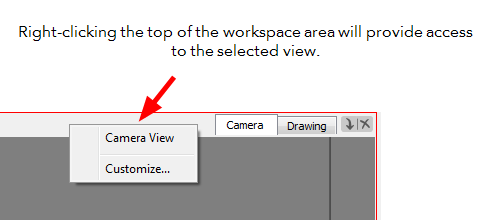
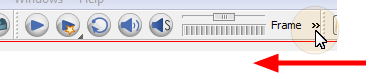
You may right-click anywhere in the toolbar area to access Toon Boom Harmony toolbars. View toolbars, however, are not available by right-clicking the toolbar area. You can access the toolbar of any open and active view by right-clicking in the workspace area.
You may also hide a portion of a toolbar by dragging another open toolbar over its tail-end.

Magnifier Tool Zoom Preference
There is now a Zoom preference that can be set from the Preferences panel under the Drawing tab.
To access the Preferences dialog box:
Do one of the following:
|
‣
|
From the top menu, select Edit > Preferences (Windows/Linux) or > Preferences (Mac OS X). |
|
‣
|
Press [Ctrl] + [U] (Windows/Linux) or [⌘] + [U] (Mac OS X). |
Zoom
|
•
|
Enable Paper Zoom: Enabling this option allows you to set the 100% Zoom level onscreen, in order to physically match the measurements of your paper drawing. |
|
•
|
Number of Pixels per Inch: Enter the PPI for your monitor. To obtain the PPI of your screen, divide the height or width of your monitor's resolution setting by the corresponding physical height or width of your monitor screen (resolution height divided by physical height, or resolution width divided by physical width) in inches. |
|
•
|
Maximum Zoom Factor: Sets the maximum zoom level for the paper zoom. |
|
•
|
Magnifier Width: Sets the width of the Drawing Magnifier floating window. |
|
•
|
Magnifier Height: Sets the height of the Drawing Magnifier floating window. |
|
•
|
Magnifier Offset X: Sets the X-axis distance from which the Drawing Magnifier window floats from your cursor. |
|
•
|
Magnifier Offset Y: Sets the Y-axis distance from which the Drawing Magnifier window floats from your cursor. |
|
•
|
Magnifier Zoom Factor: Sets the magnification level of the Drawing Magnifier floating window. |
|
•
|
Quick Close Up Zoom Factor: Sets the zoom level for the Quick Close up Zoom keyboard shortcut. The default shortcut is [Shift] + [Z]. |
Composite Mode - As Seamless Bitmap
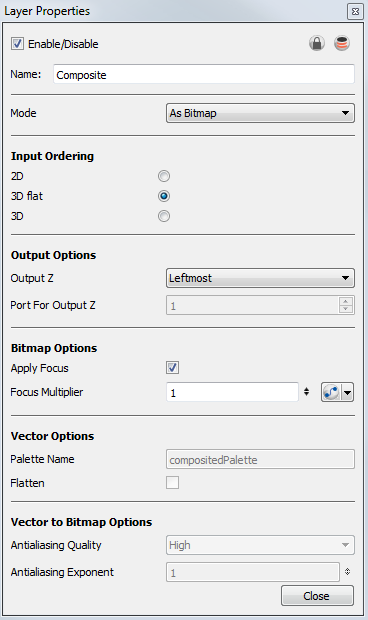
As Seamless Bitmap: When selected, it composites all of the images into a single, flat bitmap image (just like the As Bitmap compositing mode). The main difference between the As Bitmap and As Seamless Bitmap modes is that the seamless version ensures that there is no visible seam between adjacent vector drawings that have matching geometries. This can be useful for cut-out animation, where multiple drawings may align perfectly like pieces of a puzzle. This can also be useful when building a 3D set out of flat drawings rotated in 3D. In this case, using the Seamless mode will produce the correct result when two drawings are either intersecting, or nearly intersecting, in 3D. Note that the As Seamless Bitmap mode does not support the following effects: Shadow, Glow, Blending and Focus.
When building a 3D set out of planes, it is recommended that you set the composite mode to As Seamless Bitmap. This avoids intersection issues when rendering the 3D objects created out of planes.
Setting a Different Colour for Stop-motion and Motion Keyframes
In the Preferences dialog box, you can set a different colour for your stop-motion keyframes in order to create a greater visual difference in the Timeline view.

To set the stop-motion keyframe colour:
|
1.
|
Open the Preferences dialog box by pressing [Ctrl] + [U] (Windows/Linux) or [⌘] + [U] (Mac OS X). |
|
2.
|
Select the General tab. |
|
3.
|
In the Colours section, click Edit Colours. |
|
4.
|
In the Colours window, select the Exposure Sheet tab. |
|
5.
|
In the Others section, click the Stop Motion Keyframe swatch. |
|
6.
|
In the Select Colour window, select a new colour. |
|
7.
|
Click OK to close the Select Colour window. |
|
8.
|
Click OK to close the Colours window. |
|
9.
|
Click OK to close the Preferences dialog box. |
FBX Format Support
Harmony supports the following 3D formats:
You can work with Autodesk Maya, PIXIE, or 3Dlight. For this guide, Autodesk Maya will be used. To work with PIXIE or 3Dlight, contact support@toonboom.com.
3D OpenGL Render
There are two ways to preview and render your 3D elements in Toon Boom Harmony. You can render your scene using the OpenGL preview, or render calling Autodesk Maya, PIXIE or 3Delight in the background.
If you do not set up a plug-in to preview your model with Maya, or your 3D software, the preview and rendering will be done using the OpenGL preview. The result will look flat and jagged, but it can be very handy while working and exporting shots for approval.
If you render your scene calling Autodesk Maya, PIXIE or 3Delight, you will obtain a smooth result, replete with texture and lighting.
Rendering Toolbar
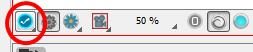
To manually update the rendering preview:
|
‣
|
In the bottom-left corner of the Camera view, hold down the Preview Update  button. From the menu that appears, select Auto-Render. button. From the menu that appears, select Auto-Render. |
Preview Wash Preference
There is now a preference that can be set from the Preferences panel, located under the Camera tab, that serves to wash out outdated previews.
To access the Preferences dialog box:
Do one of the following:
|
‣
|
From the top menu, select Edit > Preferences (Windows/Linux) or > Preferences (Mac OS X). |
|
‣
|
Press [Ctrl] + [U] (Windows/Linux) or [⌘] + [U] (Mac OS X). |
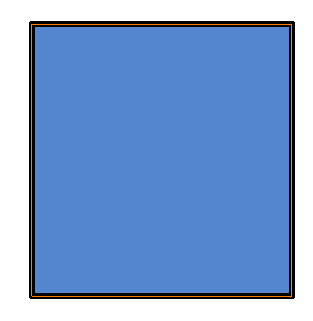
Preview Wash

|
•
|
Enable For Out of Date Previews: When you disable the automatic render preview, you need to click on the Update Preview button in either the Rendering toolbar or the Camera view bottom toolbar in order to recalculate and update the preview. When this option is enabled, if ever the current render preview is out of date and requires you to press the Update Preview button, the Camera view will display the current preview as washed out colours. |
|
•
|
Wash Background Percentage: This is the value in percentage by which the outdated preview will be washed out. |
Sound
Harmony is no longer using ffmpeg to process the sound on Windows and Mac OS X. A new utility called Media Server is used instead. It processes the sound by using QuickTime libraries.
Harmony still uses ffmpeg on Linux. The user has to install it himself, as for legal reasons it can no longer be packaged with Harmony.
Shortcuts
|
•
|
There is a new shortcut available that serves to cancel an Auto-Preview and turn off the Auto-Render in the Camera view. The shortcut is called Cancel Preview, and can be found in the Preferences panel, under the Shortcuts tab, in the General category. The shortcut is unassigned by default. |
Removed Options
|
•
|
Use Hardware Shaders to Render Textures and Gradients preference |
Improvements
|
•
|
In the Camera view, when a 3D object is selected, you can now see the different parts and textures faded with the selection colour, instead of a completely opaque selection. |
|
•
|
When rendering a scene with 3D components, Harmony now supports the render with texture using PIXIE and 3Dlight. |
|
•
|
Harmony now support Xsane drivers for scanners on Linux. |
|
•
|
Harmony 10.0 comes with a new implementation and improvements of the shaders, especially for the Deformation technology. |
|
•
|
The tooltip that appears when you hover your cursor at the top of each Xsheet column shows the absolute folder path to the source drawings for that column. |
Toon Boom Harmony 9.2 SP2
Scene Name Length Limit
When creating a new scene or when renaming a scene, the scene's name cannot exceed 23 characters.
If the name of the scene you are importing in Control Center is too long, you will be prompted with an error message stating that it will be truncated. A scene's name cannot exceed 23 characters.
Select Newly Painted/Repainted/Unpainted Contours/Lines
In the Paint  tool Tool Properties view, engaging this option will keep a selection highlighted around the latest painted zone after using either the Paint, Repaint, Unpaint, or Paint Unpainted tool.
Auto-Save Preference

There is now an Auto-Save feature which can be enabled from the Preferences panel under the General tab.
To access the Preferences dialog box:
Do one of the following:
|
‣
|
From the top menu, select Edit > Preferences (Windows/Linux) or > Preferences (Mac OS X). |
|
‣
|
Press [Ctrl] + [U] (Windows/Linux) or [⌘] + [U] (Mac OS X). |
Auto-Save
|
•
|
Interval (minutes): This is the frequency at which the auto-save takes place. |
|
•
|
Inactivity Interval (seconds): When Auto-save is about to take place, it verify if you are drawing or doing anything in the application. If so, Auto-save waits this number of seconds before attempting another save. |
|
•
|
Ask Before Saving: Before performing an auto-save, the system will prompt you with a message to confirm if you want to save or not. You can choose to turn off this option. |

|
•
|
Enabled: This enables the Auto-save feature. If you do not want the system to automatically save your work, deselect this option. The auto-save is off by default. |
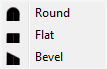
Bevel Pencil Line Tip
In the Tool Properties view, you can now select the way pencil line tips will be affected when using either of the following tools the Cutter, Eraser or Ink tool.
A new preference was also implemented:
|
•
|
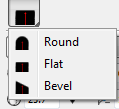
Default Pencil Line Tip: Sets the default pencil line tip to either Round, Flat, or Bevel. |
Cutter Tool
Use the Tip Style option to customize the tip of the pencil line you are cutting.
Ink Tool
Use the Ink Style option to customize the edge of the Ink tool.
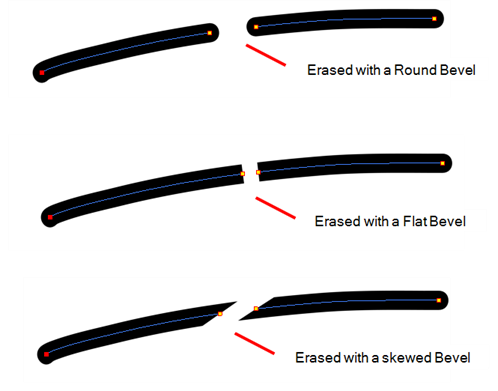
Eraser Tool
The Tip Style option affects the erased tip of pencil lines made with the Pencil, Ellipse, Rectangle, Line, and Polyline tools.
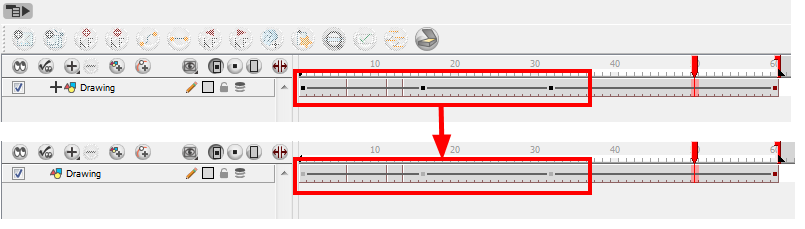
Dimmed Keyframe Colour
If you do not want to animate a drawing layer, you have the option of disabling its animation parameter. To do so, simply select the layer and in the Layer Properties view, deselect the Animate Using Animation Tools option under the Advanced tab.
If your layer was already animated and you deselect the Animate Using Animation Tools option, your keyframes will be dimmed, enabling you to easily identify them as ones that cannot be modified. Select the option in order to modify them again.
Converting your Deformation Animation to Drawings
You may at times want to adjust your deformation animation using the drawing tools in order to perfect something, or add detail. You might also want to change the timing and set it on double frame, rather than single frame. Harmony offers you the option to convert your deformation animation to an image sequence.
To convert your deformation animation to drawings:
|
1.
|
In the Timeline view, select the deformation frame range for which you wish to convert to drawings. |

|
2.
|
In the top menu, select Animation > Deformation > Convert Deformed Drawing to Drawings. |
The Baking Drawing process window opens. Wait for the baking to complete.

Deformation Convert Deformed Drawings Preference
Texture Resolution when Converting Gradient and Textures: This preference sets the size of the bitmap texture used during the conversion of deformed drawings to drawings. The maximum value accepted is 2048 pixels.
The maximum texture resolution for Deformation Convert Deformed Drawings changed from 512 to 2048. The default value for this preference changed from 512 to 1024.
Blending Modes Update
Both the Blending module and Composite-Generic module have regular blending modes and legacy blending modes. The regular blending modes will take the source images and unmultiply them before blending the two inputs together. The images will be remultiplied when being output from the module. The legacy blending modes use the pre-multipled source images as is in order to apply the effect. Unmultiplying the images before processing them will give a final result closer to what can be found in software such as Adobe Photoshop.
Image Sequence Export - DPX Format
To export an image sequence, you need to adjust a few settings in the Write module’s properties.
You can export your image sequences as several different formats:
|
•
|
TVG
TVG (Toon Boom Vector Graphic) is the Toon Boom vector proprietary format. |
|
•
|
TGA (TGA1, TGA3, TGA4)
Select TGA4 to export your sequence with an alpha channel (transparency). |
|
•
|
SGI (SGI1, SGI3, SGI4)
Select SGI4 to export your sequence with an alpha channel (transparency). |
|
•
|
SGIDP (SGIDP1, SGIDP3, SGIDP4)
Select SGIDP4 to export your sequence with an alpha channel (transparency). |
|
•
|
PSD (PSD1, PSD3, PSD4)
Select PSD4 to export your sequence with an alpha channel (transparency). |
|
•
|
PSDDP (PSDDP1, PSDDP3, PSDDP4)
Select PSDDP4 to export your sequence with an alpha channel (transparency). |
|
•
|
PNG (PNG4)
Select PNG4 to export your sequence with an alpha channel (transparency). |
PNG4 is the recommended format to export an image sequence with transparency.
|
•
|
BMP (BMP4)
Select BMP4 to export your sequence with an alpha channel (transparency). |
|
•
|
OPT (OPT1, OPT3,OPT4)
Select OPT4 to export your sequence with an alpha channel (transparency). |
|
•
|
DPX (DPX3_8, DPX3_10, DPX3_12, DPX3_16, DPX3_10_INVERTED_CHANNELS, DPX3_12_INVERTED_CHANNELS) |
Tool Preset View
Create tool presets for 20 different tools, including the Paint, Polyline, Transform, Brush and Select tools. Define the colour, size and tool properties for the preset. Import a preset, or add a script, to have it perform specified actions. In addition, assign shortcuts for up to 10 of these presets.
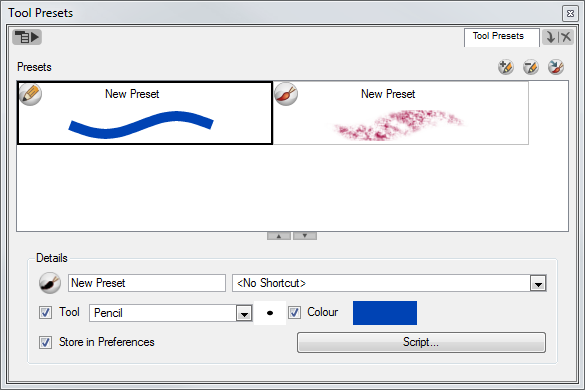
To create a Tool Preset:
|
1.
|
From the Tools toolbar, select a drawing tool. |
|
2.
|
In the Tool Properties panel, customize the selected tool. For example, if you have the Brush tool selected, you can tailor its maximum and minimum thickness, as well as assign a texture to it. |
|
3.
|
In the Colour view, create, or select, a colour. |
|
4.
|
In the Tool Presets view, click on the Create New Preset  button, or from the View button, or from the View menu, select New Preset. menu, select New Preset. |
The new preset appears in the swatch section of the Tool Presets view with much of its details filled in based on the information provided in the Tool Properties panel.
To delete a Tool Preset:
|
1.
|
In the Tool Presets view, select the preset that you would like to delete. |
|
2.
|
Click on the Delete Preset  button, or from the View menu, select Delete Preset. button, or from the View menu, select Delete Preset. |
To save a Tool Preset:
|
1.
|
In the Tool Presets view, select the preset that you would like to save. |
|
2.
|
Be sure that the Store in Preferences option is enabled (checked). |
|
3.
|
Either save your entire project, or from the View menu, select Save Presets. |
Inverting a Selection
Select Tool
Sometimes, when you want to select multiple objects, while leaving one unselected, it can be handy to select only the stroke, or line, that you do not want included in your selection. Then, you can invert that selection so that everything else becomes selected. This can be quite a time saver.
To invert a selection:
|
1.
|
From the top menu, select Edit > Invert Selection or press [Ctrl] + [Shift] + [I] (Windows/Linux) or [⌘] + [Shift] + [I] (Mac OS X). |
You can also find the Invert Selection option in the Camera View or Drawing View menu by selecting Edit > Invert Selection.
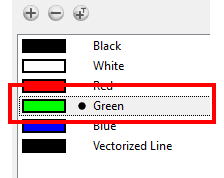
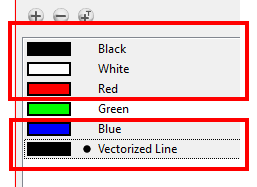
Colour View
When you need to select all colour swatches but one, or select only a few swatches here and there, it might be faster to select the only colour you do not need, in order to select and invert the selection.
To invert a colour swatch selection in the Colour view:
|
1.
|
In the Colour view, select the colour swatch you DO NOT want to have in your final selection. |
|
2.
|
In the top menu, select Edit > Invert Selection. |
Exporting a Sound File
At some point during the production, you might need to export your sound file to use it in another application such as an editing software. Harmony allows you to export your sound files either as a merged soundtrack, or as a series of individual files. The exported soundtracks are generated as *.wav files.

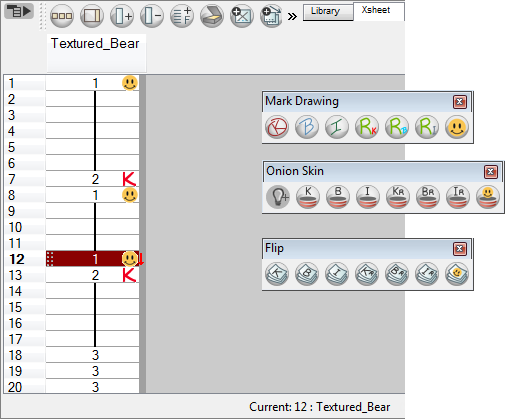
Custom Mark in the Xsheet View
Make custom marks for the Xsheet by creating your own icons, then cutting, pasting and changing a bit of code. Not only is it possible to have your custom mark appear in the Xsheet and Mark Drawing toolbar, but also in the Onion Skin and Flip toolbars.
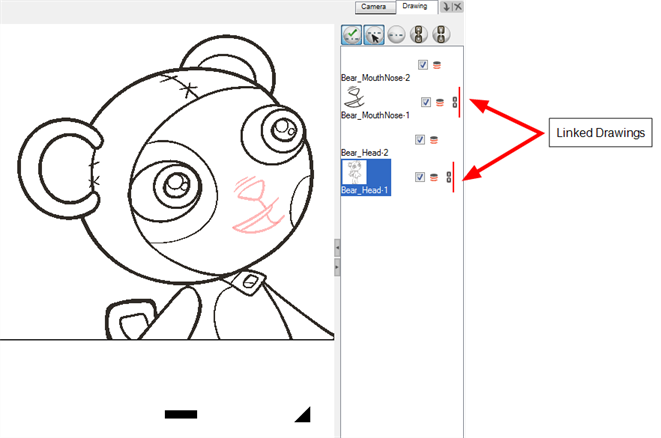
Shift and Trace Linked Drawings
When using the Shift and Trace feature, you can link different drawings from the Drawing List so that they move together when dragging or scaling. These drawings can be from different columns in the Xsheet view. Bars in differing colours will appear beside the chain link icon to easily identify different linked groups.
To link your Shift and Trace Drawings:
|
1.
|
In the Drawing view's Thumbnail area, display the drawings you want to use to perform your Shift and Trace operation. |
|
2.
|
In the Thumbnail area, hold down [Ctrl] (Windows/Linux) or [⌘] (Mac OS X) and select the drawings your want to link together. |
|
3.
|
In the Thumbnail area's toolbar, click on the Link Drawings button to link your selection. |
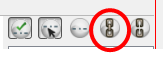
A coloured bar and a link icon appear beside the linked drawings.
Disabling the Gestural Drag Mode
You can turn off the Gestural Drag Mode for the Xsheet view to prevent drawings from being dragged from one location to another. A Toggle Gestural Drag Mode button is available for this feature, accessible by customizing the Xsheet View toolbar. Otherwise, access it by right-clicking on a cell or the Xsheet's Edit menu.
To turn off the Gestural Drag mode:
|
‣
|
In the Xsheet view, right-click and deselect the Gestural Drag Mode option. |
|
‣
|
You can also customize the Xsheet View toolbar and display the Toggle Gestural Drag mode button to enable and disable this option. |

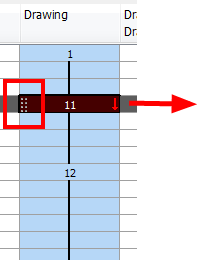
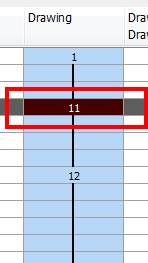
The dragging pad disappears when the Gestural Drag mode is off.
This feature does not apply for Annotation columns.
Write Module Image Sequence and QuickTime Movie Export
Using the Write module, you can export your project in both QuickTime movie and image sequences. You can export one format at a time, or both simultaneously.
Chunk Output QuickTime Movie Export
Discover the new implementation of the QuickTime movie export in chunks when doing batch rendering. It now renders all the fi nal frames and then assembles them into a QuickTime movie. This makes the process more robust and assures the QuickTime render of a whole scene. This feature only works when connected to the database (not in Harmony Standalone).
Utransform and Unvectorize Can Now Use the Most Up-to-Date Colours
Use the Utransform utility from the terminal or the Unvectorize command from the Control Centre to convert *.tvgs to bitmap images, with the assurance that the fi les will be rendered using the associated palette-list. Where previously, even if zones colours were changed in a scene, if no new marks were created on the drawing (*.tvg) with the updated palette, the zone colour change would not be registered. Now that the Utransform searches for the Palette List before rendering, this is no longer a problem.
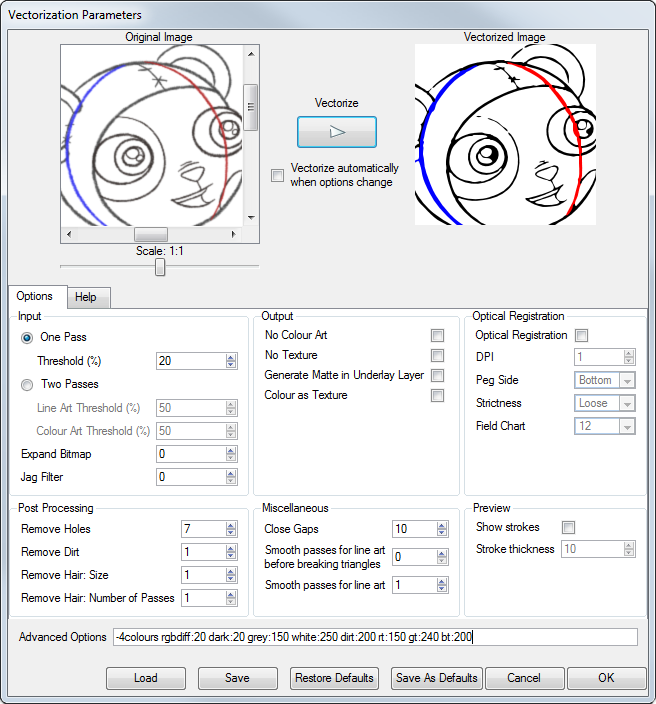
4 Colours Vectorization
Use the Vectorization Parameters dialog box to vectorize your pencil drawings, along with any red, blue or green pencil marks that you may have used to indicate highlights and shadows. The system will vectorize the drawing into pure red, blue, green and black (RGB values), while creating colour art zones wherever lines connect. After painting in your tones and highlights, change your pure RGB colours to transparent (0 Alpha) in the Colour Picker window and watch the indicator colour zone lines disappear.
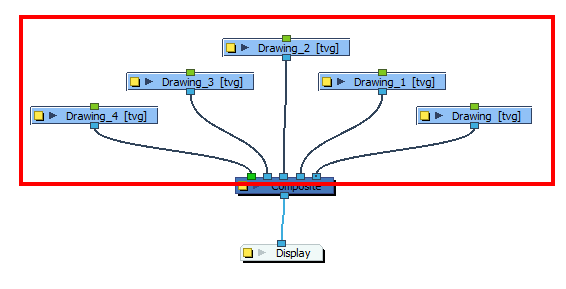
Making an Automatic Connection to a Parent Peg in the Network View
You can automatically create connections between modules in the Network view without having to drag cables out of the ports.
To create an automatic connection to a Parent Peg:
|
‣
|
In the Network view, select one or several drawing modules that are not parented to any other module. |
|
‣
|
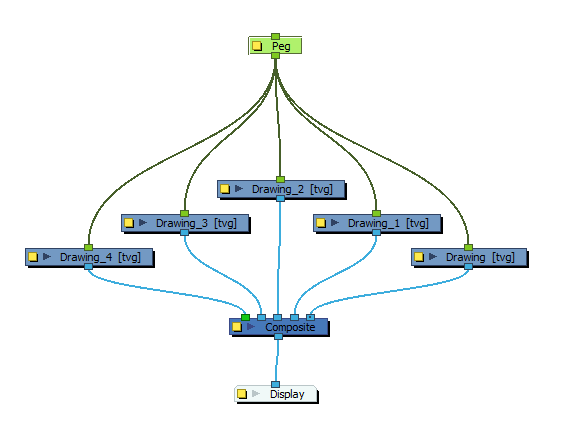
Press [Ctrl] + [P] (Windows/Linux) or [⌘] + [P] (Mac OS X) to add a new peg module to the Network view and automatically connect it to the selected modules. |
|
‣
|
Press [Ctrl] + [Shift] + [P] (Windows/Linux) or [⌘] + [Shift] + [P] (Mac OS X) to add a peg to each individual module. |
Additional Changes
|
•
|
Use Contour Editor on all sub-layers of a drawing |
|
•
|
Initial default setting of all Colour Override module sections are un-collapsed |
|
•
|
Smoothness values can be changed in smaller increments for several of the drawing tools |
Bug Fixes
|
•
|
Use the “Group selection with composite” command from the Timeline, as well as grouping other effect modules in the Network, such as the Colour Override, without worrying that the Group’s inport will appear blue instead of green in the Network view. |
|
•
|
Export a QuickTime movie with sound of a different sample rate than the original scene, for example 48khz to 22 khz, without the worry of unwanted clicking noises. |
|
•
|
Quake module now renders out. |
|
•
|
No longer an error handling for unreadable Preference files. |
|
•
|
tbprocess on Mac no longer dies, so that batch rendering can occur. |
|
•
|
Different gradient tags update when colours are picked from the multi-wheel Colour Picker. |
|
•
|
Use of 3delight and Pixie scripts now functional on Windows. |
|
•
|
Scenes containing imported PSD in layers no longer crash on close. |
|
•
|
Integrated Help in the Network view no longer opens with a double-click. |