Send Scenes to the Render Queue
When you are ready to send a set of scenes for rendering, you can use the Send to Rendering command. This command allows you to send one or more scenes for rendering to the Batch Processing machine.
You can also use Harmony Stageto render scenes, but since you must open each scene individually in Harmony Stage, you can only send one scene to render at a time.
To send a group of scenes to the render queues:
|
1.
|
In the Control Center window, select the Environment, Job and scenes that you want to send to the Render queue for rendering. |
|
2.
|
In the top menu, select Scene > Send to Rendering. You can also right-click anywhere in the Scenes list and select Send to Rendering. |
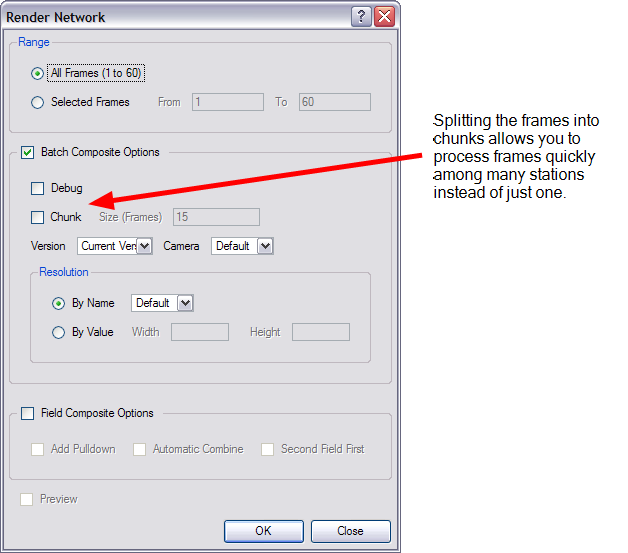
The Render Network dialog box appears.
|
3.
|
Select the frames you want to render: |
|
‣
|
All Frames: sends all the frames in the scene to be rendered. |
|
‣
|
Selected Frames: sends a range of frames to be rendered. You can only send a range of frames if you selected one scene. |
|
4.
|
Select the Chunk Size checkbox if you want to split the frames into sets of frames. Enter the number of frames you want in each chunk in the Size field. |
|
5.
|
Select the Version of the Scene you want to render. |
|
6.
|
Select the camera you want to use to render the scene's images from the Camera drop-down menu. These are the cameras you created in your exposure sheet in Harmony Stage. |
|
7.
|
If you want to create a Field Composite, select the checkbox to refine your selection. |
|
‣
|
Select the Add Pulldown checkbox to use the 3:2 pulldown technique. |
|
‣
|
Select the Automatic Combine checkbox to combine even and odd fields on a scene's image. |
|
•
|
Select the Second Field First check box to always start with the second field before combining with the first field. |
|
8.
|
If you did not enable the Batch Composite Options check box, enable the Preview option to see the render once it is completed. |
|
9.
|
Click OK to complete the render. |
To verify that the scenes have been sent for rendering, you can display the Render queue.
Related Topics