Subnode Override Node
When manipulating 3D models, by default, it is only possible to animate the transformations on the whole model. Transformations on their individual parts (subnodes) are static. These subnodes can be transformed independently in order to pose and animate 3D models that have been imported into Harmony. In order to be able to animate the subnodes in a 3D model, either a Subnode Animation node or Subnode Override node will need to be applied to the 3D model in the Node view. These nodes will store the keyframes for each subnode that you pose or animate which will be reflected on the timeline.
Connection
The Subnode Override node takes a 3D model in its input port. As soon as a 3D model is connected to a Subnode Override node, its subnodes become animatable individually. Once you start animating the model's subnodes, the node outputs the 3D model with its subnodes animated.
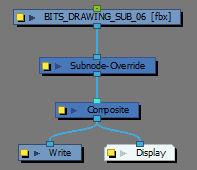
The parameters for each subnode that is animated will appear in the node's parameters in the timeline.
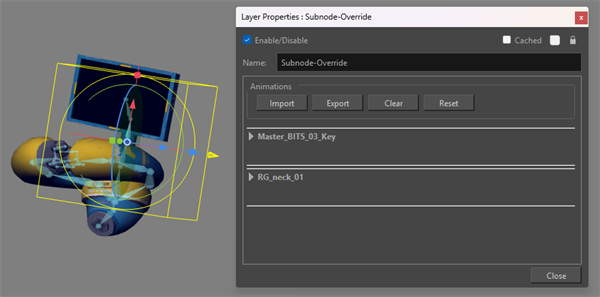
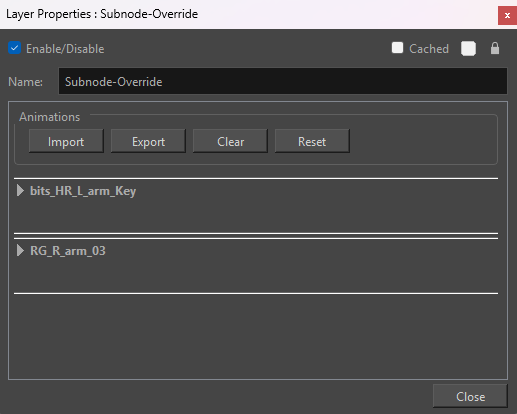
Layer Properties
All the animatable 3D model subnodes will appear on a list in the Subnode Override Layer Properties when a keyframe is made. Expand any of the subnodes in the list to view its individual properties.
Click on any of the Function buttons to open the Function Editor for that parameter.
If movements have already been created in the Camera view, you may not be able to edit some of the fields. They just display the value of that parameter at the given position in the Timeline. If you would like to edit these fields, change the field type to Local.
| Parameters | Description |
| Enable/Disable | Allows you to enable or disable the node. When disabled, a node has no visible effect on the rendered image, nor on the preview in the Camera, Perspective, Side and Top views. |
| Colour Swatch | Sets the colour of the layer in the Timeline view and of the node in the Node view. |
| Name | The name of the node as it appears in the Node View and the Timeline view. Each node must have a name that is unique to its containing group. |
| Position |
3D Path: Lets you use a 3D path function to animate an element. Separate: Lets you independently edit the different coordinate fields.
|
| Rotation |
Quaternion: Rotations made on the X, Y and Z axes are linked, as is the velocity which acts on the three rotation functions simultaneously. Euler Angles: Rotations can be made on the X, Y and Z axes independent of each other; each has its own velocity. 3D Rotation: When the Quaternion option is selected, lets you choose the path type. You can do this form the field menu, located after the Function button .
|
| Scale |
Locked: Resizes the element while keeping its ratio. The X and Y axes scale proportionally Separate: Resizes the element allowing to modify the ratio (squash and stretch).
|
| Import |
Import 3D files containing subnode information. You can import 3D files using one of the following file formats:
|
| Export |
Export 3D files containing subnode information from Harmony. You can export your 3D files using one of the following file formats:
|
| Clear |
Will remove all subnode keyframes from the timeline. The affected subnodes will remain on the subnode list contained in the Subnode Override Layer Properties. |
| Reset | Will remove all subnode keyframes from the timeline as well as remove all subnodes from the subnode list contained in the Subnode Override Layer Properties. |
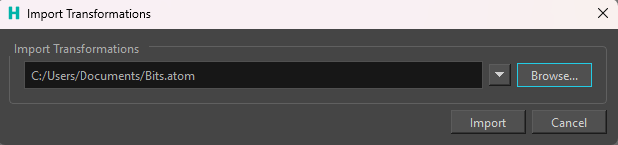
Import
You can import 3D files containing subnode information exported from Maya directly into your scene through the Subnode Override node. The 3D files will contain all the keyframes and subnode information applied to the 3D model in Maya.
| Parameters | Description |
| File Location | The file path where Harmony will source the 3D file for import. |
| File Location Picker | A dropdown menu of the most recent file paths used when performing an import. |
| Browse | Launches the File Explorer enabling you to manually locate and select the 3D file for import. |
| Import | Import the 3D file and automatically apply subnode keyframes to the 3D model in the timeline. |
| Cancel | Abort import operation. |
Export
You can export and package 3D files containing subnode information directly from your Harmony scene through the Subnode Override node. The 3D file that Harmony will write will contain keyframes and subnode information that were applied to the 3D model. The 3D model can be imported directly into Maya containing all transformations applied to the 3D model in Harmony.

| Parameters | Description |
| File Location | The file path where Harmony will write the 3D file upon export. |
| File Location Picker | A dropdown menu of the most recent file paths used when performing an export. |
| Browse |
Launches the File Explorer enabling you to manually locate and select where to write the 3D file upon export. You can also set the 3D file type in the File Explorer when naming your file. You can export your 3D file using one of the following file formats:
|
| Overwrite without asking | When enabled, Harmony will not ask permission before writing a 3D file over an existing 3D file that shares the same file location. |
| Bake Animated Values | When enabled, all cells will be assigned a keyframe upon export. |
| Export | Write a 3D file containing the subnode information to a specified location on the disk. |
| Cancel | Abort the exporting operation. |