When your scene is completed, you can revectorize scanned drawings with a different vectorization style, including TVG, greyscale, greyscale rougher lines or soft edge, and tones/highlights. You can also choose to convert vector drawings into bitmap drawings.
If you didn't scan drawings and just did them paperless or imported them, you cannot revectorize them because the original bitmaps are required in the scene.
- Select a scene from the Scenes list.
- Do one of the following:
- Select Scene > Vectorize.
- Right-click and select Send to Vectorize.
The Send to Vectorize window opens.
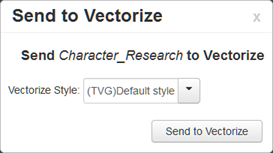
- Select a vectorization style for the scene.
- Click Send to Vectorize.
- Select a scene from the Scenes list.
- Do one of the following:
- Select Scene > Unvectorize.
- Right-click and select Send to Unvectorize.
The Send to Unvectorize window opens.
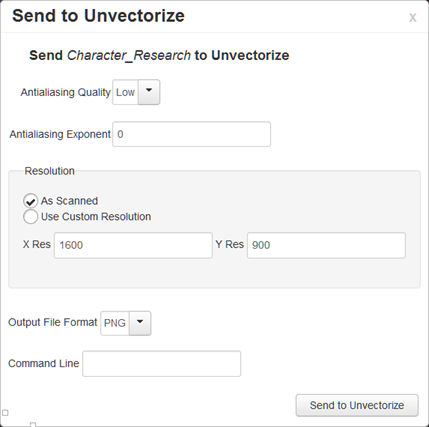
- From the Antialiasing Quality list, select a quality level.
- In the Antialiasing Exponent field, set the .
- In the Resolution section, select one of the following:
- As Scanned to use the resolution at which the drawing was scanned.
- Use Custom Resolution, then enter the desired X and Y resolution.
- From the Output File Format list, select a format for the unvectorized scene.
- In the Command Line field, you can enter a command from the utransform utility. For example, you can set the background colour: -bgcolor 1.0 1.0 1.1.
- Click Send to Unvectorize.