WebCC allows you to download (export offline) scenes from a studio's Harmony database and work on them locally from a remote location. When downloading the scene, you have the option to check it out, which locks it from being modified by other users until you make your changes to it. Once you are done working on the scene, you can re-import it back into the database via WebCC, and check it back in at the same time.
Scenes can be exported individually or in bulk. When exporting scenes, a package containing the scenes is created in the User Exchange folder. Users can then download that package using the Exchange Manager panel accessible from the File menu.
The following restrictions apply to exporting scenes from WebCC:
- Users who do not have administrative privileges must be assigned a scene before they can export or re-import it—see User Types and Restrictions in WebCC and Assigning Scenes to Users in WebCC.
- Scenes cannot be uploaded or downloaded using a tablet.
- If you want to export or import environments, jobs and scenes for archiving, you must use the Control Center. WebCC is designed to allow remote project collaborators to work on individual scenes.
- From the Scenes list, select a scene to export.
- In right pane, click Export Offline.
The Export Offline window opens.
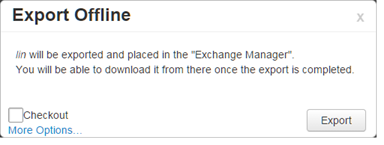
- Select the Checkout option to lock the scene, preventing anyone from modifying the scene.
- Click More Options.
Additional options for exporting offline are displayed, including the palettes and libraries for the environment and job. You can also export external drawings.
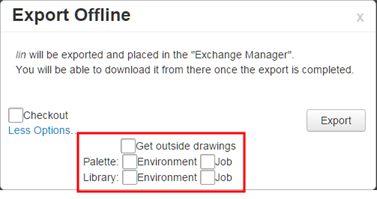
- Select the appropriate options and click Export.
The selected scene is zipped and exported to your user exchange folder. Wait for the Export process to complete.
- Close the Successful Export dialog box.
- Select File > Manage Uploaded/Exported Files.
The Exchange Manager window opens.
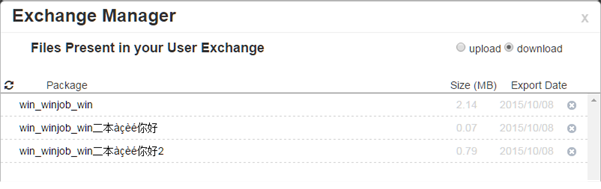
- To delete exported files after you download them, select the Delete from Exchange After Download option in the bottom-right corner.
- In the Package list, click a web link to download.
- From the Scenes list, select the scenes to export.
- Select Admin > Export.
The Export screen opens. The selected scenes are listed in the List of Scenes to Export section.
- To add more scenes, select the environment, job and scenes to add and click Add Selected Scenes.
- To remove unwanted scenes, select the scene and click Remove Selected Scene.
- To export:
- Click Export Offline to export your selection to your user exchange folder using the preset options. Select the Checkout option to lock the scene, preventing anyone from modifying the scene. Click Export.
- To export your selection with custom options, click Export to Another Database. The Export with Options window opens—see Import or Export to Another Database Options. Select the appropriate options and click Export.
- Close the Successful Export dialog box.
- In the top-left corner, click Return to Scene List to return to the main page.
- Select File > Manage Uploaded/Exported Files.
- To delete exported files after you download them, select the Delete from Exchange After Download option in the bottom-right corner.
- In the Package list, select the zip file to download.