Node View Toolbar

The Node View toolbar contains options for organizing, arranging, and presenting nodes and node connections in the Node View.

Icon Functionality Description
  Enable (A)

If the selected node is disabled, the node will be enabled and re-appear in the Camera View.

  Disable (D)

Hides the selected node from view in the Camera View.

  Order Node View Up

Arrange the node structure into a tree When selected, the Order Node View Settings dialog box will appear.

  • X Overlap % - the percentage of node overlap horizontally along the x-axis.

  • Layer Spacing - the number specifying the spacing between the layers and the Composite Node.

  • Vertical Spacing - The integer specifying of the nodes vertically.

  Order Node View Down

When selected, the Order Node View Settings dialog box will appear.

  • X Overlap % - the percentage of node overlap horizontally along the x-axis.

  • Layer Spacing - the number specifying the spacing between the layers and the Composite Node.

  • Vertical Spacing - The integer specifying of the nodes vertically.

  Align Nodes Horizontally Will organize the nodes into a tree where each of the layer nodes will align horizontally.
  Center On Selection (O) When clicked, the selected node will appear in the center of the Node View.
  Show Selected Thumbnails When selected, the thumbnails will appear for each of the selected nodes.
  Hide Selected Thumbnails When selected, the thumbnails for the selected nodes will no longer be visible.
  Select All Nodes

Allows you to search for specific nodes. All nodes that meet the search criteria will be selected.

  • Search by Node Type - When checked, the Available Node types dropdown will be enabled, and you may search by node type.

  • Find - The field where you may enter letters to search by. When clicking OK, all nodes matching the search word will be selected.

  • Case Sensitive - When checked, words containing both the search term and its exact capitalization will be selected. If unchecked, all node names matching the search term will be selected with capitalization ignored.

  • Available Node Types - When Search by Node Type is selected, the Available Node Types dropdown will be enabled. The dropdown contains four node types: COMPOSITE, DISPLAY, WRITE, and READ. When a Node Type is chosen, all matching nodes will be selected.

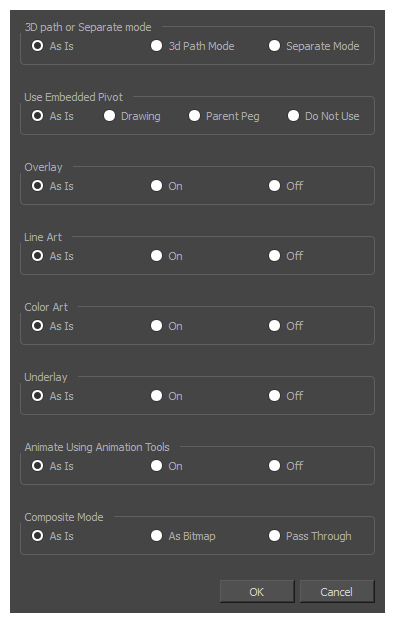
  Set Properties on Many Layers

  • 3D path or Separate Mode: Whether you want the Position parameter of the selected Peg and Drawing nodes to use a 3D Path type function or a Separate function for their position on the x, y and z axes.

  • Use Embedded Pivot: Whether you want the selected Drawing nodes to apply their embedded pivot on themselves (Drawing), on their parent peg (Parent Peg) or not at all (Do Not Use)

  • Overlay: Whether to enable the Overlay layer for the selected Drawing nodes.

  • Line Art: Whether to enable the Line Art layer for the selected Drawing nodes.

  • Color Art: Whether to enable the Color Art layer for the selected Drawing nodes.

  • Underlay: Whether to enable the Underlay layer for the selected Drawing nodes.

  • Animate Using Animation Tools: Whether to allow users to manipulate and animate the selected Drawing nodes with the animation tools. Setting this to off will make animation tools work on the Drawing node's parent peg instead.

NOTE This option only affects Drawing nodes, and not Peg nodes.
  • Composite Mode: Whether the selected Composite nodes should have their mode set to As Bitmap or to Pass Through.

NOTE Composite nodes are only available in Harmony Premium. For each property that you do not want to change for the selected nodes, leave As Is selected.
  Show All Nodes (Shift +.) If you are zoomed into a particular section of the Node view, selecting Show All Nodes will zoom out to display all nodes in the Node View screen.
  Add Prefix/Suffix Adds a prefix or suffix to all the selected nodes.
  Cable Cutter Allows you to cut node connections. Once clicked, you may disconnect node connections by clicking and dragging the cursor through them.