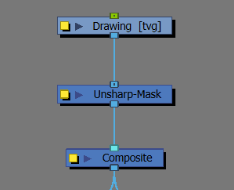
Unsharp Mask Node
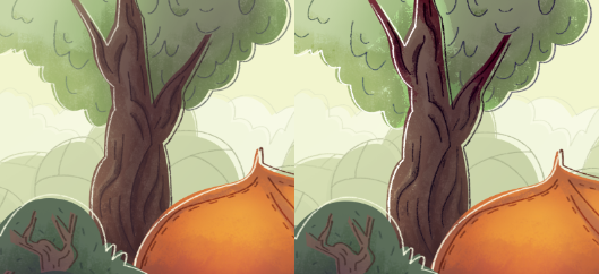
The Unsharp Mask Effect Node is an effect that can be added to sharpen an image. It does so by creating a blurred copy of the image that is subsequently applied as a mask affecting the contrast in the original image. This technique is best used to sharpen Bitmap images or to reduce the look and feel of the anti-aliasing of a vector image.
Connection
In order to set up the Unsharp Mask Node in the Node view, the Unsharp Mask Node requires an image input and image output. The image input can be any node providing an image as its output.
Properties
| Parameter | Description |
|---|---|
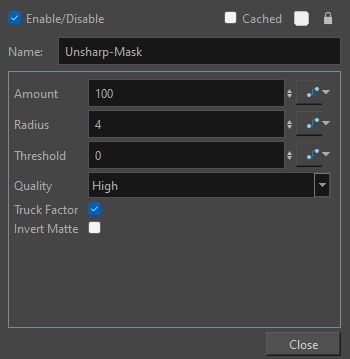
| Name |
The name of the node. NOTE When multiple Unsharp Mask nodes are in a scene, adding a sequential number to the name can help identify nodes more quickly.
|
| Amount |
The overall strength of the Unsharp Mask Node on the final image. The lower the setting the closer the effect will resemble the original unfiltered image. The higher the number, the more the image values will contrast and the harsher the sharpening effect will be. The range is expressed as a percentage from 0% to 500% |
| Radius |
The size of the blurring effect of the underlying mask. A smaller radius will consider fewer details filtering out subtle variations allowing for a sharper end result. A larger radius will consider a broader range of details which will result in a less sharpened effect. The radius can be set to a value of 0 to 100. NOTE If the Radius is too high a Halo effect will occur as the blurring effect bleeds between edges.
|
| Threshold |
The minimum amount of tonal contrast in a given area before the effect of the Unsharp Mask node is applied. A higher threshold will affect areas of higher contrast. These areas are often also more detailed. A lower threshold will occur in areas of lower contrast and less detail. A value may be entered between 0 and 255. |
| Quality |
The two options are:
|
| Truck Factor |
Activated by default, this option readjusts the blur when the elements undergo a change of depth or scale. When this option is deselected, the effect's values remain unchanged regardless of any depth or scale changes. This option should be deselected when multiple drawings are composited and attached to this effect. |
| Invert Matte | Inverts the matte used to generate the effect. By default, the effect is applied to the opaque areas of the matte drawing. When this option is enabled, the effect is applied to the transparent areas of the matte instead |