The Master Controller Slider Wizard dialog allows you to generate a slider-type Master Controller widget which can be used to position a character model based on a range of two or more key poses.
To use the Slider Wizard, all you need to do is to provide it with a selection of layers and/or groups (ie: a character rig, or part of a character rig) as well as a range of frames. The Slider Wizard dialog will store all the poses for the selected layers in the selected range of frames in a file, and generate a Slider widget which, when manipulated by the user, is scripted to apply one of these poses, or an intermediary between two of these poses, onto these layers.
A good example of how this dialog can be used is by creating poses of your characters in key angles (ie: front, 3/4 front, side, 3/4 back and back, as well as the flipped versions of these angles), and creating a slider made to interpolate between all these poses. If done properly, and provided that all the poses provided can be interpolated, the result will be a slider widget that can be used to pose the character in any angle.
-
Do one of the following to add the Master Controller toolbar to your workspace:
- Right-click on an existing toolbar and select Master Controller.
- In the top menu, select Windows > Toolbars > Master Controller.
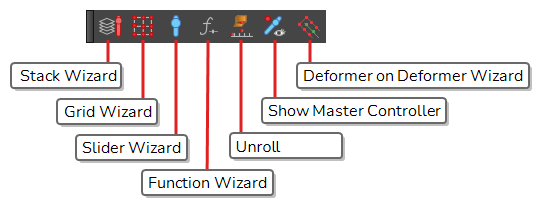
The Master Controller toolbar appears.
- In the Timeline view, select a range of frames.
- In the Master Controller toolbar, click on the
 Slider Wizard button.
| Icon | Parameter | Description |
|---|---|---|
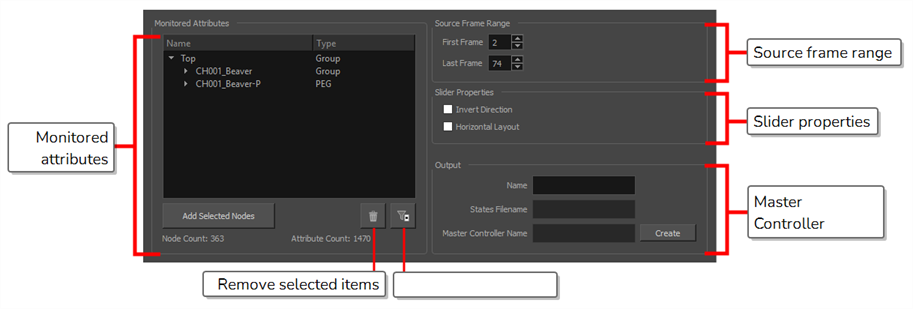
| Source Frame Range | ||
| First Frame | The frame number of the first frame in the selection. | |
| Last Frame | The frame number of the last frame in the selection. | |
| Slider Properties | ||
| Invert Direction | By default, the slider will interpolate from the first pose to the last post by sliding the handle from bottom to top, or from left to right if the Horizontal Layout option is checked. If this option is checked, the slider will interpolate from the first pose to the last pose by sliding the handle from the top to the bottom, or from right to left. | |
| Horizontal Layout | By default, the slider will slide on a vertical axis. If this option is checked, it will slide on a horizontal axis. | |
| Monitored Attributes | ||
| Attribute List |
The list of nodes (ie: layers, pegs, deformation points, etc.) that will be affected by the Master Controller. If you expand any of the listed nodes, you will find the list of attributes (ie: position, angle, scale, etc.) The list is structured in a group/node/attributes hierarchy, with Top representing the root of your scene. By expanding a group, you will find all of the nodes inside that group. By expanding a node, you will find all of its attributes. |
|
| Add Selected Nodes |
If you first select groups nodes in the Timeline or Node view, you can click on this button to add these nodes' attributes to the Monitored Attributes list. This allows you to add more nodes to the list of nodes that will be controlled by the Master Controller. If you select a group, this button will add the group as well as every node inside that group to the Monitored Attributes list. |
|
|
|
Remove Selected Items |
Removes the groups, nodes or attributes that are currently selected in the Monitored Attributes list from the Monitored Attributes list. This allows you to remove nodes from the list of nodes that will be controlled by the Master Controller. If you select a group, this button will remove the group as well as every node inside that group from the Monitored Attributes list. If you select specific attributes in a node, this button will only remove these attributes from the Monitored Attributes list, and will leave the other attributes in the list. This allows you to make the Master Controller only control specific attributes for a node and ignore others. |
|
|
Filter Static Attributes | Remove every attribute that does not change during the selected frame range. This will optimize the performance of the Master Controller as well as reduce the amount of storage space it uses without impacting its functionality. |
| Node Count | The amount of nodes (layers, pegs, deformation points, etc.) that will be controlled by the Master Controller. | |
| Attribute Count | The amount of attributes (position, angle, scale, etc.) that will be controlled by the Master Controller. | |
| Output | ||
| Name | Allows you to type in a base name for your Master Controller. | |
| States Filename |
Displays the path and name of the file where the poses database will for the Master Controller will be stored. This path is relative to the scene directory. |
|
| Master Controller Name | Displays the name of the Master Controller node that will be added to your scene. This is the name of your Master Controller the prefix mc_. | |
| Create | Generate the Master Controller and its database of poses. | |