T-HFND-007-011
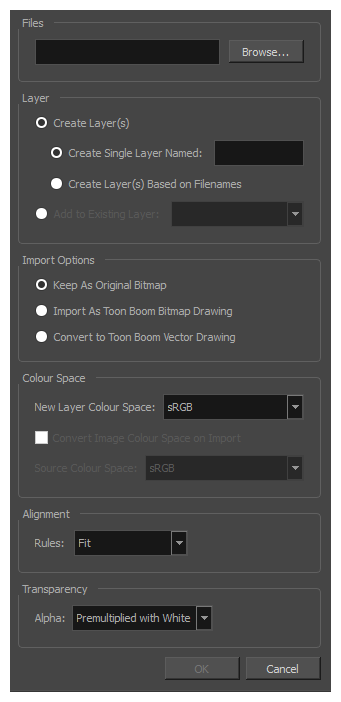
The Import Images dialog box lets you import bitmap images and vectorize them, making the images editable. Then you can use a variety of drawing tools to edit the image. Or you can always keep the original bitmap image as is.
Also, you can choose to import bitmap images on bitmap or vector layers depending on your project.
For tasks related to this dialog box, see About Importing Bitmap Images.
- Do one of the following:
- From the top menu, select File > Import > Images.
- In the File toolbar, click the Import Images
button.
- In the Xsheet view, right-click anywhere in the frame area and select Import > Images.
The Import Images dialog box opens.
| Parameter | Description | ||||||||||||||||||||||||
|
Files |
|||||||||||||||||||||||||
|
Browse |
Lets you find and select images on your computer. |
||||||||||||||||||||||||
|
Layer |
|||||||||||||||||||||||||
|
Create Layers(s) |
Create layers for imported images. |
||||||||||||||||||||||||
|
Create Single Layer Named |
Creates a new layer with the specified name and imports the images into it. | ||||||||||||||||||||||||
|
Create Layer(s) Based on Filenames |
Creates a layer based on each unique filename prefix. For example, if you import three files named a-1.tga, a-2.tga and b-1.tga, this will create two layers, one named "a" and one named "b". Layer "a" will contain the two first images and "b" will contain the third one. |
||||||||||||||||||||||||
|
Add to Existing Layer |
Imports the images into the specified layer. Note that you can only import into layers that are compatible with your import options. For example, if you're importing images as vector drawings, you can only import them into vector drawing layers. |
||||||||||||||||||||||||
|
Import Options |
Depending on how you choose to import images, the Alignment section offers different options. |
||||||||||||||||||||||||
|
Keep as Original Bitmap |
Retains an imported image as a bitmap. In the Alignment section, decide on the size and placement of your image within the camera frame. Depending on the Scene Settings (the height and width in pixels that you chose for your project), an image that you import may get scaled to the point where all its individual pixels become visible. |
||||||||||||||||||||||||
|
Import as Toon Boom Bitmap Drawing |
Imports a drawing into a vector layer where you can edit the image using the drawing tools. |
||||||||||||||||||||||||
|
Convert to Toon Boom Vector Drawing |
Imports a drawing and converts it to a Toon Boom vector drawing. |
||||||||||||||||||||||||
| Colour Space | |||||||||||||||||||||||||
| New Layer Colour Space |
Define the colour space of a new layer when importing a bitmap image.
|
||||||||||||||||||||||||
| Convert Colour Space |
By checking this option, you can convert the colour space of your source image to match the colour space set in your Harmony scene. TIP
By default, your image will be converted to sRGB. You can change this by unchecking Read Toon Boom Drawings Using sRGB Colour Space in the colour tab of your scene settings.
NOTE This option is only available when Import As Toon Boom Bitmap Drawing is selected.
|
||||||||||||||||||||||||
| Source Colour Space | Defines the colour space of the source image so that Harmony can identify the colour space to convert the source image from up. | ||||||||||||||||||||||||
| Alignment (Keep As Original Bitmap) | |||||||||||||||||||||||||
|
Rules |
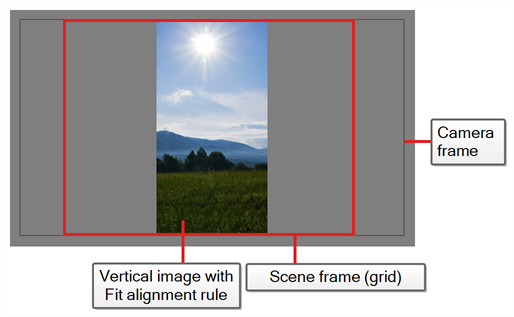
Fit: Adjusts the image's size to fit completely within the scene's field, both vertically and horizontally, making sure the entire image is visible. If the image's orientation is portrait, then it will adjust the image's height to fit the field's height, without affecting the image's aspect ratio:
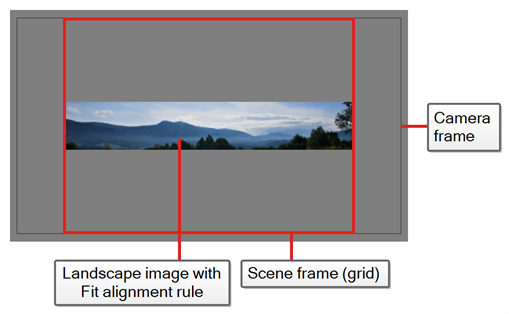
If the image orientation is landscape, then it will adjust the image's width to fit the field's width, without affecting the image's aspect ratio:
|
||||||||||||||||||||||||
|
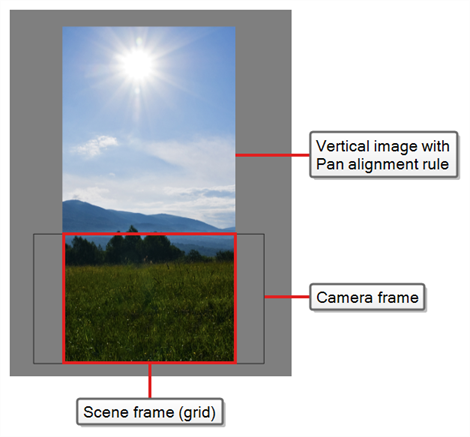
Pan: This has the opposite effect to the fit parameter. The image's smallest dimension will be made to fit the scene frame's matching dimension, and the image's largest dimension will be adjusted proportionally, making the image fill the entire scene field, and bleed past its boundaries it if its aspect ratio does not match the field's aspect ratio. This option can be used to import a panning background image, also referred to as a pan. If the image's orientation is portrait, it will adjust the image's width to fit the field's width, without affecting its aspect ratio:
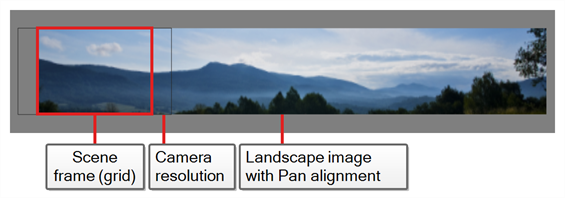
If the image's orientation is landscape, it will adjust the image's height to fit the field's height, without affecting its aspect ratio:
This has the opposite effect to the fit parameter. The image's smallest dimension will be made to fit the scene frame's matching dimension, and the image's largest dimension will be adjusted proportionally, making the image fill the entire scene field, and bleed past its boundaries it if its aspect ratio does not match the field's aspect ratio. This option can be used to import a panning background image, also referred to as a pan. If the image's orientation is portrait, it will adjust the image's width to fit the field's width, without affecting its aspect ratio:
If the image's orientation is landscape, it will adjust the image's height to fit the field's height, without affecting its aspect ratio:
|
|||||||||||||||||||||||||
|
Project Resolution: Scales the image to fit the scene's resolution, making each pixel in the image take one pixel in the scene's field. For example, if the image's dimensions in pixels are half of the scene's resolution in pixels, then the image's dimensions will appear to be half of the scene field's dimensions. |
|||||||||||||||||||||||||
|
Alignment (Import as Toon Boom Bitmap Drawing) |
|||||||||||||||||||||||||
|
Rules |
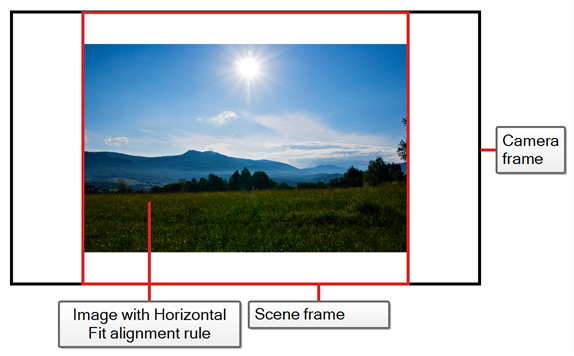
Horizontal Fit: Adjusts the image's size so that its width matches the scene's width, without affecting its aspect ratio.
|
||||||||||||||||||||||||
|
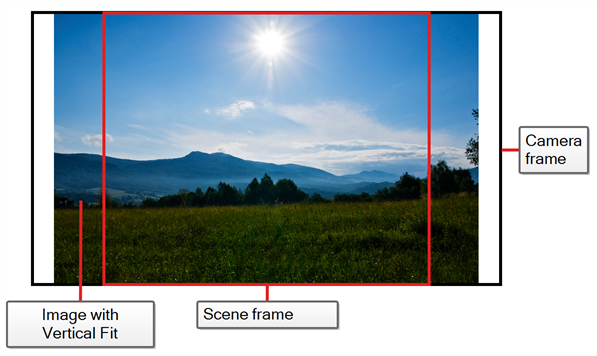
Vertical Fit: Adjusts the image's size so that its height matches the scene's height, without affecting its aspect ratio.
|
|||||||||||||||||||||||||
|
Actual Size: Imports the image in its actual size, without adjusting its size relative to the scene's resolution. For example, if the image's dimensions in pixels are half of the scene's resolution in pixels, then the image's dimensions will appear to be half of the scene field's dimensions. |
|||||||||||||||||||||||||
|
Transparency |
|||||||||||||||||||||||||
|
Alpha |
Premultiplied with White: The colour values of semi-transparent pixels in the |
||||||||||||||||||||||||
|
Premultiplied with Black:The colour values of semi-transparent pixels in the |
|||||||||||||||||||||||||
|
Straight: The colour of semi-transparent pixels in the image is encoded independently from their transparency. When |
|||||||||||||||||||||||||
|
Clamp Colour to Alpha:This is the same as Premultiplied with Black, except that it also prevents the colour values for a given pixel from being higher than that pixel's alpha value. This option is only useful if you are working with |
|||||||||||||||||||||||||
|
Vectorization |
|||||||||||||||||||||||||
|
Black and White |
Vectorizes drawings with a solid black line. This creates a 100% vector-based drawing and paints it with the Vectorized Line colour swatch from your scene's palette. |
||||||||||||||||||||||||
|
Grey |
Vectorizes the image as a mix of vector contour and greyscale bitmap filling. Lines keep the texture from the scan, and the white of the paper becomes transparent. |
||||||||||||||||||||||||
|
New Preset |
Lets you create a new preset. |
||||||||||||||||||||||||
|
Delete Preset |
Lets you delete any preset in the list. |
||||||||||||||||||||||||
|
Edit Preset |
Lets you edit the vectorization parameters for the selected preset |
||||||||||||||||||||||||