CryptoMatte-Write Node
The software is capable of writing EXRs with CryptoMatte information. These EXRs can be used as image sources in Harmony scenes and in other software. Scenes composed with labeled Port Names on output images can be rendered with custom CryptoMatte information.
Once the CryptoMatte-Write Node is linked to the composite, you are ready to adjust the export settings. You can access the settings by clicking on the yellow square on the CryptoMatte-Write Node.
Properties
Inputs
The Input tab will display all the input connections that are linked to the CryptoMatte-Write Node. The input ports will be listed from right to left. When exporting an EXR, the right-most port will compile all the layers to create the CryptoMatte for the EXR file.
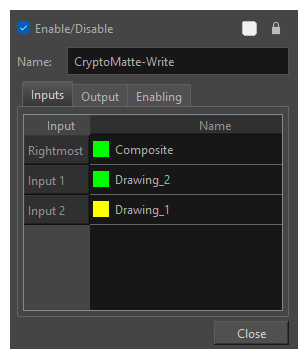
The layers will be named in the output file as they appear in the Name column. By default, each layer is named after their respective input node. If you prefer, you can customize the name of each layer. Simply double-click on a layer's name to be prompted to type a new name.
A coloured square appears to the left of each name to indicate whether the name is based on the node or is a custom name. If the square is yellow, the name is based on the node. If it is green, it is a custom name. Once a layer name has been customized, it will no longer automatically update based on the connected node's name.
Output Tab
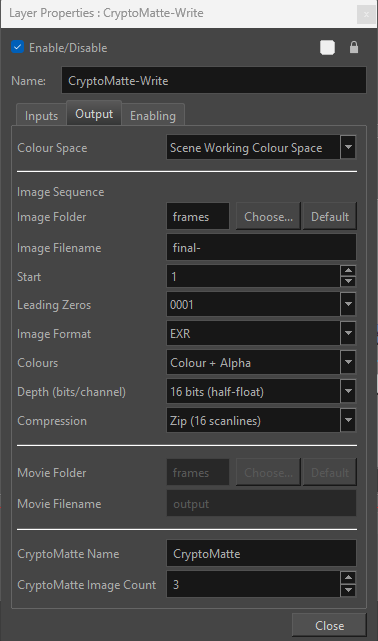
The output tab can be used to configure the path, file naming pattern and file type of frames exported by the Write node. The CryptoMatte node only supports the EXR output format, and it cannot be used to export movies.
Properties
| Parameter | Description |
| Colour Space |
The colour space in which to render your scene’s frames. When a specific colour space is selected for a Write node, frames rendered by this Write node will be converted from the project’s working colour space to the Write node’s colour space. The following colour spaces are supported in Harmony:
NOTES
|
| Image Folder | The path to the folder in which to save the rendered frames. This path can be absolute or relative to the scene's folder. For example, the default path for rendered frames is frames, which means the images are saved in the frames subfolder of the scene folder. If you want to select an absolute path, you can click on the |
| Image Filename | The prefix for the file name of each exported frame. Frames will be named with this value, followed by the frame number and their image type extension. It is recommended to leave the hyphen (-) at the end of the prefix to separate the prefix from the frame number.You can define a custom file name and path using variables. For a list of possible variables, hover your mouse over the Image Filename textbox. |
| Start |
Select the starting number for the image sequence. |
| Leading Zeros | Allows you to select the number of digits in the number used to identify each frame. |
| Image Format |
OpenEXR (*.exr) A highly capable deep image format. Each pixel in an EXR file is exported with its Z-depth information. Additionally, if a pixel is semi-transparent, the color and depth information of pixels further back is stored along with it. If your scene has multiplane or 3D elements, this format can be used for compositing your animation with other graphical elements in 3D animation software. NOTES
|
| Colours |
Drop list with colour modes.
|
| Depth (bits/channel) |
Drop list with bit depth value and a label next to it "bits/channel". Available bit depth depends on the selected file type.
|
| Compression |
Drop list that appears for EXR and TIF formats only.
|
| Movie Folder | Only available when the Movie option is enabled. The folder in which to export the movie file. You can click Choose to the right of the text field to browse for the directory where you want the movie to be exported, or click Default to set the export path to the default value. You can also type a path relative to the scene's directory. For example, the default value is frames, which exports the movie to the scene's frames subdirectory. |
| Movie Filename | Only available when the Movie option is enabled. The name of the movie file to export. Do not enter the file's extension. |
| CryptoMatte Name |
Refers to the name of the CryptoMatte. Will be how the CryptoMatte is Named in the EXR file upon export. To change the name of the CryptoMatte, enter a new name into the Name bar. |
| CryptoMatte Image Count |
Corresponds to the coverage of pixels that separate images. Each count defines a CryptoMatte image containing RGBA channels. These channels correspond to the IDs and coverage of the rendered content. As a result, a count of three will provide six-levels of ID and coverage information. NOTE
It may be useful to increase the CryptoMatte Image Count if the scene is very busy and has a lot of overlapping translucent areas.
A higher value will offer more coverage and support more distinct layers. |
Enabling Tab
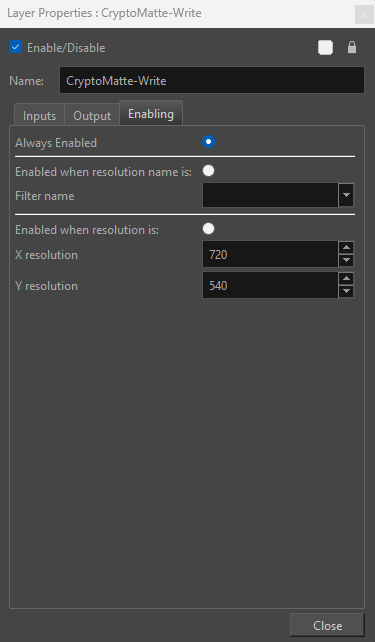
You can create several Write nodes for a single scene and, by default, when a scene is rendered, all of its Write nodes will perform their render. However, using the options in the Enabling tab, you can set up some Write nodes to only perform their render if the scene is rendered at a specific resolution. This is mostly useful on Harmony Server, as Harmony Server allows you to select the resolution at which to render a scene when sending a scene for rendering by the Harmony database's render farm.
A good example of how this can be useful is if your scene has storyboard thumbnails in the corner, and a Write node connected to a composite that crops the picture to only include the storyboard thumbnail, so that your scene can export both the final animation and the animated storyboard when rendered. You can set up your scene's main Write node to only work when exporting the scene at the scene's original resolution, and the storyboard thumbnails Write node to only work when exporting at the desired resolution for an animated storyboard.
This option allows you to filter with either resolution presets, or by specifying the width and height of the chosen resolution in pixels. You can hence create custom resolution presets named after their Write node's purpose, to make it easier to choose the resolution when rendering a scene.
| Parameter | Description |
|
Always Enabled |
Makes this Write node render every time the scene is rendered. This is the default option. |
|
Enabled when Resolution Name is |
Makes this Write node render only when the scene is rendered at the specified resolution preset. |
|
Filter Name |
Select the resolution preset at which to render the scene to activate this Write node. |
|
Enabled when Resolution is |
Make this Write node render only when the scene is rendered at the resolution with the specified width and height, in pixels. |
|
X Resolution |
The width (in pixels) of the resolution at which to render the scene to activate this Write node. |
|
Y Resolution |
The height (in pixels) of the resolution at which to render the scene to activate this Write node. |