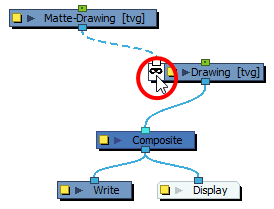
Each drawing in a Harmony scene has their own Matte port. Connecting a drawing or
Optionally, you can invert a drawing layer's matte. This will make parts of the drawing that intersect with the matte image visible, and everything else hidden.
- In the toolbar above the layer list in Timeline view, click on the Add Layer
 button and select Drawing.
-
Give your new drawing layer a relevant name for a matte layer, such as "Matte-Drawing", then click on Add and Close.

-
In the new matte drawing layer, draw a matte for your effect. Your matte can be a simple shape, but should be filled with a colour, as only parts of the matte that are opaque will be taken in account.
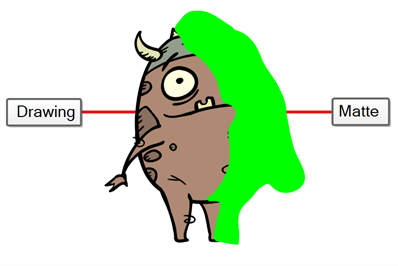 NOTE Mattes can also have semi-transparent areas. Areas of the drawing that are covered by a semi-transparent area of the matte will appear semi-transparent. For example, if a matte is filled with a colour that has an alpha value of 64 (25% opaque), instead of making the parts of the drawing it covers completely invisible, it will subtract the matte's opacity from the opacity of those parts of the drawing, making them 75% opaque.
-
In the Node view, click on the output port of the matte drawing node and drag the cable to the left edge of the drawing node. A Matte port will appear. Release the mouse button to connect the matte drawing node to the matte port of the drawing node.

At this point, areas of the drawing layer that intersect with the artwork in the matte drawing node are hidden.
-
If you want to invert the matte effect for the drawing node, so that the artwork that intersects with the artwork in the matte layer is visible and that everything else is hidden, double-click on the Cutter node's Matte
 icon to toggle its Inverted parameter. When an effect's matte is inverted, its matte port also appears inverted
  .
.