T-COMP2-002-013A
In order for matte points and contours to snap to the contours of the snapping source drawing, you must use the Set to Snap mode of the Animated Matte Generator view to select which points and which contours of the matte should snap.
- In the Node or Timeline view, select the Animated Matte Generator node.
- Display the controls of the Animated Matte Generator node by doing one of the following:
- In the Camera view toolbar, click on Show Control
 .
. - From the top menu, select View > Show > Control.
- Press Shift + F11.
The control points for the Animated Matte Generator display in the Camera view.
- In the Tools toolbar, select the Transform
 tool.
tool.
- In the Editing Mode panel of the Animated Matte Generator view, select Define Matte Point
 .
.
- Adjust the contours of the matte so that they are close to the contours of the snapping source drawing. Contours and points will only snap if they are at a short distance from the contours of the snapping source drawing.
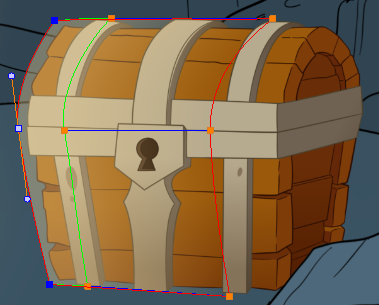
- In the Editing Mode panel of the Animated Matte Generator view, select Set to Snap
 .
.
Switches to enable or disable snapping appear over each of the matte's contours and points in the Camera view.
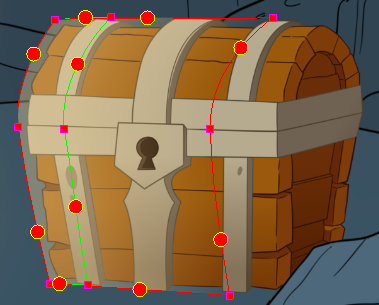
- In the Camera view, do one of the following:
- To enable or disable snapping on a matte point, click on its control point.
- To enable or disable snapping on a matte contour, click on the snapping switch for that contour.
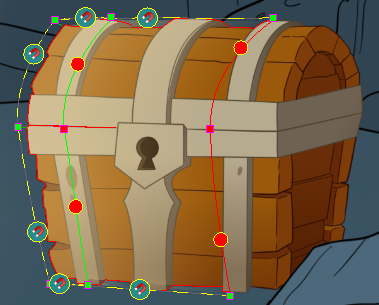
Points that are set to snap will appear green instead of purple. Contours that are set to snap will have a magnet icon on their snapping switch.
- If a point or contour does not snap to the contour of the snapping source drawing, adjust the position and curves of the matte so that they are closer to the contour of the snapping source drawing.