Animating with Shape-Aware Deformation
About Animating with Shape-Aware Deformation
Just like with animating pegs and drawing layers, you can animate your deformers by creating keyframes on their corresponding layers in the Timeline. When the ![]() Transform tool is selected, deformation controls in the Camera view display in green, which means they are in animation mode, whereas when the Rigging tool is selected, they display in red, meaning they are in rigging mode.
Transform tool is selected, deformation controls in the Camera view display in green, which means they are in animation mode, whereas when the Rigging tool is selected, they display in red, meaning they are in rigging mode.
Animating with Points
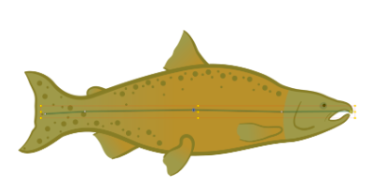
You can animate the position, scale and rotation of each individual point in the Shape-Aware Deformation.
-
In the Timeline view, collapse your character using the Expand/Collapse arrow.

-
Select the first frame of the scene.

-
To ensure your model doesn’t disappear after one frame, open the Extend Exposure dialog by doing one of the following:
-
Right-click on the first frame in the Timeline and select Extend Exposure.
-
Press F5.
-
-
In the Extend Exposure dialog, type in the amount of frames in your scene and confirm. This will make your model exposed (visible) throughout your whole scene.
-
Now, we will make your character’s first pose. First, make sure there is a keyframe on the first frame of every layer of the model. This ensures that when you make the second pose later, your first pose will not be affected. To do this do one of the following:
-
In the Timeline toolbar, click the
 Add Keyframe button.
 -
Right-click and select Add Keyframe.
-
Press F6.
A Keyframe is added on the current frame.

-
-
In the Tools Toolbar, select the
 Transform tool or press Shift + T.
 -
In the Tools toolbar, if
 Animate Off or
  Animate Onion Skin Range mode is selected, click on it to open the Animate pop-up menu and select
  Animate Current Frame.
 -
In the Camera, Timeline or Node view, select one of the drawing layers linked to the deformation chain you want to animate.
-
In the Deformation toolbar, either:
-
Click the
 Show the Selected Deformation Chain and Hide All Others button to show the selected element’s deformation chain and hide any other deformation chain that is currently displayed.
 -
Click the
 Show Selected Deformers button to show the selected element’s deformation chain along with any other deformation chain that is currently displayed.
-
-
In the Camera view, do the following:
-
Click and drag on the centre of a control point to reposition it.
TIP You can also nudge a deformation point by selecting it, then pressing the arrow keys.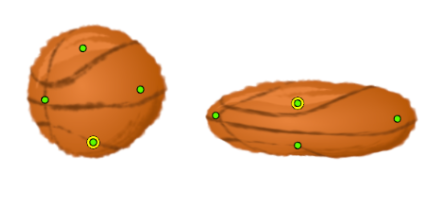
-
Click on a points handle to rotate or a Point.
-
To scale do one of the following:
-
To scale an individual Point, click a Point and drag on the scaling slider.
-
To scale multiple Points, Click + Shift on multiple Points. In the Tool Properties window select the
 Mixed Manipulation Mode.
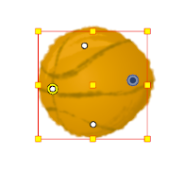
-
-
-
Repeat for all the other control points until the drawing is deformed as intended.
-
In the Timeline view, go to the frame on which you want to set the next key pose.
-
Add a keyframe on the current frame by doing one of the following:
-
In the Timeline toolbar, click the
Add Keyframe button. -
Right-click and select Add Keyframe.
-
Press F6.
-
-
Transform your deformer’s points to make your new key pose.
-
Repeat the previous steps until your animation is complete.
Animating with Bone
You can animate the position, scale and rotation of each handle in the Shape-Aware Deformation as well as stretch limbs and joints.
-
In the Timeline view, collapse your character using the Expand/Collapse arrow.
-
Select the first frame of the scene.
-
To ensure your model doesn’t disappear after one frame, open the Extend Exposure dialog by doing one of the following:
-
Right-click on the first frame in the Timeline and select Extend Exposure.
-
Press F5.
-
-
In the Extend Exposure dialog, type in the amount of frames in your scene and confirm. This will make your model exposed (visible) throughout your whole scene.
-
Now, we will make your character’s first pose. First, make sure there is a keyframe on the first frame of every layer of the model. This ensures that when you make the second pose later, your first pose will not be affected. To do this do one of the following:
-
In the Timeline toolbar, click the
Add Keyframe button. -
Right-click and select Add Keyframe.
-
Press F6.
A Keyframe is added on the current frame.
-
-
In the Tools Toolbar, select the
Transform tool or press Shift + T. -
In the Tools toolbar, if
Animate Off or Animate Onion Skin Range mode is selected, click on it to open the Animate pop-up menu and select Animate Current Frame. -
In the Camera, Timeline or Node view, select one of the drawing layers linked to the deformation chain you want to animate.
-
In the Deformation toolbar, either:
-
Click the
Show the Selected Deformation Chain and Hide All Others button to show the selected element’s deformation chain and hide any other deformation chain that is currently displayed. -
Click the
Show Selected Deformers button to show the selected element’s deformation chain along with any other deformation chain that is currently displayed.
-
-
In the Camera view, do the following:
-
Click and drag on the control point to reposition it.
TIP You can also nudge a deformation point by selecting it, then pressing the arrow keys.
-
Click on a points handle to rotate a Point.

-
To scale do one of the following:
-
To scale an individual Point, click a Point and drag on the scaling slider.
-
To scale multiple Points, Click + Shift on multiple Points. In the Tool Properties window select the
Mixed Manipulation Mode.
-
 NOTE A manipulatable Pivot will appear on the first Point you select.
 -
-
Repeat for all the other control points until the drawing is deformed as intended
-
In the Timeline view, go to the frame on which you want to set the next key pose.
-
Add a keyframe on the current frame by doing one of the following:
-
In the Timeline toolbar, click the
Add Keyframe button. -
Right-click and select Add Keyframe.
-
Press F6.
-
-
Transform your deformer’s points to make your new key pose.
-
Repeat the previous steps until your animation is complete.
Animating with Cage
You can animate the position, scale and rotation of each handle in the Shape-Aware Deformation.
-
In the Timeline view, collapse your character using the Expand/Collapse arrow.
-
Select the first frame of the scene.
-
To ensure your model doesn’t disappear after one frame, open the Extend Exposure dialog by doing one of the following:
-
Right-click on the first frame in the Timeline and select Extend Exposure.
-
Press F5.
-
-
In the Extend Exposure dialog, type in the amount of frames in your scene and confirm. This will make your model exposed (visible) throughout your whole scene.
-
Now, we will make your character’s first pose. First, make sure there is a keyframe on the first frame of every layer of the model. This ensures that when you make the second pose later, your first pose will not be affected. To do this do one of the following:
-
In the Timeline toolbar, click the
Add Keyframe button. -
Right-click and select Add Keyframe.
-
Press F6.
A Keyframe is added on the current frame.
-
-
In the Tools Toolbar, select the
Transform tool or press Shift + T. -
In the Tools toolbar, if
Animate Off or Animate Onion Skin Range mode is selected, click on it to open the Animate pop-up menu and select Animate Current Frame. -
In the Camera, Timeline or Node view, select one of the drawing layers linked to the deformation chain you want to animate.
-
In the Deformation toolbar, either:
-
Click the
Show the Selected Deformation Chain and Hide All Others button to show the selected element’s deformation chain and hide any other deformation chain that is currently displayed. -
Click the
Show Selected Deformers button to show the selected element’s deformation chain along with any other deformation chain that is currently displayed.
-
-
In the Camera view, do the following:
-
Click and drag on a vertice to reposition it. This can be used to warp or rotate your image.

-
To scale do one of the following:
-
To scale an individual Point, click a Point and drag on the scaling slider.
-
To scale multiple Points, Click + Shift on multiple Points. In the Tool Properties window select the
Mixed Manipulation Mode.
-
NOTE A manipulatable Pivot will appear on the first Point you select. -
-
Repeat for all the other control points until the drawing is deformed as intended
-
In the Timeline view, go to the frame on which you want to set the next key pose.
-
Add a keyframe on the current frame by doing one of the following:
-
In the Timeline toolbar, click the
Add Keyframe button. -
Right-click and select Add Keyframe.
-
Press F6.
-
-
Transform your deformer’s points to make your new key pose.
-
Repeat the previous steps until your animation is complete.