Before importing your 3D model in Harmony, you must export it in a format supported by Harmony. Currently Harmony only supports polygonal geometry and FK bone rigs. The following steps will explain how to export a 3D object in Filmbox (.fbx) or Alembic (.abc) format from Autodesk Maya. Depending on the software and version you are using as well as the file type you wish to export, the instructions may vary. Please refer to the documentation of your 3D authoring software as needed.
Export to FBX format
Before exporting you need to remove constraints.
Exporting from Autodesk Maya for External Rendering
If the 3D asset is going to be rendered in Maya through the RenderMayaBatch Node, there are some additional considerations. In Harmony, the parts of a 3D asset (geometry, bones, groups) will always inherit the transformations of their parents. This is not always the case in Maya, there are attribute settings in the Attribute editor that will change how parent transformations are applied. This can cause discrepancies in how renders from Maya look versus how the asset looks in Harmony.
Assets without an Armature
-
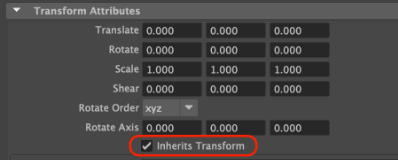
If you are exporting an asset without a bone armature bound to it, “Inherits Transforms” must be checked on all of its elements.
Assets with an Armature
-
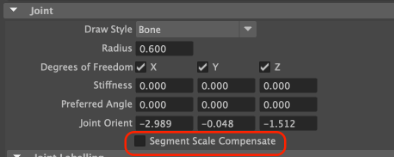
If you are exporting an asset with a bone armature, all bones must have “Segment Scale Compensate” unchecked.
Exporting Bones
When exporting the FBX file from Autodesk Maya, you can use either the “Export All…” or the “Export Selection…” command. Using the “Export Selection…” command is recommended as it allows exporting of only the required elements to Harmony.
- In Autodesk Maya, create your 3D object. Make sure your 3D object is ready for rendering by properly creating its textures and setting up the lights in the stage. Harmony will use the original Maya project to create the final renders.
The animation done on the 3D object in Harmony will be applied to the Maya project when rendering. This means that moving the object in Harmony may move it out of its light source. To prevent this from happening, you can make the light source a child of the 3D object, so that the light moves along with it. In Maya, you can make a layer a child of another layer by middle-clicking it and dragging it over the intended parent.
- Save your Maya scene file as you will use it later on.
-
From the top menu, select File > Export All or Export Selection.
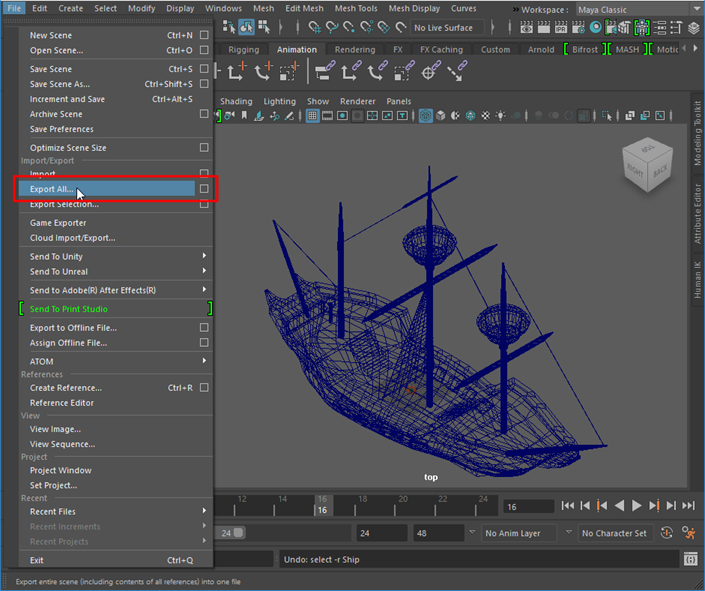
The Export dialog box opens.
- In the Files of type drop-down, select FBX Export.

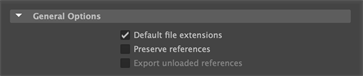
- In the General Options section of the Options panel, uncheck the Preserve references checkbox to ensure all references are included.
- In the Animation section of the Options panel, check the Animation checkbox if you want the subnode animations to be included in the model.
- In the Deformed Models section, you can include the skinning of the joints.
When Deformed Models is checked, deformations are enabled.
When Skins is checked, the mesh will be attached to the joints.

- In the Embed Media section of the Options panel, check the Embed Media checkbox. This will export textures with the model.
Include Options > Include texture info is checked (when exporting using the Export Selection command)
-
In the Advanced Options panel you can ensure the model is imported at the correct unit scale and orientation.
-
The Units panel will allow you to set the scale factor.
-
The Scale Factor will set the correct scale for export from Autodesk Maya to Harmony when Automatic is checked.
-
-
The Axis Conversion will ensure that the orientation from Autodesk Maya is converted properly to Harmony.
NOTE By default the Up Axis is set to Y. The default is best left unchanged.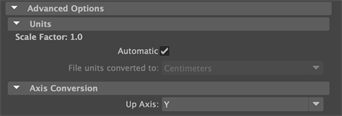
-
- In the FBX File Format section of the Options panel:
- Set the Type option to Binary.
- Set the Version option to FBX 2020.
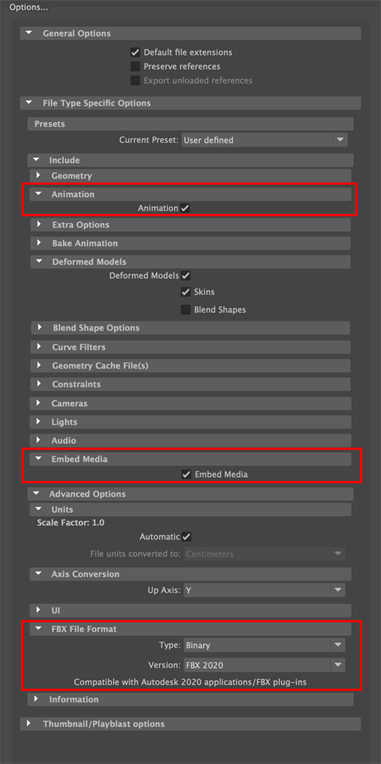 NOTE If the asset contains animation, the following options need to be selected when exporting the FBX:
Include Options > History (when exporting using the Export Selection command)
Include Options > Channels (when exporting using the Export Selection command)
This is only in the event of an Export Selection.
-
Click on Export All/Export Selection.
An .fbx file will be created in the selected location.
- In Autodesk Maya, create your 3D object. Make sure your 3D object is ready for rendering by properly creating its textures and setting up the lights in the stage. Harmony will use the original Maya project to create the final renders.
The animation done on the 3D object in Harmony will be applied to the Maya project when rendering. This means that moving the object in Harmony may move it out of its light source. To prevent this from happening, you can make the light source a child of the 3D object, so that the light moves along with it. In Maya, you can make a layer a child of another layer by middle-clicking it and dragging it over the intended parent.
- Save your Maya scene file as you will use it later on.
-
From the top menu, select Cache > Alembic Cache > Export All to Alembic or Export Selection to Alembic.
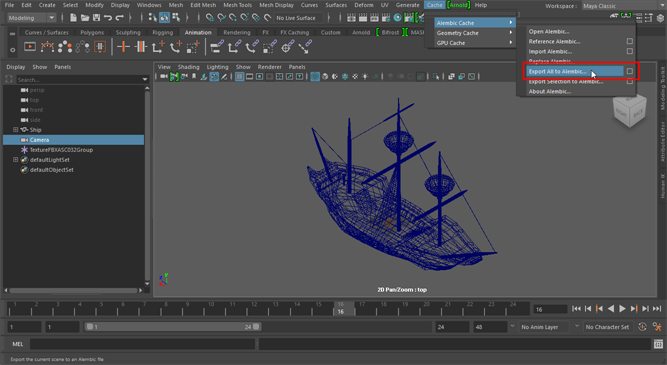
The Export dialog box opens.
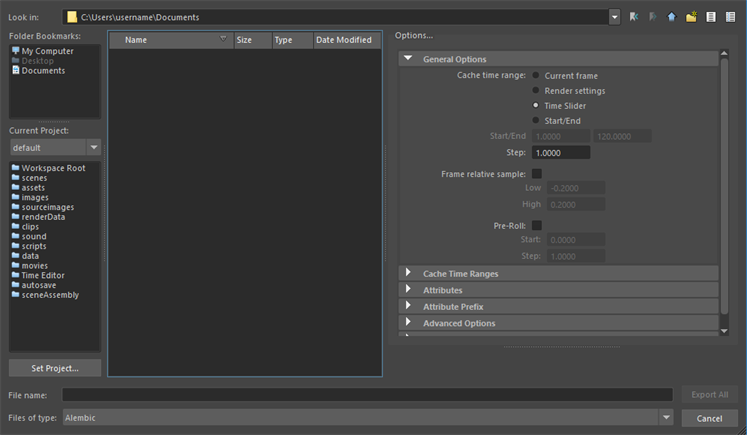
- In the Cache time range dialog box, select the range of frames that you want to export in the Alembic (.abc) file:
- Current frame: Exports only the current frame.
- Render settings: Exports the frame range specified in the Render Settings dialog.
- Time Slider: Exports the frame range covered by the time slider.
- Start/End: Exports the frame range specified in the Start/End fields below.
-
If you want to import the vertex colours of your 3D model into Harmony, scroll down to and expand the Advanced Options section, then check the Write Color Sets option.

-
Click on Export All/Export Selectionbutton.
An .abc file will be created in the selected location.