Animating 3D Armatures
In Harmony it is possible to animate 3D models as well as pose them. Transformations made to the 3D model can be recorded into the Timeline and even interpolated.
In order to animate a 3D model in Harmony, there are a few steps that need to be taken prior to articulating the subnodes.
To transform a 3D object, it is important to activate the Animate Using Animation Tools check box in the Layer Properties of the 3D Element read node.

This option allows you to transform your 3D model. If it is left unchecked, you will be unable to interact with your 3D asset.
-
Open Layer Properties of the 3D Element read node by clicking the yellow box.
-
Open the Controls tab.
-
Check the Animate Using Animation Tools checkbox.
You will now be able to interact with your 3D object.
Next you will need to apply a Subnode-Animation node beneath the 3D Model’s Element node in the Node view.
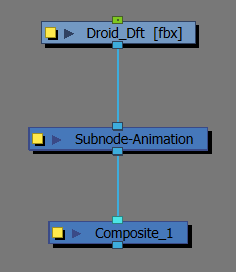
By adding and connecting a Subnode-Animation node to the 3D Model’s element node in the Node view, a new Subnode-Animation layer will be generated in the Timeline view with a keyframe on frame one. From there, you are able to select the Geometry Subnode, Bone Subnode or Transformation Subnode in the 3D Graph View or by clicking directly on the 3D object in the Camera view.

Whatever transformations are applied to the 3D model will be recorded in the form of a keyframe in the Timeline view on the current frame. You also have the ability to interpolate between the keyframes made using the Subnode-Animation node.

For more information about animating using the Subnode-Animation node, see Animating Individual Parts of 3D Models.
Any poses or animations made using the Subnode-Animation node can be templated. If you have templated poses or animations that were done prior in another scene, they can be saved and imported from the Library. These keyframes can be imported into the Subnode-Animation layer in the Timeline view to be applied and reused.
For more information about adding pose to the Library, see Creating Templates.
Importing Animated 3D Sequences
You can import animated 3D models in Harmony and manipulate their structure. By default, a 3D model will be imported with only the first frame exposed. If it was animated in a 3D software prior to export, the 3D project file will contain the animated information.
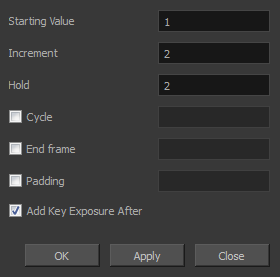
In order to expose the animation in the model, you will need to use the XSheet and provide the appropriate timing exposures for that model on its drawing column. In the XSheet, you can access the Sequence Fill Dialog box which will give you the ability to expose specific frames of the 3D model’s animated sequence.
You have the ability to manipulate the keyframes of the 3D sequence in Harmony. The animated sequence will appear in the Timeline view as drawing substitutions. Any transformations or interpolations made will impose an offset in the animation that can be set using a Subnode-Animation node.

For more information about animating using the Subnode-Animation node, see Animating Individual Parts of 3D Models.
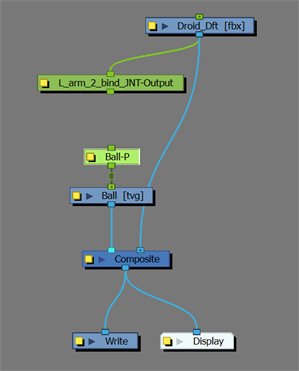
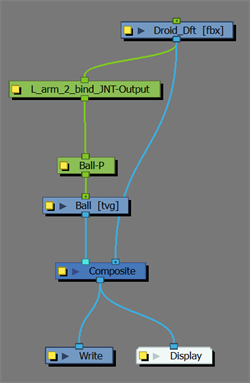
3D Kinematic Output
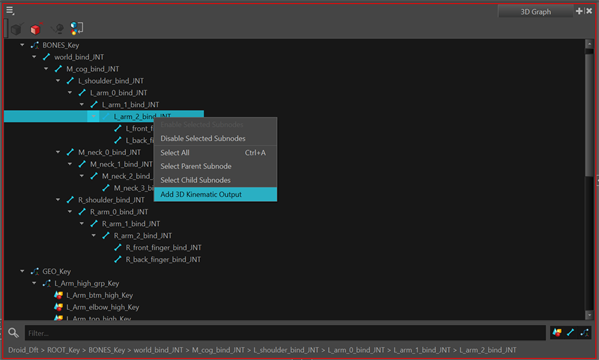
You can create a 2D bitmap on the surface of a 3D model in Harmony. In doing so, the 2D drawing will track the animation applied to the 3D object. In order to link the 2D drawing to the surface of the 3D model, it will need to be linked to a Bone Subnode.
-
In 3D Graph View, Right + Click a Bone Subnode.
-
Select Add 3D Kinematic Output from the dropdown menu.
-
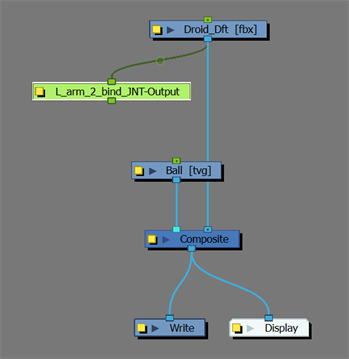
In the Node view , apply a Peg to your 2D drawing node.
-
Link output of 3D Kinematic Output node to the input of the 2D drawing Peg.
-
Reposition 2D drawing with 3D manipulator.
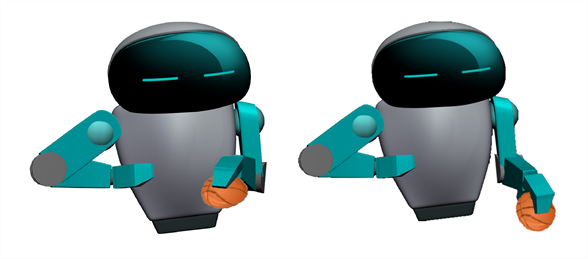
Once the drawing is linked to the 3D Kinematic Output, the 2D drawing will track the specified bone of the 3D model as it is articulated.
NOTE If the 3D model is deformed, the 2D drawing will align to the plane of the bone being manipulated.