The extension is required in order for Flash to export files to Harmony. The extension is called Export to Harmony.zxp and is located here:
| OS | Edition | Location |
| Windows | Premium | C:\Program Files (x86)\Toon Boom Animation\Toon Boom Harmony Essentials [version] Premium\resources\flash |
| Advanced | C:\Program Files (x86)\Toon Boom Animation\Toon Boom Harmony Essentials [version] Advanced\resources\flash | |
| Essentials | C:\Program Files (x86)\Toon Boom Animation\Toon Boom Harmony Essentials [version] Essentials\resources\flash | |
| macOS | Premium | Applications > Toon Boom Harmony Essentials [version] Premium > tba > resources > flash |
| Advanced | Applications > Toon Boom Harmony Essentials [version] Advanced > tba > resources > flash | |
| Essentials | Applications > Toon Boom Harmony Essentials [version] Essentials > tba > resources > flash |
-
Ensure the following software is installed:
- Adobe Creative Cloud
- Animate CC and Mobile Device Packaging
-
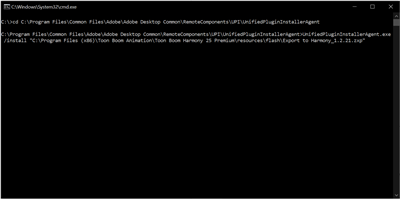
In a Command Prompt, go to the folder where the
UnifiedPluginInstallerAgentutility is located.For example, cd
Program Files\Common Files\Adobe\Adobe DesktoCommon\RemoteComponents\UPI\UnifiedPluginInstallerAgent
- Enter the following command:
UnifiedPluginInstallerAgent.exe / install <filename.zxp> - Press Enter.
If no error message displays, the extension has been installed on your computer and recognized by the Extension Manager CC.
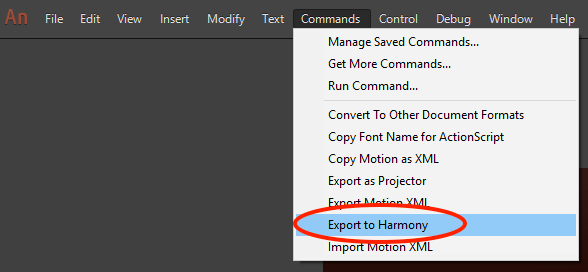
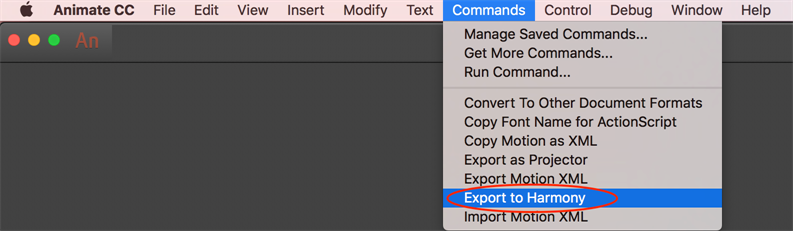
- Open Animate CC.
- Access Top Menu > Commands.
If the Export to Harmony option appears in the Top Menu > Commands list, your installation was successful.
NOTE If you have a region language other than English (US) installed on your computer, or if you have more than one language installed on your computer, Animate CC may not be able detect in which language folder the extension has been installed. If this occurs, you will not be able to see the Export to Harmony menu option in Top Menu > Commands list. To correct this, proceed to How to ensure Adobe detects extension files installed on your computer.
-
Ensure the following software is installed:
- Adobe Creative Cloud
- Animate CC and Mobile Device Packaging
-
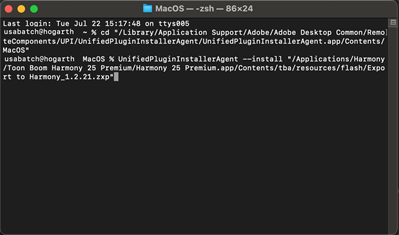
In Terminal, go to the folder where the UnifiedPluginInstallerAgent utility is located.
For example, /Library/Application Support/Adobe/Adobe Desktop Common/RemoteComponents/UPI/UnifiedPluginInstallerAgent/UnifiedPluginInstallerAgent.app/Contents/MacOS
- Enter the following command:
UnifiedPluginInstallerAgent --install <filename.zxp>
- Press Enter.
If no error message displays, the extension has been installed on your computer and recognized by the Extension Manager CC.
-
Open Animate CC.
-
Access Top Menu > Commands.
If the Export to Harmony option appears in the Top Menu > Commands list, your installation was successful.
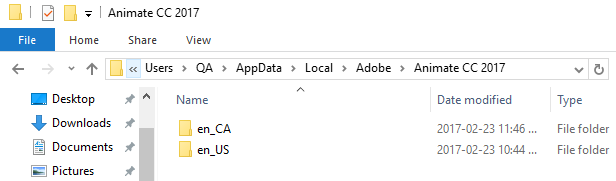
- Browse to:
C:\Users\<UserName>\AppData\Local\Adobe\Animate <VersionNumber>
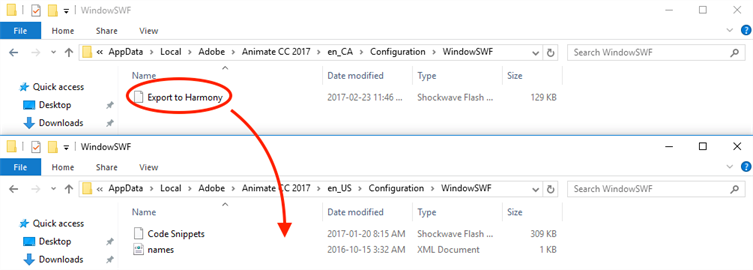
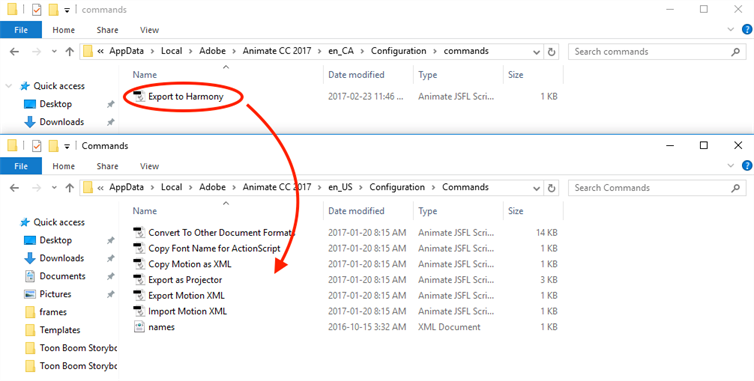
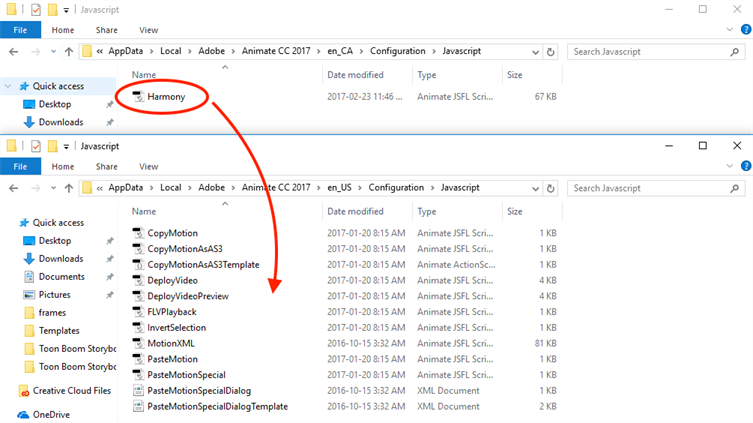
If Adobe detects more than one language on your computer, you will see multiple language folders in the path. For example:
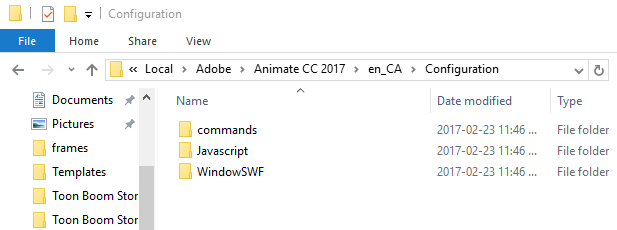
- Look inside each folder to detect the main language used by Adobe on your computer. To do so, compare the contents of both folders.
For example, inside the en_Ca\Configuration:
For example, inside the en_US\Configuration:
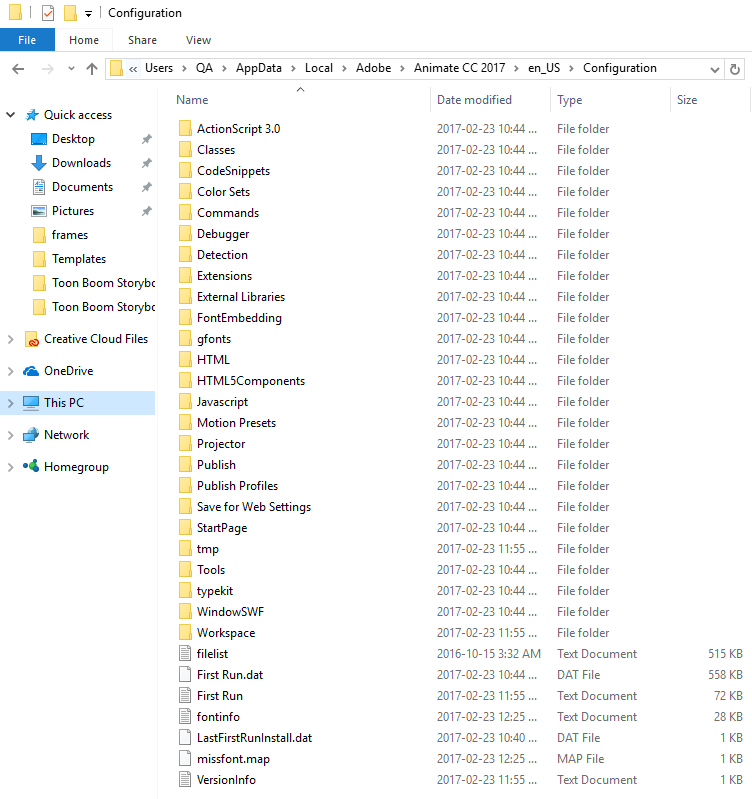
The main folder is the one with more files. In this case, Adobe is using English (US) as the main language. The folder en_CA only contains what was installed with the extension installation: commands, Javascript and WindowSWF.
- Copy and paste the contents of the commands folder within the sub-language folder, to the commands folder within the main language folder .
- Copy and paste the contents of the Javascript folder within the sub-language folder, to the Javascript folder within the main language folder.
- Copy and paste the contents of the WindowSWF folder within the sub-language folder, to the WindowSWF folder within the main language folder.