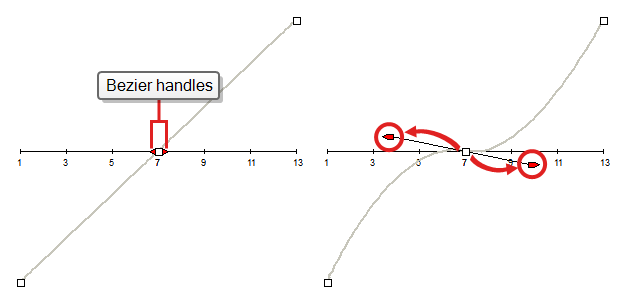
You can set and fine-tune the ease for your animations using the Set Ease for Multiple Parameters dialog. In this dialog, you can edit the ease for your animation using Bezier handles, allowing you to adjust both the length and the angle of the Bezier curve that makes the timing of the animation. You can also select which types of parameters, such as position, rotation angle and scale, to which the ease should be applied.
You can also quickly set the ease for a range of keyframes using the Set Ease on Keyframes dialog, which only allows you to set the length of the ease, but not the angle.
-
In the Timeline view, collapse the hierarchy of the rig (or of the part of the rig) to which you want to apply an ease.
 NOTE When you apply an ease to a layer with children, and this layer’s hierarchy is collapsed, the ease is applied to that layer and all of its children.
-
Select one of your animation keyframes.
 NOTE You should only select one keyframe. The Set Ease for Multiple Parameters dialog can only edit the ease on one keyframe at a time, but it also allows you to quickly jump between keyframes in your timeline.
- Do one of the following:
- In the Timeline view, right-click and select Set Ease For Multiple Parameters.
- In the Timeline toolbar, you can click the Set Ease For Multiple Parameters
button.
The Set Ease For Multiple Parameters dialog box opens.

- In the Bezier editor, click and drag on the Bezier handle to adjust the ease for the selected keyframes.
-
You can also adjust the easing by typing values in the Time Ratio and Value Ratio fields below the Bezier editor. The values are calculated in percentage.
- In the Left Time Ratio and Right Time Ratio fields, type the percentage value corresponding to the length of time you want the easing to last. This will move the Beziers horizontally, away from their keyframe. The value must be between 0% and 100%.
- In the Left Value Ratio and Right Value Ratio fields, type the percentage value of how skewed you want the ease to be. This will move the Bezier vertically, towards their nearest keyframe if the value is positive, or away the nearest keyframe if their value is negative. The value must be between 0% and 100%.
- To apply these easing parameters to a certain type of function only, such as Rotation or Scale, in the Filters section, deselect the function types you do not want to affect.
- Motion: Applies the easing parameters to the selected Position X, Position Y, Position Z and 3D Path functions
- Rotation: Applies the easing parameters to the selected Angle functions.
- Scale: Applies the easing parameters to the selected Scale functions.
- Skew: Applies the easing parameters to the selected Skew functions.
- Morphing: Applies the easing parameters to the selected Morphing Velocity functions.
- Other: Applies the easing parameters to all the other selected functions, such as all functions created to animate effect parameters.
- Click one of the following buttons:
- Apply/Previous: Applies the ease parameters to the selected keyframe and then jumps to the previous keyframe in the timeline so that you can adjust its ease next.
- Apply: Applies the easing parameters to the selected keyframe.
- Apply/Next: Applies the ease parameters to the selected keyframe, then jumps the next keyframe in the timeline so that you can adjust its ease next.
- Close: Closes the dialog box. If you did not apply the modifications, they will be cancelled
-
In the Timeline view, collapse the hierarchy of the rig (or of the part of the rig) to which you want to apply an ease.
NOTE When you apply an ease to a layer with children, and this layer’s hierarchy is collapsed, the ease is applied to that layer and all of its children.
-
Select all the keyframes for which you want to adjust the ease.

-
In the Timeline toolbar, click on the
 Set Ease on Selected Keyframes button.
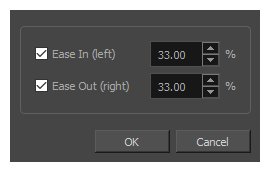
The Set Ease on Keyframes dialog appears.
-
For the ease before the selected keyframes, do one of the following:
- If you want to set the ease before the selected keyframes, check the Ease-In (left) checkbox. Then, in input field next to the checkbox, type in the percentage of ease you want to apply before the selected keyframes.
- If you don’t want to make changes to the ease before the selected keyframes, uncheck the Ease-In (left) checkbox.
-
For the ease after the selected keyframes, do one of the following:
- If you want to set the ease after the selected keyframes, check the Ease-Out (right) checkbox. Then, in input field next to the checkbox, type in the percentage of ease you want to apply after the selected keyframes.
- If you don’t want to make changes to the ease after the selected keyframes, uncheck the Ease-In (left) checkbox.
-
Click OK.
The eases on all the selected keyframe is now updated.