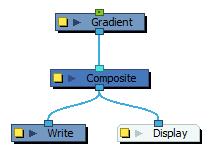
The Gradient node is similar to a Colour Card in which it fills all of the space in the stage, except that instead of filling it with a solid colour, it fills it with a configurable gradient. A gradient is a colour that tapers into another colour. The Gradient node can generate linear or radial gradient, between colours with or without transparency. The colours as well as the start and end points of the gradient in the stage can be configured and animated.

The Gradient node covers the entire camera frame and beyond. You do not need to scale it up or down. It will automatically cover an infinite zone. You simply need to connect it behind your scene's elements. You can connect it in front of some elements you want to cover. By default, the Gradient has a Z ordering value of 0. When you select the Gradient node, the Camera view displays yellow triangles to indicate that it's selected.
Connection
Being a generator, the Gradient node does not need an input image. It generates a gradient on its own, based on its parameters alone.

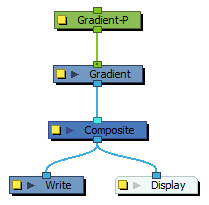
Just like Element nodes, Gradient nodes can be hooked to a peg, allowing you to easily move, rotate, scale and animate the gradient.

Optionally, the Gradient node can be connected to a matte image. In this case, the gradient will only be applied over the opaque areas of the matte.

Controls
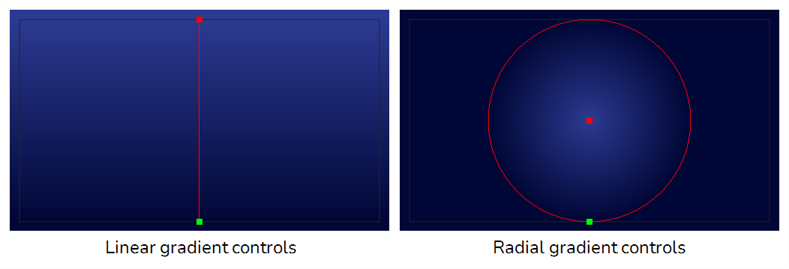
If you want to control the gradient's orientation and points position in the Camera view, you can use the Control command to display the points and move them.
- In the Tools toolbar, select the Transform
tool.
- In the Timeline or Node view, select the Gradient node.
- Do one of the following:
- In the Camera toolbar, click on the Show Control
button.
- From the top menu, select View > Show > Control.
The starting and ending points of the gradient will appear in the Camera view, like so:

- In the Camera toolbar, click on the Show Control
- Click and drag on one of the points to change its position.
Layer Properties

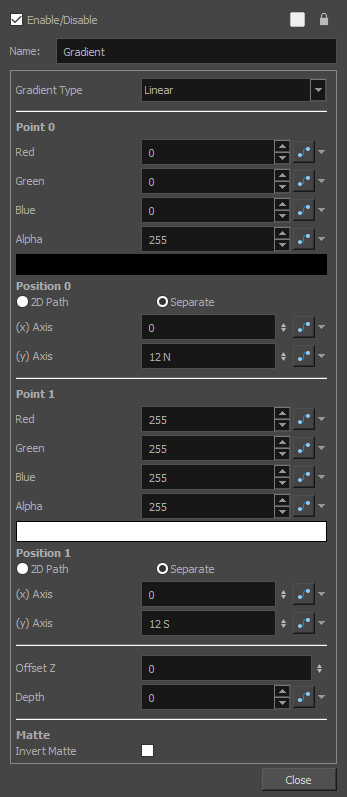
Use the Gradient property editor to modify the values of the gradient and the position of its output.
| Parameter | Description |
| Gradient Type |
Allows you to select between the following types of gradient:
|
| Point 0 | |
| Colour |
The colour of point 0. The gradient will start with this colour and taper to the colour of point 1.
|
| Position 0 |
The position of point 0 in the stage. The gradient will start from this position and end at the position of point 1. If you want to animate the point, you can choose which type of function to use to store the animation.
|
| (x) Axis | The position of point 0 on the x-axis. |
| (z) Axis | The position of point 0 on the y-axis. |
| Point 1 | |
| Colour |
The colour of point 1. The gradient will start with the colour in point 0 and taper to this colour.
|
| Position 1 |
The position of point 1 in the stage. The gradient will start from the position of point 0 and end in this position. If you want to animate the point, you can choose which type of function to use to store the animation.
|
| (x) Axis | The position of point 1 on the x-axis. |
| (z) Axis | The position of point 1 on the y-axis. |
| Position | |
| Offset Z | The position of the Gradient layer on the z-axis. |
| Depth | This parameter can be used to determine whether the gradient displays behind or in front of elements with the same position on the z-axis. Elements and Colour Cards also have a depth parameter. |
| Matte | |
| Invert Matte | If an image is connected to the Gradient node's matte port, by default, the gradient is only applied on the opaque areas of the matte. If this parameter is enabled, the gradient is applied to the transparent areas of the matte instead. |

