Element / Drawing Node
The Element node is at the very core of a scene's structure. An element is a directory in which drawings are stored, which is associate to an Xsheet column indicating when and for how long each drawing is exposed, and which is in turn linked to a layer which indicates the position of the drawings in the scene. The Element node allows you to connect the element to effects, pegs and composites, determining how its drawings are processed and rendered.
Connection
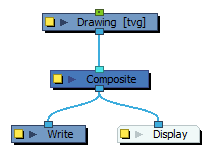
The Element node does not need an input image. It generates its output image from the drawings in its element and their exposure. Hence, it can be simply connected to a composite.
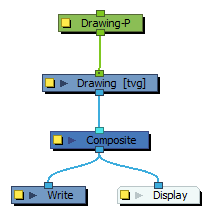
Although Element nodes can be transformed and animated on their own, it is typical to connect their input port to a Peg. This allows you to keep the position and animation information of the element in a separate node, making it easier to manipulate the exposure and the transformations separately. This is especially useful in digital cut-out animation where manipulating and transforming layers is often the main method of simulating movement, and changing drawings is the secondary method.
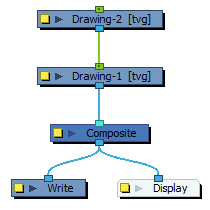
You can also connect an Element node to another Element node. Just like with pegs, any transformation done on the parent Element node, whether on itself or through one of its parents, will also be applied to the child Element node.
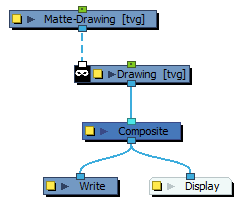
Optionally, you can connect a matte drawing to the left edge of an Element node. When an Element node is connected to a matte drawing, only the parts of the drawings that intersect with the opaque areas of the matte drawing will be rendered. This allows you to accomplish the same effect as connecting the Element node to a cutter node, without using an extra node.
Layer Properties
The drawing node's properties are organized in the following tabs:
Transformation Tab
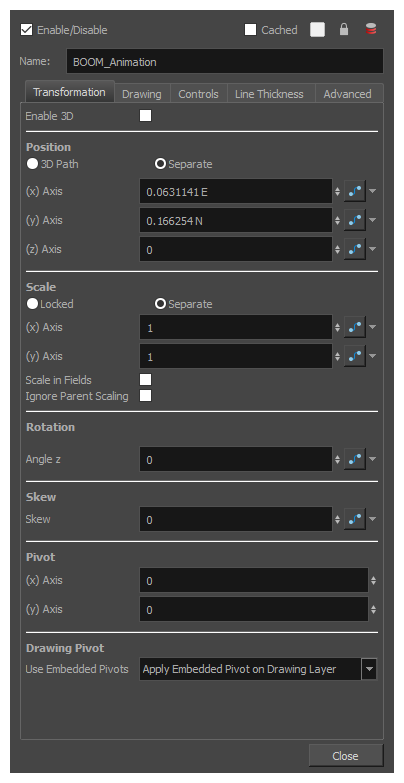
The Transformation tab contains parameters for adjusting the position, scale, rotation, skew and pivots of an element.
| Parameter |
Description |
| Enable 3D | Allows the layer to be rotated and scaled in 3D. This means it can be rotated on the X and Y axes and scaled on the Z axis. |
| Position |
3D Path: Use a 3D path to position the element. A 3D path uses a single function to define the position on the X, Y and Z axes. This function is made of control points linked by a curvilinear path, making the movement follow a natural curve. The pace and ease of the movement is determined by a single velocity function. Separate: Positions the element using separate functions for the X, Y and Z axes. This allows to control the direction and pace of the movement across all three axes separately. Unless ease is applied to the axes, the trajectory of the element will follow straight lines going between each keyframe. |
|
Path: If the 3D Path option is selected, this field allows you to create or select the 3D Path function used to position the element. Path (x) Axis: The position of the element on the East-West axis, in fields. Path (y) Axis: The position of the element on the South-North axis, in fields. Path (z) Axis: The position of the element in the Back-Front axis, in fields. Velocity: If the 3D Path option is selected, this function is used to control the pace at which the element moves towards each control point in the 3D Path function, on all three axes simultaneously. |
|
| Scale |
Locked: Uses a single scale parameter to scale the element, preserving its proportions. Separate: Uses a separate parameter to scale the element on the X and Y axis |
|
(x) Axis: The horizontal scale factor. The default value is 1. (y) Axis: The vertical scale factor. The default value is 1. (z) Axis: The depth scale factor for 3D-enabled elements. The default value is 1. Scale in Fields: With this option enabled, the scale factor is based on the amount of fields in the scene. For example, to shrink one of the dimensions of an element to half its original size, the scale factor would normally bet set to 0.5. If this option is enabled and the amount of fields in the scene is 12, then the scale factor to shrink the element by half would be 6. Ignore Parent Scaling: When this option is enabled, scaling factors applied to a parent layer will not be applied to the current layer. This can be handy in cut-out rigs when you need to scale an arm without affecting the forearm. |
|
| Rotation |
Angle z: The angle at which the element is rotated, based on the 360 degrees scale. Values below 0 or above 360 degrees will cause the rotation to cycle. |
| Rotation (3D enabled) |
Quaternion: Similar to a 3D Path, the Quaternion determines the angle of a 3D object using a single function. Euler Angles: Determines the angle of a 3D object by rotating it on the X, Y and Z axes using separate angles. |
|
3D Rotation: If the Quaternion option is selected, this field allows you to create or select the Quaternion function used to rotate the element. (x) Axis: The angle at which the element is rotated on the horizontal axis. (y) Axis: The angle at which the element is rotated at the vertical axis. (z) Axis: The angle at which the element is rotated on the depth axis. Velocity: If the Quaternion option is selected, this function is used to control the speed at which the element is rotated on all 3 axes. |
|
| Skew |
Skew: The angle at which the element is skewed. This value can range from -90 to 90 degrees. |
| Pivot |
(x) Axis: The horizontal position of the pivot point of the element relative to the pivot point of the drawing, in fields. (y) Axis: The vertical position of the pivot point of the element relative to the pivot point of the drawing, in fields. NOTE These parameters can be changed visually by clicking and dragging the pivot point when using on of the tools in the Advanced Animation toolbar.
|
| Drawing Pivot |
An element layer has two pivots:
This preference is used to determine what to do with the pivot point of the currently exposed drawing:
TIP
The two latter options are useful when making a character rig where a layer can represent a body part from different angles. Since each angle is represented by a drawing, and each angle is liable to have a different pivot point, you can set the pivot point of each angle by using the Drawing Pivot
|
Drawing Tab
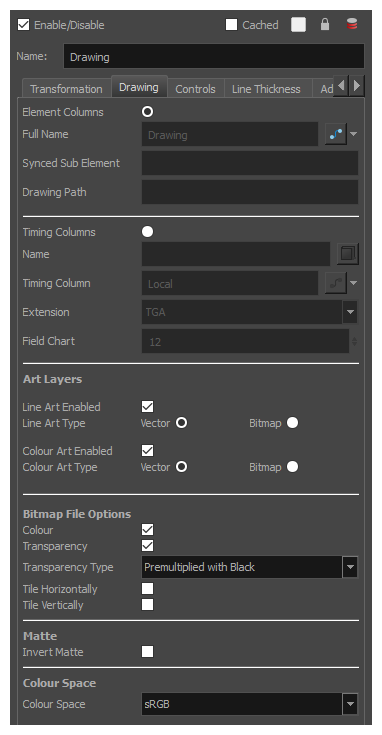
The Drawing tab contains parameters for
| Parameter |
Description |
| Element Columns |
Full Name: Select which element to connect to the node from the list of elements that already exist in your scene. Synced Sub Element: If the layer is synced to another layer, this field displays the name of the layer's sub-element. A sub-element is an element stored inside another element for syncing layers. Drawing Path: Displays the full path to the current drawing. |
| Timing Columns |
Name: The path to the drawing file the element links to. Timing Column: The name of the Xsheet timing column used for the layer's timing. Extension: The extension of the drawing file the element links to. Field Chart: The size of the field chart used for the drawings the element links to. This setting is useful when linking to traditional animation drawings. |
| Art Layers |
These parameters allow you to set whether each art layer in the drawing layer is enabled, and whether they should contain vector or bitmap artwork. By default, options for the Line Art and Colour Art layers will be available. If the Enable Overlay and Underlay Arts preference is enabled, options for the Overlay Art and Underlay Art layers will also be available. Enabled: Determines whether the art layer is displayed. Vector: Makes the art layer enabled for vector artwork, Vector drawing tools will be used to draw in this art layer, and vector artwork information will be preserved. Bitmap: Makes the art layer enabled for bitmap artwork. Only bitmap-compatible drawing tools will be enabled when drawing on this layer, and all artwork will be rasterized into a bitmap image. |
| Bitmap File Options |
Colour: Determines whether or not the colours in the image is processed. If unchecked, the image will be solid black. Transparency: Determines whether or not the transparency in the image is processed. If unchecked, the image will be fully opaque. |
|
Transparency Type: If the layer contains bitmap images with a transparency channel, there are several approaches to rendering the image's transparency. You may need to select the proper transparency type to make sure Harmony renders the image as intended.
|
|
|
Tile Horizontally: Repeats the bitmap image infinitely to the left and to the right of the layer. This can be useful for making looping backgrounds. Tile Vertically: Repeats the bitmap image infinitely to over and underneath the layer. This can be useful for making looping backgrounds. NOTE When both the Tile Horizontally and Tile Vertically options are used together, the bitmap image is tiled all over the scene.
|
|
| Matte | Invert Matte:
|
| Colour Space |
Colour Space: The colour space in which the element’s colours should be interpreted. If the element’s colour space is different from the project colour space, then the element’s colours will be converted from the element’s colour space to the project’s colour space as they are processed, before being composited together with the scene’s special effects.
NOTE
In the |
Controls Tab
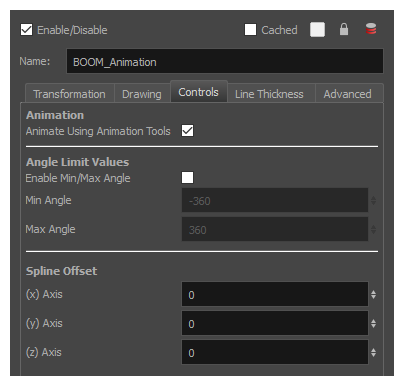
The Controls tab contains animation control options.
| Parameter |
Description |
| Animation |
Animate Using Animation Tools: By default, a drawing layer can be animated directly, as if it was its own peg. If you disable this option, it will only be possible to animate the layer using its parent peg. If the layer has no parent peg, it will be immutable. This can be useful if you want to create cut-out character rigs that should only be animated using pegs, which can help separate the drawing exposure from the transformations on the drawings. If every drawing layer in a character rig has this option disabled, only layers that have a parent peg will be animatable, and the animator will only be able to animate on the pegs. This also rules out the possibility of accidentally animating an element directly and using its parent peg concurrently. When this option is disabled, clicking on the drawing layer in the Camera view with the Transform tool will automatically select the layer's parent peg. |
| Angle Limit Values |
Lets you set a maximum and minimum rotation angle for a drawing. This option is used mainly for a cut-out character when you do not want an elbow to bend too far in or out. Enable Min/Max Angle: Activates the minimum and maximum angle constraints. Min Angle: The minimum rotation angle for the element. Max Angle: The maximum rotation angle for the element. |
| Spline Offset |
If the layer's controls are displayed, you can see its animation trajectory in the Camera view. This is referred to as the spline. By default, the position of each point in the spline is based on the element's pivot point. However, you can use the spline offset to give it a more fitting position if desired. You can do this by using the Spline Offset tool of the Advanced Animation toolbar, or by manually entering the offset values in the Spline Offset fields. (x) Axis: The horizontal offset of the spline, in fields. (y) Axis: The vertical offset of the spline, in fields. (z) Axis: The depth offset of the spline, in fields. TIP
To display the animation trajectory of the layer in the Camera view, select the layer, then do one of the following:
|
Line Thickness
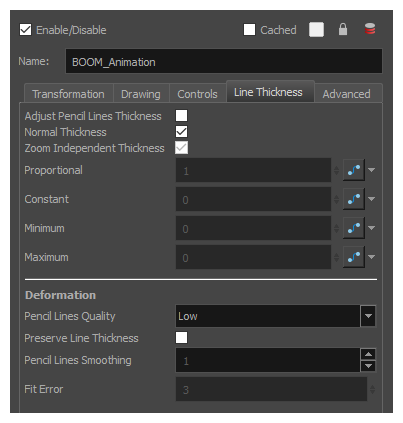
The Line Thickness tab contains options regarding the way pencil lines in the element are rendered. These options can be very useful to enhance the quality of line art without having to work on it.
| Parameter |
Description |
| Line Thickness |
Adjust Pencil Lines Thickness: Enables the options below to adjust the line thickness in the rendered image. Normal Thickness: This setting makes the line thickness adjustments take one of two very different behaviors:
NOTE When this option is disabled, all artwork in the line art layer that does not surround artwork in the colour art layer will be cropped out.
Zoom Independent Thickness: Makes the thickness of pencil lines remain unchanged when the camera zooms in or zooms out. |
|
Proportional: The factor by which to adjust line thickness. The original line thickness in the drawing will be multiplied by this value. A value between 0 and 1 can be used to make pencil lines thinner. Constant: The offset by which to adjust line thickness. This value will be added to the original line thickness in the drawing. A negative number can be entered to make pencil lines thinner. Minimum: The minimum pencil line thickness allowed. Line thickness will not go below this value. Maximum: The maximum pencil line thickness allowed. Line thickness will not go above this value. Set it to 0 to disable maximum line thickness. |
|
| Deformation |
Pencil Lines Quality: The quality of the rendered pencil lines when deformed by deformation chains. Increasing this parameter is unlikely to wield noticeable result unless rendering in very high resolutions. Preserve Line Thickness: If this option is checked, the thickness of pencil lines will not be affected by deformations. Only their directions will be affected. Also, if a pencil line is textured, it will not be stretched or squashed by deformations. NOTE This setting must be enabled for the Pencil Lines Smoothing and Fit Error parameters to be available.
Pencil Lines Smoothing: The smoothing factor applied to pencil lines when rendering. This value can range from 0 to 10. The higher it is, the more corners and points will appear smoothed out. Fit Error: When this parameter is increased, pencil lines in the rendered image will have less vector points and the curves between the remaining vector points will be adjusted to fit the original shape. This setting can be increased if the amount of details and points in the pencil lines creates problems around deformation articulations and corners. Its value can range from 1 to 100. NOTE The Fit Error parameter will have no effect if the Pencil Lines Smoothing parameter is set to 0.
|
Advanced Tab
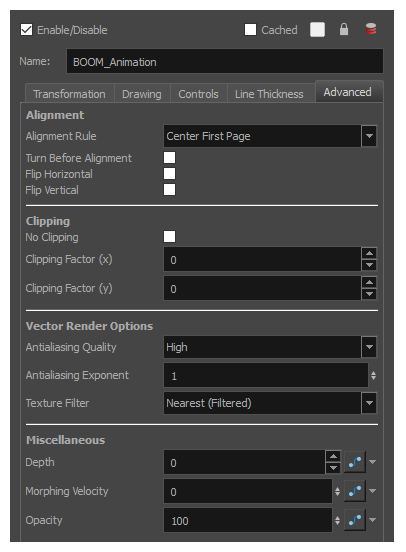
The Advanced tab contains options for setting the alignment of drawings,
| Parameter | Description |
| Alignment |
Alignment Rule: The alignment rule selections are intended to deal with drawings that were created on paper of a different size or orientation from the default alignment rule (set up in the Scene Settings dialog box) or imported bitmap images. The drawings are then scaled to match the Harmony alignment rectangle. Note that alignment rules are not based on the camera frame, but on the scene frame. Refer to the Fundamentals Guide to learn more about scene alignment and scene settings.
|
|
Turn Before Alignment: Rotates the drawings in the selected element 90 degrees to the left before scaling and aligning them according to the alignment rule, and before performing any offset, rotation or scaling for the element or peg. This and the Alignment Rule are intended for drawings that were created on paper of a different size or orientation than the other paper in the scene, and requires alignment so they are treated accurately. |
|
|
Flip Horizontal: Flips the drawing on the horizontal axis. |
|
|
Flip Vertical: Flips the drawing on the vertical axis. |
|
| Clipping |
No Clipping: By default, when using the Apply-Image-Transformation node on a bitmap layer, the image is clipped by the camera frame before the transformation. This can cause the resulting image to appear cropped if the peg connected to the Apply-Image-Transformation node brings the element from outside of the camera frame, or shrinks it. Enable this option to avoid clipping the image—see Apply Image Transformation Node. NOTE In the great majority of cases, it is recommended to use an Apply-Peg-Transformation node instead to avoid clipping—see Apply Peg Transformation Node.
Clipping Factor (X): This parameter would extend the horizontal clipping area of vector drawings before effects are applied to it. Using this parameter is no longer required as Harmony manages the clipping areas of vector drawings automatically, and is only made available for legacy support. Clipping Factor (Y): This parameter would extend the vertical clipping area of vector drawings before effects are applied to it. Using this parameter is no longer required as Harmony manages the clipping areas of vector drawings automatically, and is only made available for legacy support. |
| Vector Render Options |
Antialiasing Quality: The smoothness (antialiasing) setting used to make the crisp vector contours appear smooth.
TIP It is recommended to leave this setting to High unless you are working on a pencil test, or another type of scene where rendering speed is more important than rendering quality.
TIP If the production requires exporting line art without antialiasing to colour them in a third-party software, it is recommended to use the None - No Transparency setting. This setting automatically fills one-pixel gaps created by crisp lines intersecting each other, which would otherwise need to be filled manually in the third-party software.
Antialiasing Exponent: Determines how much the artwork is scaled up to apply antialiasing onto it. A higher value will results in sharper edges, and a lower value will result in softer edges. Typical values range between 0 and 3. Higher values may be attempted but may result in overly crisp outlines. Negative values will cause the outlines to appear blurry. Texture Filter: This setting determines how textures in the element are resampled when rendering:
|
| Miscellaneous |
Depth: Overrides the order of cables in the node system to determine the forward/backward order in which this element is rendered. The Z position value overrides the depth value. Morphing Velocity: When morphing drawings in the element using the Morphing tool, this parameter can be used to create or select the velocity function used to determine the pace of the morphing animation. Opacity: Lets you quickly change the transparency of the selected element. Opacity settings here will be reflected in both OpenGL preview, and full render. |
