Configuring Movie Settings for QuickTime Movies on Windows
On Windows, it is possible to export QuickTime Movie (.mov) files using the libraries provided with Apple QuickTime.
Harmony allows you to customize the video
- Proceed to the Movie Settings dialog—see Exporting a Movie File.

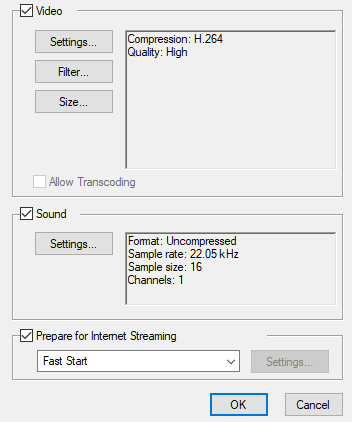
- In the Movie Settings dialog:
- Make sure the Video checkbox is checked.
- If you want your movie file to have an audio stream, make sure Sound is checked.
- In the Video section, click Settings.
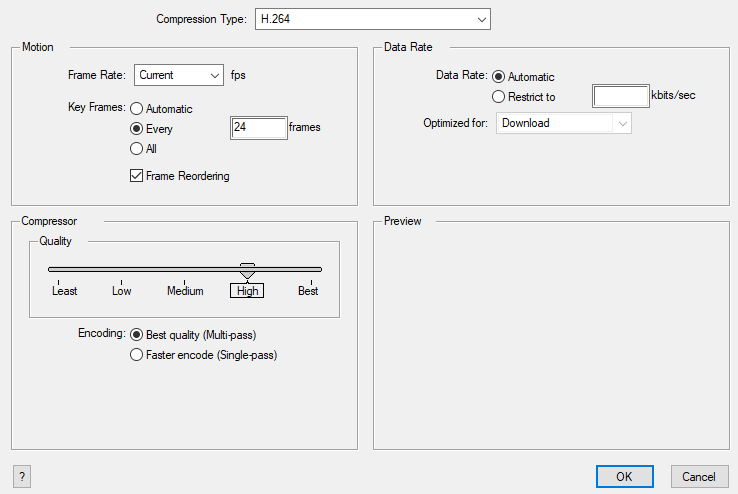
The Standard Video Compression Settings dialog box opens.

- In the Compression Type drop-down, select a video compression codec. It is recommended to use one of the following codecs, depending on your usage scenario:
- H.264: A very effective lossy compression algorithm that is commonly supported by web browsers and most media players.
- MPEG-4 Video: A very effective lossy compression algorithm that is commonly supported by media players, but less so by web browsers.
Animation: A high quality compression algorithm that is commonly used for media interchange and video editing.
TIPS- You can export a video with transparency by selecting the Animation codec and setting the Depth setting to Millions of Colors+.
- You can export a video with virtually lossless compression by selecting the Animation codec and setting Quality setting to Best.
NOTE The availability of certain of the compression settings described below will depend on the selected compression type. - In the Motion section, make sure the Frame Rate drop-down is set to Current. This will ensure that the video's frame rate matches the frame rate of your Harmony project.
- If you set the Compression Type to H.264, make sure the Key Frames option is set to All.
- In the Quality section, if you set the Compression Type to Animation, select the desired colour depth for your video in the Depth drop-down.
-
In the Quality section, use the slider to choose a quality setting.
 NOTE The selected quality setting will impact the movie's file size.
- If you set the Compression Type to H.264, in the Quality section, select the encoding method:
- Best quality (Multi-pass): This will extend the time required for the export, but optimize the quality of the video.
- Faster encoding (Single-pass): This will shorten the time required for the export, but may sacrifice some video quality.
- In the Data Rate section, select Automatic to let QuickTime determine the best bit rate for your movie, or Restrict to to set a maximum bit rate for your movie and limit its file size.
- If you set the Data Rate to Restrict to, enter the maximum bit rate, in kilobits per second, in the text field to the right.
- If you set the Data Rate to Restrict to, in the Optimized For drop-down, select the intended distribution method for your movie.
- Click OK.
- From the Movie Settings dialog box, click Sound Settings.
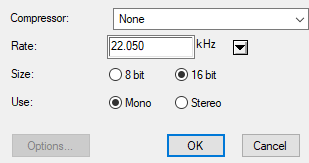
The Sound Settings dialog box opens.

-
From the Compressor menu, select the algorithm to use to compress the movie's audio track.
NOTE It is recommended to leave this setting to None, as other formats are likely to sacrifice audio quality for negligible savings in disk space.
-
In the Rate field, select the desired sample rate for the movie's audio track
NOTE Harmony cannot export audio at a higher sample rate than 22.050 kHz. If you select a higher sample rate, your project's audio will be upsampled, which means it will take more disc space without increasing in quality.
-
Right of Size, select the desired bit depth for the audio track. This determines the amount of precision used to record each wavelength in the audio track.
NOTE The standard bit depth is 16-bit. If you choose 8-bit, the amount of disk space the audio track of your movie file requires will be halved, but the audio quality will be significantly lower.
-
Right of Use, select whether you want to export audio in the Mono or Stereo channel mode.
NOTE Stereo sound has a separate track for the left and right speakers, whereas mono sound only has a single audio track for all speakers. - Click OK.
- In the Movie Settings dialog, click OK.