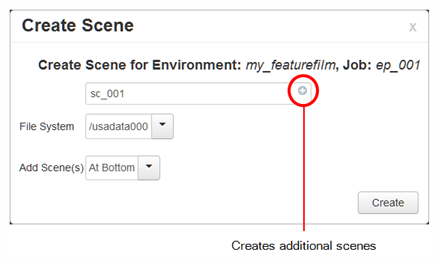
When creating scenes, you must indicate where you want to store the scene data and where you want the new scene to appear in the Scenes list. You can create a single scene or multiple scenes at the same time.
- From the Environment list, select the environment with the job in which you want to add scenes.
- From the Job list, select the job in which you want to add scenes.
- Select Scene > Create.
The Create Scene window opens.

- In the first field, enter the name of the scene to create.
- To create additional scenes, do one of the following:
- Click the plus (+) sign and enter a name.
- Press Enter/Return.
Repeat until you have the required number of scenes.
NOTE By default, when creating a new scene or renaming a scene, the scene's name cannot exceed 23 characters. If Unicode is enabled, the scene's name can not exceed 119 characters. Job and scene names are alphanumeric and can include underscores (_), but no spaces, or other special characters. All names are case-sensitive.
- From the File System list, select the path where you want to store the files.
If you are unsure which hard drive to select, consult your technical director or system administrator.
NOTE Although you can add as many scenes as you want, you can only select one path at a time. Therefore, the WebCC stores all scenes you create in one session at the same place (same path).
- Select where you want to place the scene(s) in the Scenes list from the Add Scene(s) list:
- At Bottom: Places the new scenes at the bottom of the list.
- At Top: Places the new scenes at the top of the list.
- Click Create.
The new scene(s) are created and displayed in the Scene list. If you do not want to create the scene(s), click the close button (x) at the top-right corner of the Create Scene window.