Moving Toolbars
T-HFND-003-005, T-HFND-003-006
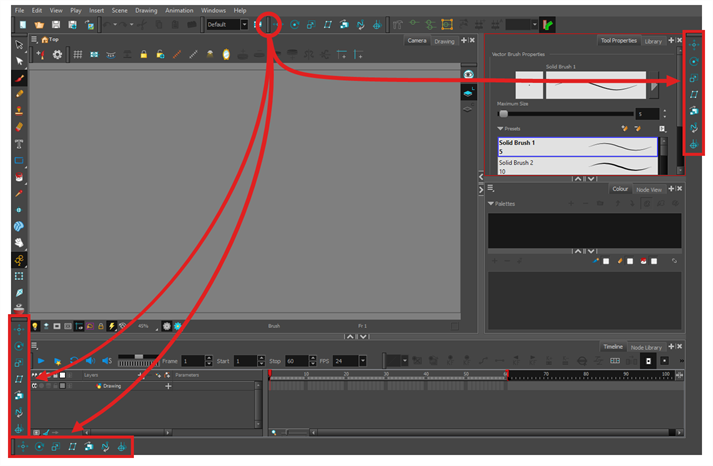
You can move toolbars around using drag & drop. This can be used to:
- Reorder toolbars within the same toolbar area.
- Move a toolbar from one edge of the application window or view in which it is located to another edge.
- Hide part of a toolbar with another toolbar.
Which you do depends on the gesture with which you drag the toolbar:
-
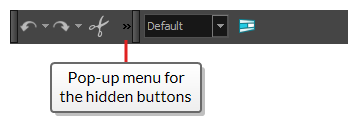
If you drag the toolbar horizontally you are “sliding” the toolbar. This allows you to move the toolbar over another toolbar in the same row. When two toolbars share the same space, the toolbar on the right appears over the toolbar on the left, and the left toolbar’s rightmost buttons are hidden in a pop-up menu.

Likewise, you can do this with a vertical toolbar by sliding it vertically, in which case the toolbar at the bottom appears over the toolbar at the top.
-
If you drag the toolbar vertically, you “pop” it out of its row. When a toolbar is popped out, you can reorder toolbars and move the toolbar to another row or to a different edge of the user interface.

Likewise, you can do this with a vertical toolbar, such as the Tools toolbar at the left of the workspace, by moving it horizontally.
-
Click and hold the handle at the left of the toolbar you want to move.

- Do one of the following:
If the toolbar is horizontal, move it up or down to make it pop out of its row.

If the toolbar is vertical, move it left or right to make it pop out of its column.
-
Do one of the following:
-
To reorder toolbars, drag the toolbar where you want it to be located and drop it.

The toolbar will move to its new position. Toolbars to the right (or to the bottom, if the toolbar is vertical) will be offset to make space for it.

-
To move the toolbar to a new row or to a new column, simply move the toolbar where the new row or column should be created. For example, to create a new row of toolbars at the top of the user interface, move it just below the existing toolbars at the top of the user interface. A new row or column will appear, highlighted in cyan.

When you drop the toolbar, the new row will be created and the toolbar will be placed at the left end of the row.

Likewise, to create a new column at the left of the user interface, move the toolbar just right of the existing toolbars at the left of the user interface.
-
To move the toolbar to another edge of the user interface, drag it all the way to that edge of the user interface.

-
- Make sure both toolbars are in the same row or column. If they are not, move both toolbars to the same row or column using the method previously described.
If the toolbars are horizontal, click and hold the handle at the left of the rightmost toolbar. Then, without going outside of the toolbar’s row, slide the toolbar towards the left.

- If the toolbars are vertical, click and hold the handle at the top of the bottom toolbar. Then, without going outside of the toolbar’s column, slide the toolbar up.
As you slide the toolbar over the other toolbar, the other toolbar’s buttons become hidden and a pop-up menu button appear.

- To separate the toolbars again, simply slide the same toolbar in the opposite direction.
-
To expand a toolbar that is overlapped by another toolbar, click on the expand button at the right of the overlapped toolbar.
