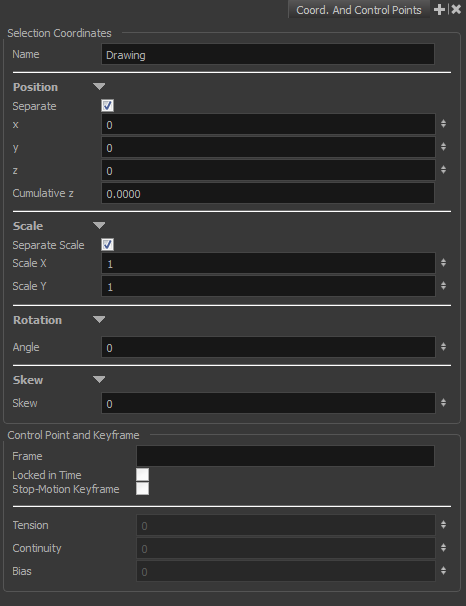
The Coordinates and Control Points view displays the parameters of keyframes or control points selected in the Camera, Timeline or Xsheet view. You can also see the same information in the Coordinate and Control Point toolbars.
In this view, you can edit keyframes and control point parameters, such as the position, continuity, bias, tension and lock-in-time.

Do one of the following:
- From the top menu, select Windows > Coordinates and Control Points.
- From any of the other views, click the Add View
button and select Coordinates and Control Points.
| Parameter | Description |
| Name |
The name of the function curve to which the select point is linked. |
|
Position |
|
|
Separate |
Modifies modify the X, Y and Z coordinates independently. When this option is deselected, all three parameters are linked. If one is deleted, all others will also be deleted. |
|
Cumulative Z |
When a layer is parented to other layers that are moved forward or backward on the Z-axis, the currently selected layer's Z position value may not be accurate since its parent will also have an offset on the Z-axis. The Cumulative Z value is a compilation of all the Z-axis offsets to give the real Z-axis offset value related to the (0,0) centre. |
|
Scale |
|
|
Separate Scale |
Modifies the width and height values independently. When this option is selected, the width and height are locked to the same value, forcing the scale to be on a 1:1 ratio. If the option is deselected, you have the ability to squash and stretch your layer at will. |
| Rotation | |
|
Angle |
The rotation angle value from the permanent pivot of the element. |
| Skew | |
|
Skew |
This is the skewing value. |
| Control Point and Keyframe | |
|
Frame |
The frame at which the select point is set. |
|
Locked in Time |
Indicates whether the point is locked to a specific frame (keyframe) or only locked to a specific position and the curve can flow through it freely as other points are being added, moved, or adjusted (control point). |
|
Stop-Motion Keyframe |
When this option is selected, the keyframe is set as a stop-motion point. This means that there is no automatic interpolation created between the selected point and the next one. The layer will maintain its position until the animation reaches the frame of the next point and will then jump to the new position. Deselect this option to generate interpolation and get the layer to progressively move to the next position. |
|
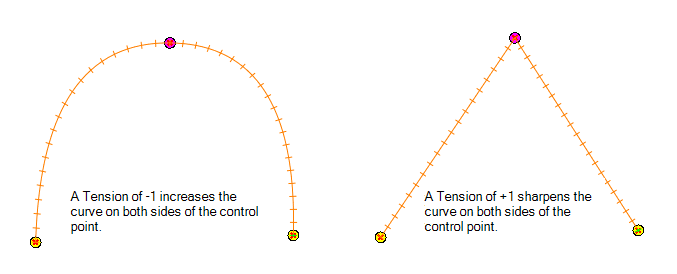
Tension |
Controls how sharply the path bends as it passes through a control point or keyframe.
|
|
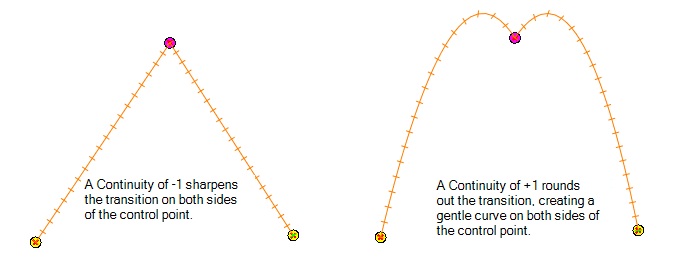
Continuity |
Controls the smoothness of a transition between the segments joined by a point.
|
|
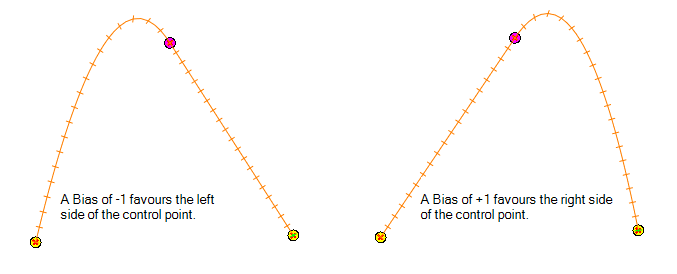
Bias |
Controls the slope of the path so it flows towards one side of the motion point or the other.
|


