The Animated Matte Generator view allows you to configure and animate the matte created by a Animated-Matte-Generator node. It also allows you to quickly add Animated-Matte-Generator templates to your Node view.

- Do one of the following:
- From the top-right corner of any currently visible view, click the Add View
 button and select Animated Matte Generator.
 - From the top menu, select Windows > Animated Matte Generator.
- In the Tools toolbar, select the Transform tool or press Shift + T.
- In the Timeline or Node view, select the Animated Matte Generator node you wish to configure or animate.
- In the Camera view toolbar, click on Show Controls
 or press Shift + F11.
| Icon | Functionality | Description |
| Editing Mode | ||
|
|
Define Matte Point |
Allows you to manipulate the matte's contour points by dragging them in the Camera view. Use this mode to edit and animate your matte.
|
|
|
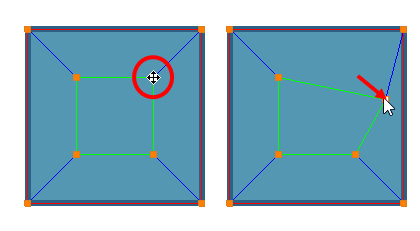
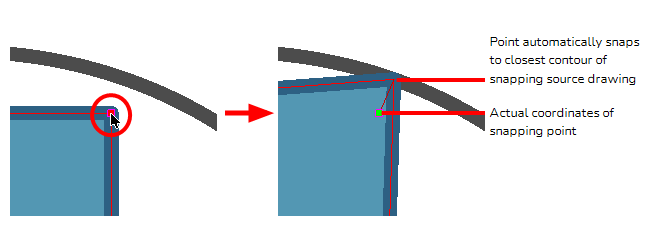
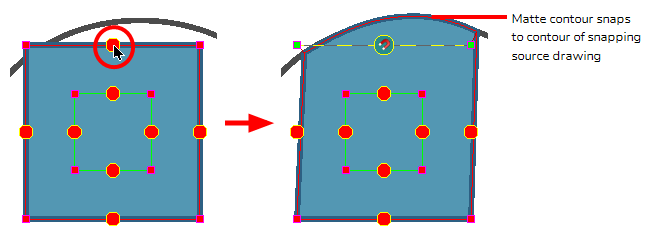
Set to Snap |
If the Animated Matte Generator node is connected to a snapping source drawing, this allows you to define which points and contours of the matte should snap to the contours of the snapping source drawing, by clicking on them.
If you click on a point in this mode, it will be set to snap to the nearest contour of the snapping source drawing.
If you click on a contour in this mode, the contour will be set to snap to the nearest contour of the snapping source drawing, and will be made to match its curve. Both points on either end of that contour will also be set to snap to the snapping source drawing.
Points and contours that are configured to snap will snap to the closest point or contour they can find in the snapping source, provided that they are at a reasonable distance from their actual coordinates. This distance can be adjusted by changing the Drag-to-Snap Distance parameter in the Animated Matte Generator's layer properties. |
|
|
Add Matte Point |
Allows you create a point on the contour of the map by clicking on one of the matte's contour where you want the point to be created.
NOTE Adding a matte point to one of the matter's contours will also add a point to the matte's other contour. It is not possible to have a different amount of points on a matte's inner and outer contours.
NOTE Contrary to tools like the Contour Editor, you cannot use a keyboard shortcut to click and add a point to a matte contour.
|
| Matte Visibility Settings | ||
|
|
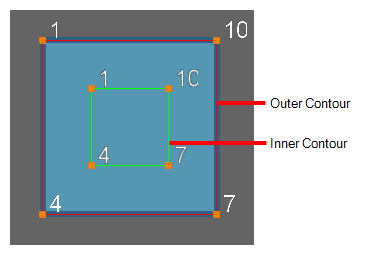
Outer Contour |
When enabled, the matte's Outer Contour and its controls display in the Camera view, and the Outer Contour can be modified. TIP You can hold Alt while pressing this button to quickly enable the outer contour and disable the inner contour simultaneously. You can also hold Shift while pressing any of the Matte Visibility Settings buttons to quickly enable all matte visibility settings.
|
|
|
Inner Contour |
When enabled, the matte's Inner Contour and its controls display in the Camera view, and the Inner Contour can be modified. NOTE A matte always has an outer contour and an inner contour. By default, both contours are merged together, having the same shape and points, allowing you to animate them simultaneously as if the matte had a single contour. You can separate the points of the inner and outer contours by hiding one of the contours and making modifications on the other contour.
NOTE When two contour points are separated, you can lock them back together by selecting them and clicking on the Merge Inner and Outer Matte Contour
TIP You can hold Alt while pressing this button to quickly enable the inner contour and disable the contour simultaneously. You can also hold Shift while pressing any of the Matte Visibility Settings buttons to quickly enable all matte visibility settings.
|
|
|
Point Id |
When enabled, the identification number of each of the matte's points display in the Camera view. These numbers are used to track which point of the outer contour are matched with which points of the inner contour.
TIP You can hold Shift while pressing any of the Matte Visibility Settings buttons to quickly enable all matte visibility settings.
|
|
|
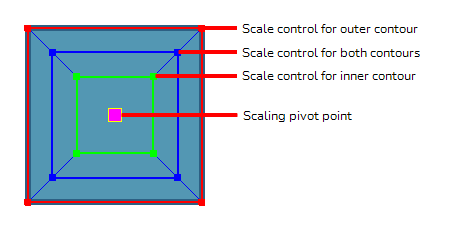
Scaling Controls |
When enabled, moving one of the control points of the matte contours will scale the entire matte. A purple square will appear in the middle of the matte's contour. Moving this square will change the position of the pivot point used for scaling the contour.
TIP You can hold Shift while pressing any of the Matte Visibility Settings buttons to quickly enable all matte visibility settings.
|
| Keyframe Settings | ||
|
|
Auto Key on All Points |
By default, when a matte control point is moved in the Camera view, a keyframe is created for that point and its handles. With this option enabled, a keyframe will be created for all the points in the matte and all of their handles. |
|
|
Fix Adjacent Keyframes |
When moving a control point, this will look for keyframes on other control points right before and after the current frame and, if it finds any, it will create keyframes for the control point being moved at these frames. This ensures that animating without the Auto Key on All Points option does not create overlapping animation for control points, but does not create unnecessary keyframes.
|
| Node Systems Creation | ||
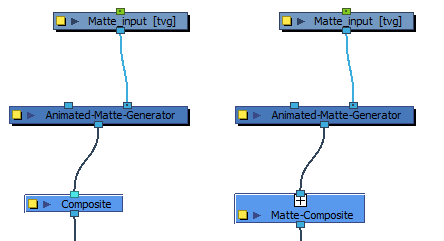
| Add Matte to Composite |
If a Composite or Matte-Composite node is selected in the Node view, this creates an Animated Matte Generator template with an empty matte drawing layer in the Node view, then connects the newly created Animated-Matte-Generator node to the selected composite.
|
|
| Composite Operation |
When using the Add Matte to Composite option on a Matte Composite node, this determines whether the Animated Matte Generator node being created will be connected to the selected Matte Composite node in Add, Subtract or Intersect mode. |
|
| Add Matte Generator |
This creates an Animated Matte Generator template in the Node view which includes a Matte drawing layer, an Animated Matte Generator node, a Colour Selector and a Cutter.
If a drawing layer is selected when clicking this button, it will be connected as the peg of the Matte drawing layer, and as the input of the Colour Selector node. |
|
| Add Matte Generator as Mask |
This creates a similar template to the one created by the Add Matte Generator button, except that the Animated-Matte-Generator node created by this option is connected to the matte port of the Cutter node, and the Colour-Selector node connected to the selected layer is connected to the input port of the Cutter node.
|
|