The 3D Graph toolbar works in conjunction with the elements in the 3D Graph view.
-
Do one of the following:
- In the top menu, select Windows > Toolbars > Timeline View.
- Right-click on the space at the top of the Timeline view and, in the context menu, select Timeline View.
| Icon | Name | Description | ||||||||||||||||||||||||||||||||||||||||||||
|---|---|---|---|---|---|---|---|---|---|---|---|---|---|---|---|---|---|---|---|---|---|---|---|---|---|---|---|---|---|---|---|---|---|---|---|---|---|---|---|---|---|---|---|---|---|---|

|
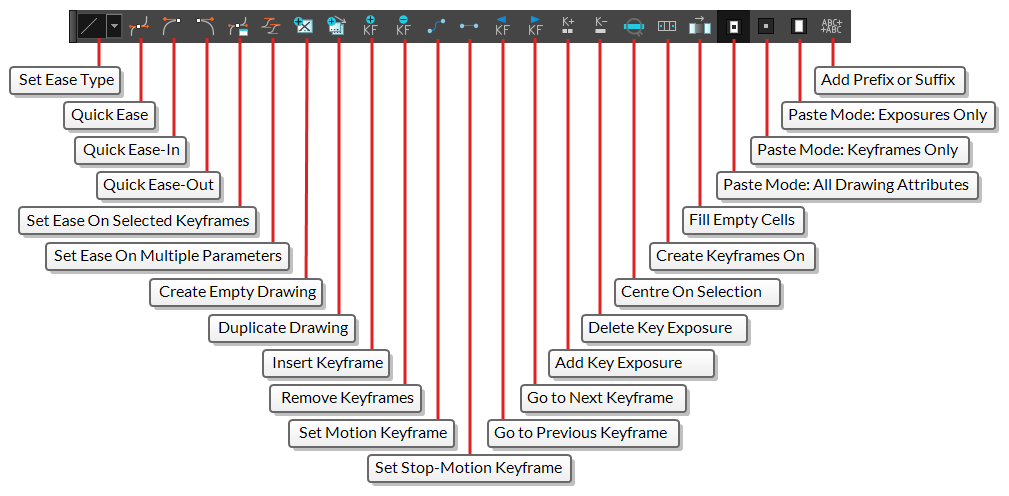
Set Ease Type |
Allows you to quickly apply an ease to the selected animation keyframes in the camera view. To set the ease of an animation, simply select the first keyframe in the animation, then select the ease type in this drop-down. The ease-in will be applied to the selected keyframe, and the ease-out will be applied to the next keyframe in the timeline. The following presets are available:
|
||||||||||||||||||||||||||||||||||||||||||||
|
|
Quick Ease | Sets the ease before and after the selected keyframe to 33%. | ||||||||||||||||||||||||||||||||||||||||||||
|
|
Quick Ease In | Sets the ease before the selected keyframe to 33%. | ||||||||||||||||||||||||||||||||||||||||||||
|
|
Quick Ease Out | Sets the ease after the selected keyframe to 33%. | ||||||||||||||||||||||||||||||||||||||||||||
|
|
Set Ease on Selected Keyframes | Opens the Set Ease on Keyframes dialog. In this dialog, you can set the ease-in (before) and the ease-out (after) on the selected keyframes to a custom percentage. | ||||||||||||||||||||||||||||||||||||||||||||
|
|
Set Ease for Multiple Parameters | Opens the Set Ease for Multiple Parameters dialog. This dialog allows you to adjust the Bezier handles on all the selected animation keyframes in the Timeline. | ||||||||||||||||||||||||||||||||||||||||||||
|
|
Create Empty Drawing | Creates a drawing in the selected cell, replacing any drawing that may already be exposed in that cell and the following ones until it meets another drawing, key exposure or a blank cell. | ||||||||||||||||||||||||||||||||||||||||||||
|
|
Duplicate Drawing |
Creates a duplicate of the selected drawing in the layer. The duplicate drawing will be exposed at the selected frame instead of the original drawing. Hence, this command allows you to instantly start working on a duplicate of the current drawing and retain the original. NOTE
When duplicating a drawing, the exposure at the selected cell is replaced with the new drawing, up until the next key exposure. |
||||||||||||||||||||||||||||||||||||||||||||
|
|
Insert Keyframe | Adds a keyframe on the selected cell in the Timeline view. | ||||||||||||||||||||||||||||||||||||||||||||
|
|
Delete Keyframes | Deletes the selected keyframes. | ||||||||||||||||||||||||||||||||||||||||||||
|
|
Set Motion Keyframe | Converts the selected keyframes to motion keyframes. With motion keyframes, Harmony generates the interpolation between the motion keyframe and the next keyframe. This means that a value for each frame between the keyframes is calculated by Harmony to progress from the value of the previous keyframe to the value of the next keyframe. | ||||||||||||||||||||||||||||||||||||||||||||
|
|
Set Stop-Motion Keyframe | Converts the selected keyframes to stop-motion keyframes. Between a stop-motion keyframe and the next keyframe, Harmony does not generate any animation and the element remains static until the next keyframe. | ||||||||||||||||||||||||||||||||||||||||||||
|
|
Go to Previous Keyframe | Goes to the previous keyframe. | ||||||||||||||||||||||||||||||||||||||||||||
|
|
Go to Next Keyframe | Goes to the next keyframe. | ||||||||||||||||||||||||||||||||||||||||||||
|
|
Add Key Exposure | Adds a key exposure to the selected cell. | ||||||||||||||||||||||||||||||||||||||||||||
|
|
Delete Key Exposure | Removes key exposures from the selected cells. | ||||||||||||||||||||||||||||||||||||||||||||
|
|
Centre On Selection | Scrolls the layers list to the currently selected layer. This is useful if you want to select a layer in the Camera view, then manipulate its timing Timeline view. | ||||||||||||||||||||||||||||||||||||||||||||
|
|
Create Keyframes On | Opens the Create Keyframes On dialog box, in which you can create keyframes at every set number of frames within a given range of frames. | ||||||||||||||||||||||||||||||||||||||||||||
|
|
Fill Empty Cells | Fills the empty frames in the selection with the exposure just before. For example, if you select a range of frame that starts with an exposed drawing and then ends with empty cells, all of the empty cells in the selection will be filled with the exposed drawing just before the empty cells. | ||||||||||||||||||||||||||||||||||||||||||||
|
|
Paste Mode: All Drawing Attributes |
Sets the Paste Mode to All Drawing Attributes. In this mode, when you cut or copy and paste frames in the Timeline view, both the animation keyframes and the exposed drawings will be pasted. Likewise, if you drag and drop frames in the Timeline view, both the animation keyframes and the exposed drawings will be moved. |
||||||||||||||||||||||||||||||||||||||||||||
|
|
Paste Mode: Keyframes Only |
Sets the Paste Mode to Keyframes Only. In this mode, when you cut or copy and paste frames in the Timeline view, only the animation keyframes will be pasted. The exposed drawings will not be pasted. Likewise, if you drag and drop frames in the Timeline view, only the animation keyframes will be moved. The exposed drawings will not be affected. |
||||||||||||||||||||||||||||||||||||||||||||
|
|
Paste Mode: Exposures Only |
Sets the Paste Mode to Exposures Only. In this mode, when you cut or copy and paste frames in the Timeline view, only the exposed drawings will be pasted. The animation keyframes will not be pasted. Likewise, if you drag and drop frames in the Timeline view, only the exposed drawings will be moved. The animation keyframes will not be affected. |
||||||||||||||||||||||||||||||||||||||||||||
|
|
Add Prefix or Suffix | Opens the Add Prefix or Suffix dialog. This dialog allows you to instantly rename all the selected layers by adding a prefix or a suffix to their name. |