In the Tool Properties view, you can customize not only the behaviour of the tool but also the settings of the deformers that you will create.
Mode
| Button | Name | Description |
|---|---|---|
|
|
Automatic Mode | Sets the Rigging tool to automatically create a Bone or Curve deformer, corresponding to the movement of the cursor in the Camera view. |
|
|
Bone Mode | Sets the Rigging tool to create Bone deformations. |
|
|
Curve Mode | Sets the Rigging tool to create Curve deformations. |
|
|
Envelope Mode | Sets the Rigging tool to create Envelope deformations. |
|
|
Game Bone Mode | Sets the Rigging tool to create Game Bone deformations. |
|
|
Free Form Mode | Sets the Rigging too to create Free Form deformations. |
Options
| Button | Parameter | Description |
|---|---|---|
|
|
Show All Manipulators | Lets you immediately see the resting position in red (Setup) and the animated position in green. |
|
|
Show All Regions of Influence | Lets you visualize the area within which the art will be influenced by the deformation effect—see Rigging Tool Properties. |
|
|
Automatically Create Group when Creating a New Deformation Rig | This option automatically creates a deformation group connected to the input port of the selected element. This group includes all the necessary deformation nodes you created. |
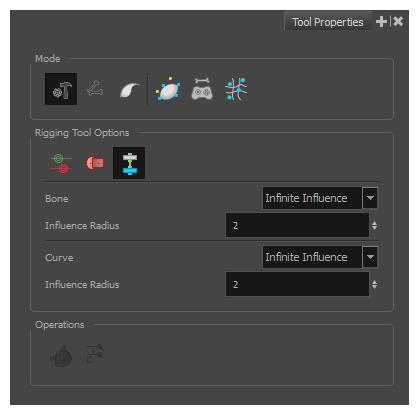
| Bone |
Sets the zone of influence for newly created Bone deformation points:
|
|
|
|
Influence Radius | For Bone deformations with an Elliptic Influence, this sets the size of the influence zone. |
| Curve |
Sets the zone of influence for newly created Curve deformation points:
|
|
| Influence Radius | For Curve deformations with an Elliptic Influence, this sets the size of the influence zone. |
Operations
| Button | Name | Description |
|---|---|---|
|
|
Convert Elliptic Zone of Influence to Shape |
After you have created a deformation chain using Elliptic as the Zone of Influence type, you can select your deformer and click on this button to convert it to a Shaped type. Control points will appear around the shape making it easy to customize.You can also convert the Elliptic zone of influence to a shape. Select Animation > Deformation > Convert Elliptic Deformation ROI to Shape. This will create a much smaller initial zone of influence than if you were to convert it directly to a shape. |
|
|
Reset Deform (Reset Current Keyframe) | Copies the resting position of the deformation skeleton to the current frame. |