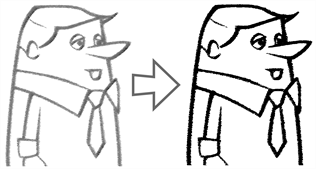
The Paint tool allows you to fill closed areas of your drawing with the selected colour.
- In the Tools toolbar, select the Paint
 , Paint Unpainted

 tool.
tool.
The tool's properties are displayed in the Tool Properties view.
Paint Tool Options
| Icon | Property | Description |
|---|---|---|
|
|
Selection Mode |
Allows you to choose the method to visually select multiple elements:
TIP You can press and hold the Alt key to temporarily use the other selection mode.
|
|
|
Paint Mode |
The Paint tool has
|
|
|
Paint and Remove Textures |
The Paint and Remove Texture option is used when you vectorized images as greyscale texture style. An image vectorized as texture is a mix of bitmap filling encapsulated in a vector-based frame. Painting a textured zones with the Paint tool will change the tint of the textured lines. Painting the textured zones using the Paint and Remove Texture option transforms the bitmap filling into a 100% vector based zone and fills it with a solid colour.
|
|
|
Apply to Visible Drawing Layers |
This option allows you to select which layers the tool should affect. It can be toggled on or off. When toggled on, it has two different modes. You can select a mode by clicking and holding on the button.
NOTE This option only works in the Camera view.
|
|
|
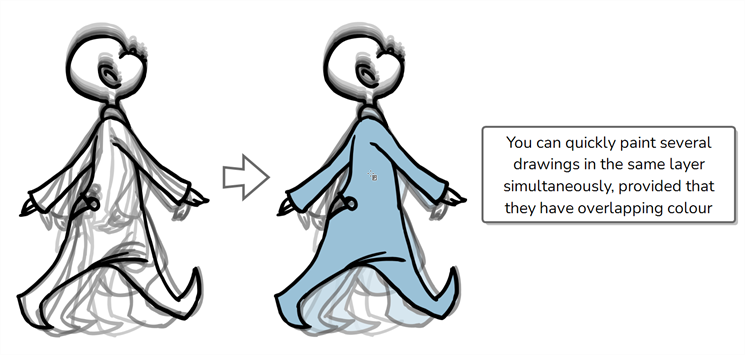
Apply to All Frames |
This option allows you to determine which drawings in the current layer the tool should affect. It can be toggled on or off. When toggled on, it has two different modes. You can select a mode by clicking and holding on the button.
|
|
|
Respect Protected Colour |
The Respect Protected Colour option is enabled by default. In your Colour view, you can protect some colour swatches to avoid repainting or unpainting the zones linked to that swatch. If you disable this option the Paint tool will not follow the protect colour rule and will repaint or unpaint the protected colours on your drawings until you enable the option again |
|
|
Use Stored Colour Gradient |
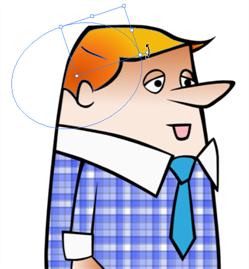
When you paint a zone with a gradient or textured colour swatch, the gradient or texture’s position is set relative to the size of the zone you are painting. If you want the Paint tool to use a particular size and position, you must first store your desired position and size using the Select tool and then enable the Use Stored Colour Gradient option in the Paint tool properties
|
|
|
Select Newly Painted, |
In the Paint tool properties, this option keeps a selection highlighted around the latest painted zone after using the Paint,
|
|
|
Close Gap |
By default, if you attempt to fill a shape that has a small gap in its contour, the Paint tool will not be able to fill the shape. This option allows you to make the Paint tool automatically add a stroke to close the shape when it detects a small gap between two strokes in the shape. The Close Gap setting can be set to a value between 0 and 10. This determines the maximum size of a gap to close, in pixels. You can also use one of the following presets:
|
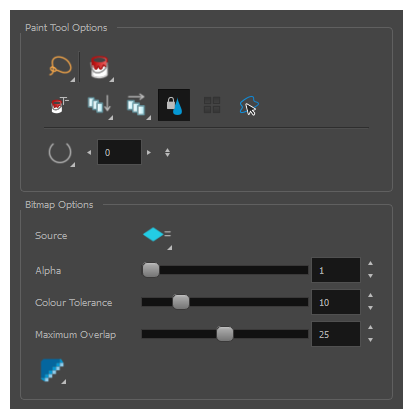
Bitmap Options
Since bitmap drawings are made of pixels instead of shapes, and that the outlines of shapes in bitmap drawings are often feathered, it can be complicated to figure out exactly the area the Paint tool must fill when trying to fill a zone in a bitmap drawing. For example, if the Paint tool only replaces pixels with the exact same colour as the one you click on with the selected colour, it will leave a small gap near the outlines of the shape.
The following settings determine how the Paint tool figures out the area it must fill. When any of these settings are increased, the Paint tool's tolerance for colour or alpha differences increases and it will a bigger area that it otherwise would.
| Icon | Property | Description |
|---|---|---|
|
|
Source |
Allows you to select which art layer to use in order to determine the fillable zone. By default, this is set to Current Art This property has the following options:
|
| -- | Alpha |
The alpha threshold that separates opaque and transparent zones. When filling a "transparent" zone, the paint tool will apply the colour under semi-transparent pixels, making them opaque. Then filling an "opaque" zone, the paint tool will replace the colour of semi-transparent pixels without affecting their transparency. If you want to repaint lineart or shapes that have no outlines, you can do so by decreasing this setting completely. This will make it fill any pixel that isn't 100% transparent, so it will paint your outlines completely. However, if you're using this method to repaint outlines, they must not be filled yet for this method to work. If you want to paint transparent zones that have dirt or semi-transparent spots, you can increase this setting to make the Paint tool paint behind them instead of around them. NOTE Raising this setting too high may cause the paint tool to ignore outlines that are not 100% opaque, which can cause it to think the shape is not closed. Hence, it might fail to find a zone to fill and not do anything.
|
| -- | Colour Tolerance |
The amount of tolerance the paint tool has for changes in colour when filling an area. Raising this setting will allow the paint tool to fill over areas that have some variations in colour, but may cause it to fill beyond the areas you meant to paint. |
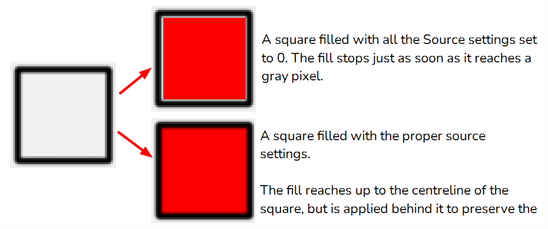
| -- | Maximum Overlap |
The maximum amount of pixels beyond the fillable zone that the Paint tool can fill. When this setting is set to any value above zero, the paint tool will fill the zone until it finds a pixel that is a different colour, value or transparency as the one you clicked on. Then, it will start filling pixels beyond that point, up until it filled the amount of pixels in the Maximum Overlap setting. If it lands outside of a fillable zone before it reached the maximum overlap, it will stop filling at that point. However, if it lands into another fillable zone before reaching its maximum overlap, it will fill that zone as well. Therefore, if you're filling shapes inside other shapes, you have to set this setting to the approximate width of your outlines. Setting it higher will make the colour spill beyond the zone you clicked on and fill the zone outside of it, and setting it lower is liable to leave a small gap between the fill and the outlines. NOTE When you fill a zone with overlap, Harmony tries to detect and preserve the outlines of your shape. This is easy to do when filling a transparent shape, or when repainting a shape made of solid outlines and a solid fill. However, if you are trying to repaint an already painted zone, it may fail to detect your outlines and may repaint over them if the colour of your outlines or inside the shape isn't consistent. Therefore, it is highly recommended to avoid repainting painted zones as much as possible when working with bitmap layers.
|
|
|
Antialiasing |
When enabled, the outlines of the fill will be smoothed so that they do not look pixelated. NOTE The effect of this setting will not be visible if you fill all the way to the outlines, as the Paint tool will preserve the antialiasing of existing outlines when filling up to them.
|