The Eraser tool allows you to erase artwork by drawing eraser strokes over it. When using the Eraser tool with a tablet, it is pressure sensitive, like with the Brush
- In the Tools toolbar, select the Eraser
 tool.
tool.
The tool's properties are displayed in the Tool Properties view.

Eraser Properties
The way the Eraser tool is configured is almost identical to the way the Brush tool is configured.
| Property | Description |
|---|---|
| Stroke Preview Area |
The Preview area lets you see a preview of the stroke your drawing tool will make.
|
| Eraser Properties Dialog |
The arrow button right of the display area opens the Eraser Properties dialog, which gives you access to all the parameters and options for your eraser. The Tool Properties view only gives you access to a few of the eraser properties, a list of eraser presets and options for the Eraser tool that are not related to the eraser properties. For more information on the Eraser Properties dialog, see the Eraser Properties Dialog section below.
|
| Maximum Size |
Defines the maximum size of the eraser.
If the tool is used with a pressure sensitive pen tablet, the width of the stroke will vary between its maximum size and minimum size depending on the amount of pressure used. If used with a mouse, the width of the stroke will always be its maximum size. |
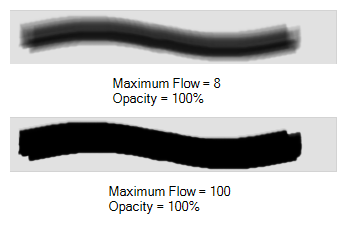
| Flow |
Lets you set the opacity for each instance of the eraser tip that gets erased from your artwork. Contrary to the Opacity parameter, the flow parameter has a cumulative effect. This means that a lower flow will make your eraser strokes less effective towards its extremities and more effective in its center. Your stroke's flow will also accumulate if you draw over it. By default, your eraser's flow varies with the amount of pressure you put on your tablet pen. NOTE This option is only displayed in the Tool Properties view when drawing on a bitmap layer.
|
| Opacity |
The Opacity parameter are where Lets you set the opacity of your brush strokes. Contrary to the Flow parameter, the Opacity parameter is non-cumulative. Your whole brush stroke's opacity will not exceed the Opacity parameter. By default, the Opacity parameter varies depending on the amount of pressure you put on your tablet pen. NOTE This option is only displayed in the Tool Properties view when drawing on a bitmap layer.
|

Eraser Presets
These options allow you to select, create and manage eraser presets.
| Icon | Property | Description |
| Presets list |
By default, Harmony has preloaded eraser presets. You can also create your own eraser presets by configuring your eraser, then saving its properties into a new preset. It is also possible to export and import eraser presets. |
|
|
|
New Brush Preset |
Creates a new preset based on the current tool properties. |
|
|
Delete Brush |
Deletes the currently selected preset. |
| Rename Brush |
Allows you to rename the currently selected preset. |
|
| Import Brushes |
Allows you to import brush presets exported from Harmony. |
|
| Export Brushes |
Allows you to export your brush presets into an .xml file. |
|
| Small Thumbnail | Displays presets in a grid of small thumbnails with a preview of their tip. | |
| Large Thumbnail | Displays presets in a grid of big thumbnails, with their name and a preview of their tip. | |
| Stroke View |
Displays presets in a list, with their name and a preview of a stroke done with each preset. |
Erasing Options
These options affect the way your eraser strokes are applied to your artwork.
| Icon | Property | Description |
|---|---|---|
|
|
Apply to Line and Colour Art |
Allows you to perform drawing operations on both the Line Art and Colour Art layers of your drawing simultaneously. NOTE If you have Overlay and Underlay Art layers enabled, they will also be affected when this option is enabled.
|
|
|
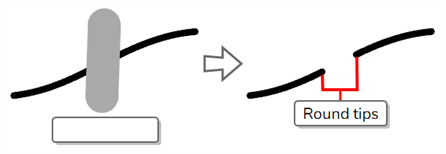
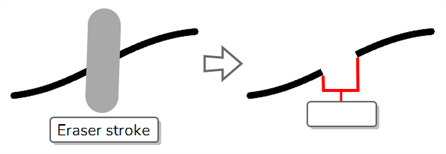
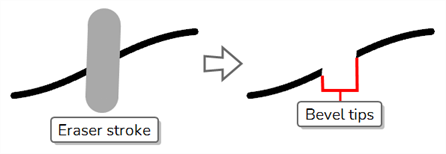
Tip Style |
When you erase part of a pencil line, this option determines the shape of the extremity of the pencil line where you erased:
|
|
|
Snapping |
Allows you to enable or disable snapping for this tool and all other animation and drawing tools that support snapping, as well as to select which types of snapping are enabled. If you double-click or long-click on this button, it will open a pop-up menu in which you can toggle different snapping modes. You can also click on this button to toggle it off, which will disable all snapping modes, and click on it again and toggle it on to re-enable the snapping modes which were previously enabled. This tool supports the following snapping mode:
|
|
|
Apply to Synced Drawing Layers |
If the currently selected layer is synced with another layer, the tool will work on both the current layer and its synced layer. |
Eraser Properties Dialog
Erasers have an extensive set of options and properties that are not displayed in the Tool Properties view, but rather, in a dialog you can access from it. To open the Eraser Properties dialog, click on the arrow button right of the stroke display area.

The Eraser Properties dialog has
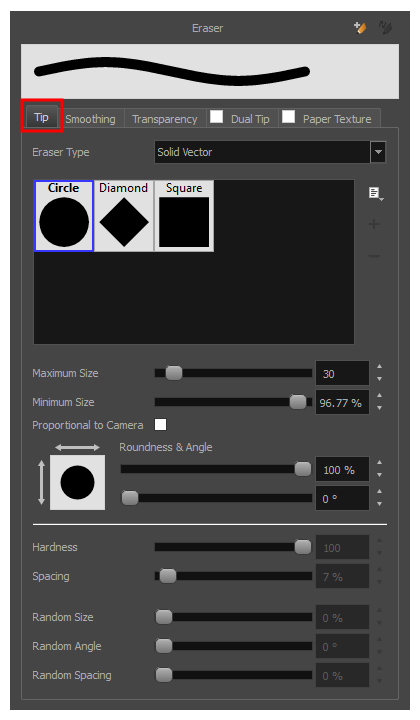
Tip Tab
The Tip tab allows you to configure the shape, size, hardness and spacing of your eraser tip.
| Property | Description |
|---|---|
| Eraser Type |
Allows you to select between one of the following eraser types:
NOTE Textured erasers only work as expected on textured brush strokes. Using a Textured eraser on a solid vector brush stroke or on a pencil line will only cut the eraser stroke's shape out of it. If you use a Textured, Preserve Vector type eraser on a solid vector shape or on a pencil line, the eraser will not erase anything.
NOTE This option is not available when working on a bitmap layer. With bitmap layers, erasers are always textured, and textured eraser options are always available.
|
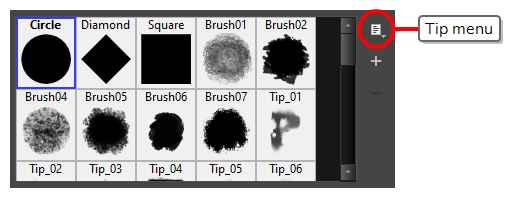
| Eraser Tip Library |
This is where you select the shape of the eraser tip. By default, it is round. To create a custom eraser tip, you must prepare the file ahead of time, either in Harmony or in a third-party software, such as Adobe Photoshop. Colour is not supported and transparency is not supported in the traditional sense. Black appears as 100% opaque, white appears as 100% transparent and all the shades of grey in between appear as varying degrees of semitransparency. A range of file formats are supported—.jpeg, .png, .tif, .psd, .tga to name a few. Alpha channels are disregarded on import. It is recommended that your file be between 100 x 100 pixels and 400 x 400 pixels. You can also import eraser tips that you exported from Harmony, so you can share them with colleagues. |
|
Minimum and Maximum Size |
The minimum and maximum sizes of your drawing tool produce the thick and thin effect on your stroke. This works with the pressure sensitivity of a pen tablet.
NOTE Setting the Minimum Size value to 100% eliminates the possibility of creating width variation on your stroke. In other words, you would be forcing a uniform line width using the Maximum Size value.
|
| Proportional to Camera |
If you check this option, the size of the eraser will be adjusted to the position of the camera on the z-axis. This means that if the camera is zoomed in on the scene, the eraser will be proportionally smaller so that it appears the same size in the rendered image. Likewise, if the camera is zoomed out, the eraser will be proportionally bigger. |
|
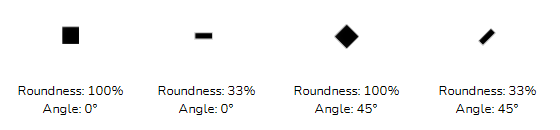
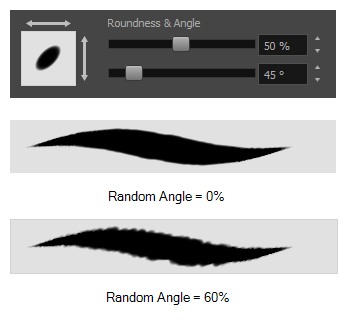
Roundness and Angle |
The Roundness and Angle parameters allow you to change the shape and orientation of the tip.
NOTE
The squashing is not relative to the angle—if the tip is rotated, the squashing will still be done relative to the tip's original orientation.
|
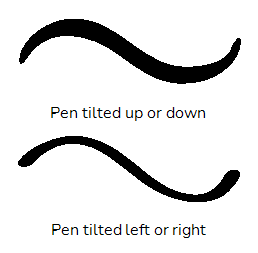
| Pen Tilt Sensitivity |
If your pen and tablet support tilt sensitivity, this option allows you to set whether your eraser takes your pen's tilt angle in account, and how much. When your pen is fully tilted, your eraser tip will be stretched by the percentage you set in this parameter, in the angle in which you tilt it. For example, if you set the Pen Tilt Sensitivity to 50%, and you tilt your pen all the way up or down, your eraser tip will be stretched vertically by 50%. With the same setting, if you tilt your pen all the way left or right, your eraser tip will be stretched horizontally by 50%.
|
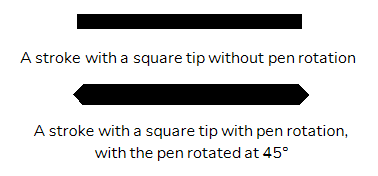
| Use Pen Rotation |
If enabled, and if your pen and tablet support tip rotation, your eraser tip will rotate with the angle of your pen tip.
|
|
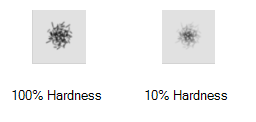
Hardness |
The Hardness and Spacing parameters allow you to change the softness and spacing of the marks made by the eraser tip. You can preview the hardness and spacing at the top of the Eraser Properties window, stroke preview area. The hardness value corresponds to the softness of the eraser tip's edges. The lower the value, the softer the tip edge. The higher the value, the sharper the tip edge. Be aware that some eraser tips are not 100% opaque, so they will always appear somewhat soft, even at 100% hardness.
|
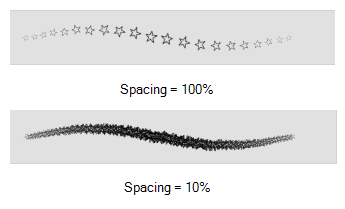
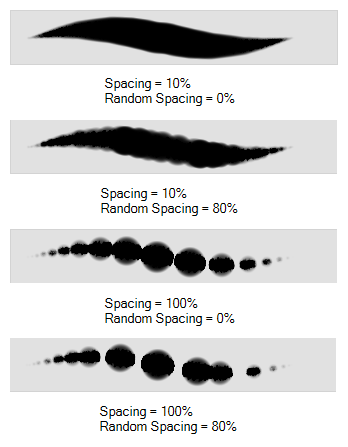
| Spacing |
Defines the amount of space between each stamp of the eraser. A value of 100% sets the stamp marks edge to edge, if there is no white space around the shape. The larger the value, the greater the space between marks. A really large value can make the eraser stroke appear as a string of individual marks. Conversely, a small spacing value will give the appearance of a fluid brush stroke. Spacing is only evident when making a continuous stroke.
|
| Randomness |
The Randomness parameters let you create a varied bitmap eraser stroke. Refining these options can give your stroke a lovely, non-mechanical look. |
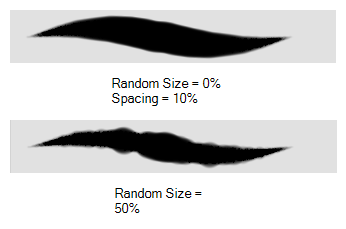
| Random Size |
You can create variation between the thick and thin of your eraser stroke just by setting the Maximum and Minimum Size values. If you add randomness to the mix, pressure sensitivity from your drawing tablet will still be applied. Light pressure will create random values around the minimum, while heavy pressure will create random values closer to the maximum. The larger the percentage, the larger the range of random variation.
NOTE Setting the Minimum Size to 100% eliminates the possibility of creating width variation on your stroke, whether you are applying randomness or not. Therefore, you would be forcing a uniform line width using the Maximum Size value.
|
| Random Angle |
Sets the range for random rotation around the set Angle value. For example, if the Angle is set to 45° and the Random Angle set to 10°, the software will choose values between 40°–50° (plus or minus 5 degrees, equaling a total of 10 degrees).
|
| Random Spacing |
Sets the range for random spacing around the set Spacing value. For example, if the Spacing is set to 50% and the Random Spacing is set to 10%, then Harmony will choose values between 45%–55% (plus or minus 5 percent, equaling a total of 10 percent).
|
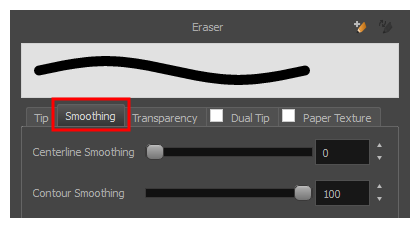
Smoothing Tab
The Smoothing tab contains options to configure how Harmony should automatically smooth your eraser strokes as you paint.
| Property | Description |
|---|---|
| Centerline Smoothing | Defines the amount of smoothing Harmony should perform on your eraser stroke's direction, curves and corners. A higher setting will prevent your line from being shaky, but is liable to reduce drawing precision and turn sharp angles into curves. |
| Contour Smoothing |
|
Transparency Tab
The Transparency tab allows you to decide if your eraser has antialiasing as well as to set its flow and opacity settings.
![]()
| Property | Description |
|---|---|
| Antialiasing |
Enabled by default. This option causes the contours of the eraser strokes to blend with the surrounding colours, to create an illusion of smoothness otherwise not possible due to the picture resolution. If antialiasing is disabled, the eraser will either fully erase pixels or leave them intact. NOTE When disabled, all other options in the Transparency tab are disabled.
|
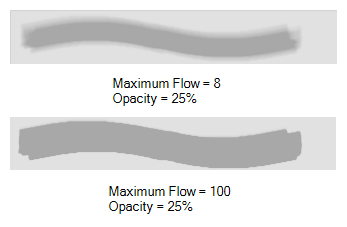
| Maximum and Minimum Flow |
The Maximum and Minimum Flow parameters let you set the range for the rate at which your eraser's effect flows. The greater the flow, the more consistent the effect is. If the flow is light, then the effect may look spotty. This feature works with the pressure sensitivity of a pen tablet.
|
| Maximum Opacity and Minimum Opacity |
The Maximum and Minimum Opacity parameters are where you set the opacity range for a eraser mark. This works with the pressure sensitivity of a pen tablet.
|
| Randomness |
Th Randomness parameter lets you set the range for the randomness of the flow and opacity. This works with the pressure sensitivity of a pen tablet. |
| Randomness Flow |
You can create variation in the flow of your eraser stroke just by setting the Maximum and Minimum Flow values. If you add randomness to the mix, pressure sensitivity from your drawing tablet will still be applied. Light pressure will create random values around the minimum, while heavy pressure will create random values closer to the maximum. The larger the percentage, the larger the range of random variation.
NOTE Setting the Minimum Flow value to 100% eliminates the possibility of creating flow variation on your stroke, whether you are applying randomness or not. That is, you would be forcing a uniform flow using the Maximum Flow value.
|
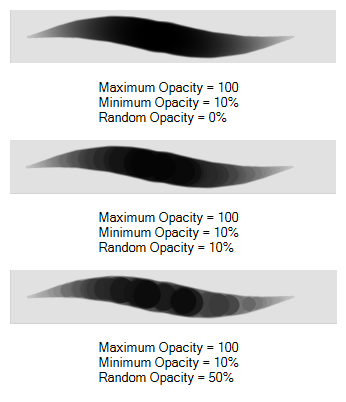
| Random Opacity |
You can create variation in the opacity of your eraser stroke just by setting the Maximum and Minimum Opacity values. If you add randomness to the mix, pressure sensitivity from your drawing tablet will still be applied. Light pressure will create random values around the minimum, while heavy pressure will create random values closer to the maximum. The larger the percentage, the larger the range of random variation.
NOTE Setting the Minimum Opacity value to 100% eliminates the possibility of creating opacity variation on your stroke, whether you are applying randomness or not. That is, you would be forcing a uniform opacity using the Maximum Opacity value.
|

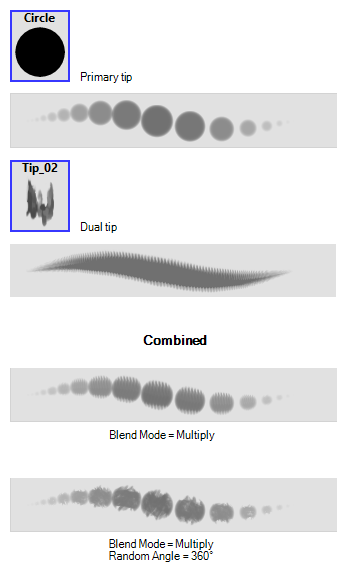
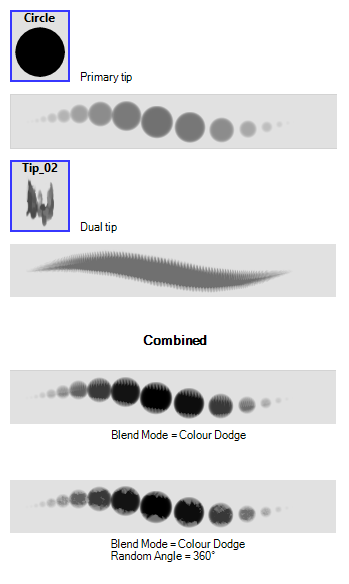
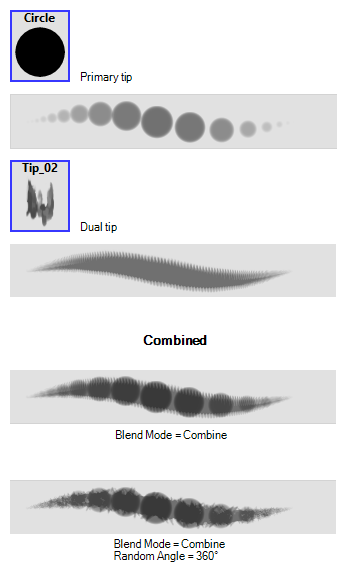
Dual Tip Tab
The Dual Tip tab lets you set the parameters for creating a dual tip eraser. The primary bitmap eraser tip and the dual tip always work together. You can set the parameters for the primary tip in the Tip tab and those for the dual tip in the Dual Tip tab. The Blend mode you select determines how the tips are combined.
By default, the Blend Mode is set to Multiply and the Random Angle to 360°.

| Tool Name | Description |
|---|---|
| Enable/Disable | The checkbox inside the tab allows you to decide whether or not your eraser uses a dual tip. If this checkbox is unchecked, the options in the Dual Tip tab will be disabled. |
| Blend Mode | The Blend modes let you decide how the primary tip and the dual tip are combined. |
|
Multiply |
This is the default blend mode. When the two eraser tips are combined in this mode, they essentially cut each other out in overlapping areas, where one or both tips have an area of 100% transparency. The less opaque the eraser tips are, the lighter their combination.
|
|
Colour Dodge |
In this mode, the primary tip cuts out the shape of the dual tip. Where the tip shapes overlap, within the boundaries of the primary shape, the colour and opacity appear darker.
|
|
Combine |
This mode treats the two tips as two different and separate erasers that have the same colour and follow the same path.
|
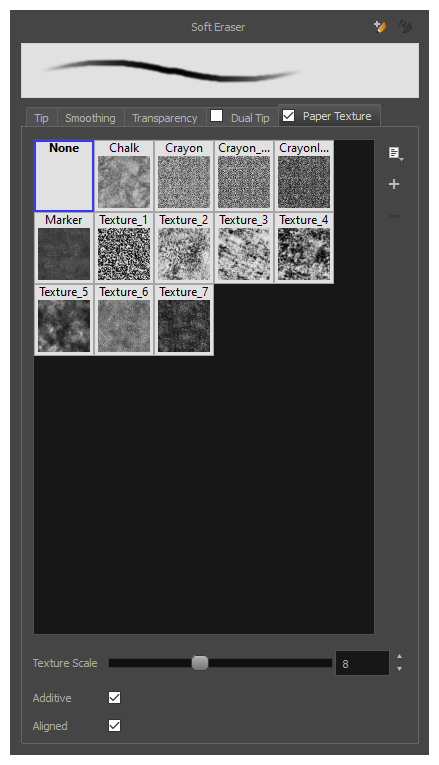
Paper Texture Tab
The Paper Texture tab lets you configure a paper-like texture for your eraser. You can also add textures by importing image files, or import paper textures that were previously exported from Harmony.
| Property | Description |
|---|---|
| Enable/Disable | The checkbox inside the tab allows you to decide whether or not your eraser uses a paper texture. If this checkbox is unchecked, the options in the Paper Texture tab will be disabled. |
| Texture Scale | Increase or decreases the size of the paper texture. |
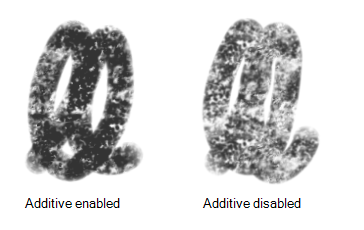
| Additive |
This option layers the texture on top of itself as you scribble overlapping lines in one continuous stroke. If this option is turned off, areas of overlapping lines from a single, continuous stroke will appear the same, in terms of darkness and texture, as non-overlapping areas.
|
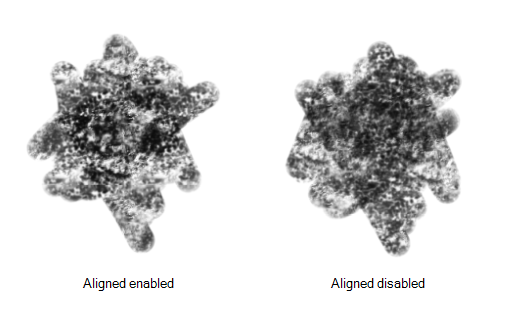
| Aligned |
This option defines the way separate, overlapping strokes behave. If this option is enabled, the paper texture's position does not change with each sweep of the eraser. If this option is disabled, each sweep of the eraser produces a different texture position. The texture orientation always stays the same. |